Lars Vogel, David Weiser (c) 2012 - 2026 vogella GmbH :revnumber: 1.9 :revdate: 12.04.2017
This tutorial describes how to write unit test for Android applications with the Robolectric framework.
1. Robolectric
1.1. What is Robolectric
Robolectric is a framework that allows you to write unit tests and run them on a desktop JVM while still using Android API.
Robolectric provides a JVM compliant version of the android.jar file. Robolectric handles inflation of views, resource loading, and lots of other stuff that’s implemented in native C code on Android devices.
This enables you to run your Android tests in your continuous integration environment without any additional setup.
Robolectric supports resource handling, e.g., inflation of views.
You can also use the findViewById() to search in a view.
Robolectric is not an integration test framework, i.e., you cannot not test the interaction of Android components with it.
Robolectric does not require additional mocking frameworks, of course it is still possible to use frameworks like Mockito if desired.
1.2. Shadow objects
Robolectric replaced all Android classes by so-called shadow objects. If a method is implemented by Robolectric, it forwards these method calls to the shadow object. Shadow objects behave similar to the Android implementation. If a method is not implemented by the shadow object, it simply returns a default value, e.g., null or 0.
To access a shadow object use Shadows.shadowOf.
2. Using Robolectric for your test with Gradle
To use Robolectric for your Android unit tests, add the following dependency to your Gradle build file.
dependencies {
    ...
    // Robolectric
    testCompile "org.robolectric:robolectric:3.3.2"
}
Your tests should be stored in the src/test directory.
The class containing your Robolectric test must be annotate with the @RunWith(RobolectricGradleTestRunner.class) test runner.
It must also use the @Config() to point to your BuildConfig.class class.
The following shows an example test configured to run via Robolectric on the JVM.
package com.vogella.android.test.robolectric;

import com.vogella.android.test.robolectric.BuildConfig;
import com.vogella.android.test.robolectric.R;
import com.vogella.android.test.robolectric.WelcomeActivity;

import org.junit.Before;
import org.junit.Test;
import org.junit.runner.RunWith;
import org.robolectric.Robolectric;
import org.robolectric.RobolectricTestRunner;
import org.robolectric.annotation.Config;

import static org.junit.Assert.assertNotNull;

@RunWith(RobolectricTestRunner.class)
@Config(constants = BuildConfig.class)

public class WelcomeActivityTest
{
    private WelcomeActivity activity;

    @Before
    public void setUp() throws Exception
    {
        activity = Robolectric.buildActivity( WelcomeActivity.class )
                              .create()
                              .resume()
                              .get();
    }

    @Test
    public void shouldNotBeNull() throws Exception
    {
        assertNotNull( activity );
    }

    @Test
    public void shouldHaveWelcomeFragment() throws Exception
    {
        assertNotNull( activity.getFragmentManager().findFragmentById( R.id.welcome_fragment ) );
    }
}|
Instead of specifying the values via the |
3. Exercise: Use Robolectric and Android Studio to test your activity
This exercise describes how to write a unit test for an Activity using Robolectric and Android Studio.
3.1. Project setup
Create an application called com.vogella.android.robolectric with an activity call RobolectricActivity.
Use the com.vogella.android.robolectric top-level package name.
To use Robolectric in your application, add the following dependency to your build.gradle file
testImplementation "org.robolectric:robolectric:3.3.2"3.2. Activity to test
Adjust your activity to the following:
package com.vogella.android.robolectric;

import android.app.Activity;
import android.os.Bundle;

public class RobolectricActivity extends Activity {

    @Override
    protected void onCreate(Bundle savedInstanceState) {
        super.onCreate(savedInstanceState);
        setContentView(R.layout.activity_main);
    }
}
Adjust the layout file of your activity to the following.
<?xml version="1.0" encoding="utf-8"?>
<LinearLayout xmlns:android="http://schemas.android.com/apk/res/android"
              xmlns:tools="http://schemas.android.com/tools"
              android:layout_width="match_parent"
              android:layout_height="match_parent"
              android:orientation="vertical"
              tools:context="com.vogella.android.robolectric.RobolectricActivity">
    <TextView
        android:id="@+id/hello_textview"
        android:layout_width="match_parent"
        android:layout_height="match_parent"
        android:text="Hello World!"
        android:gravity="center"
        android:layout_marginLeft="10dp"
        android:layout_marginRight="10dp"
        android:layout_marginTop="5dp"
        android:layout_marginBottom="5dp"
        android:background="@android:color/holo_green_dark"/>
</LinearLayout>
3.3. Create a unit test for the ativity
Create the following test class and place it in your src/test directory. This class tests that the TextView has a top and bottom margin of 5dp and a left and right margin of 10dp.
package com.vogella.android.robolectric;

import android.widget.LinearLayout;
import android.widget.TextView;

import org.junit.Before;
import org.junit.Test;
import org.junit.runner.RunWith;
import org.robolectric.Robolectric;
import org.robolectric.RobolectricTestRunner;
import org.robolectric.annotation.Config;

import static org.junit.Assert.assertEquals;

@RunWith(RobolectricTestRunner.class)
@Config(constants = BuildConfig.class)
public class RobolectricActivityTest {

    private RobolectricActivity activity;

    @Before
    public void setUp() throws Exception {
        activity = Robolectric.buildActivity(RobolectricActivity.class)
                .create()
                .resume()
                .get();
    }

    @Test
    public void shouldHaveDefaultMargin() throws Exception {
        TextView textView = (TextView) activity.findViewById(R.id.hello_textview);
        int bottomMargin = ((LinearLayout.LayoutParams) textView.getLayoutParams()).bottomMargin;
        assertEquals(5, bottomMargin);
        int topMargin = ((LinearLayout.LayoutParams) textView.getLayoutParams()).topMargin;
        assertEquals(5, topMargin);
        int rightMargin = ((LinearLayout.LayoutParams) textView.getLayoutParams()).rightMargin;
        assertEquals(10, rightMargin);
        int leftMargin = ((LinearLayout.LayoutParams) textView.getLayoutParams()).leftMargin;
        assertEquals(10, leftMargin);
    }
}
A method with a @Before annotation creates the RobolectricActivity.
A method which is annotated with @Test is an actual test method and represents a single JUnit test case.
3.4. Create the run configuration
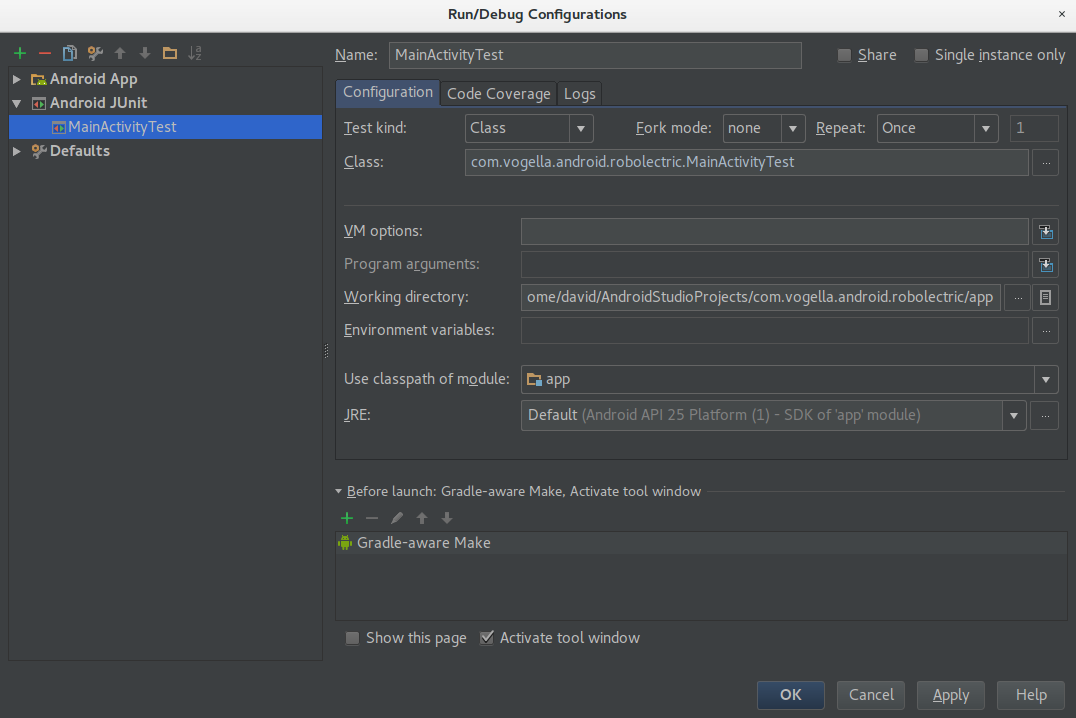
Now create a run configuration to run your unit test. To do so, select Run and then Edit Configurations…. Use the green + sign at the top left corner to add a new run configuration and select Android JUnit. Make your JUnit run configuration look like the following:

At Use classpath of module select the app module of your Android application. As Working directory use the directory of your app module. Class is the file that contains your unit tests (in this case your ctivityTest class).
Now you can simply select and run this run configuration to run your unit tests.
3.5. Extend the tests
Extend your activity and your test so that the following tests are successful.
package com.vogella.android.robolectric;

import android.content.Intent;
import android.widget.Button;
import android.widget.LinearLayout;
import android.widget.TextView;

import org.junit.Before;
import org.junit.Test;
import org.junit.runner.RunWith;
import org.robolectric.Robolectric;
import org.robolectric.RobolectricTestRunner;
import org.robolectric.Shadows;
import org.robolectric.annotation.Config;
import org.robolectric.shadows.ShadowToast;

import static org.hamcrest.CoreMatchers.equalTo;
import static org.junit.Assert.assertEquals;
import static org.junit.Assert.assertNotNull;
import static org.junit.Assert.assertThat;

@RunWith(RobolectricTestRunner.class)
@Config(constants = BuildConfig.class)
public class RobolectricActivityTest {

    private RobolectricActivity activity;

    @Before
    public void setUp() throws Exception {
        activity = Robolectric.buildActivity(RobolectricActivity.class)
                .create()
                .resume()
                .get();
    }

    @Test
    public void shouldHaveDefaultMargin() throws Exception {
        TextView textView = (TextView) activity.findViewById(R.id.hello_textview);
        int bottomMargin = ((LinearLayout.LayoutParams) textView.getLayoutParams()).bottomMargin;
        assertEquals(5, bottomMargin);
        int topMargin = ((LinearLayout.LayoutParams) textView.getLayoutParams()).topMargin;
        assertEquals(5, topMargin);
        int rightMargin = ((LinearLayout.LayoutParams) textView.getLayoutParams()).rightMargin;
        assertEquals(10, rightMargin);
        int leftMargin = ((LinearLayout.LayoutParams) textView.getLayoutParams()).leftMargin;
        assertEquals(10, leftMargin);
    }

    @Test
    public void checkActivityNotNull() throws Exception {
        assertNotNull(activity);
    }

    @Test
    public void shouldHaveCorrectAppName() throws Exception {
        String hello = activity.getResources().getString(R.string.app_name);
        assertThat(hello, equalTo("Hello world!"));
    }

    @Test
    public void buttonClickShouldStartNewActivity() throws Exception
    {
        Button button = (Button) activity.findViewById( R.id.startNextActivity );
        button.performClick();
        Intent intent = Shadows.shadowOf(activity).peekNextStartedActivity();
        assertEquals(RobolectricSecondActivity.class.getCanonicalName(), intent.getComponent().getClassName());
    }

    @Test
    public void testButtonClickShouldShowToast() throws Exception {
        RobolectricActivity activity = Robolectric.buildActivity(RobolectricActivity.class).create().get();
        Button view = (Button) activity.findViewById(R.id.showToast);
        assertNotNull(view);
        view.performClick();
        assertThat(ShadowToast.getTextOfLatestToast(), equalTo("Lala") );
    }

}
4. Robolectric resources
4.1. vogella Java example code
If you need more assistance we offer Online Training and Onsite training as well as consulting

