
Getting Started with Theia AI
Eclipse Theia comes with quite extensive AI capabilities. This includes the usage of AI from a users perspective as well as from a developers perspective to implement AI features in Theia. This tutorial focuses on implementing AI features in Theia. But as you can not describe how to implement something without knowing how to use it in the end, there are also some Theia AI usage guides in here. For a more detailed description on how to use Theia AI as an end-user, have a look at Using the AI Features in the Theia IDE as an End User.
To get a better understanding of the Theia AI capabilities compared to Visual Studio Code GitHub Copilot, I will try to keep the same structure as in my Extending Copilot in Visual Studio Code tutorial. For Theia the structure will be a slightly different, as Theia AI is doing things differently and even provides some more features that help in providing AI features for end users.
Prerequisites
Additionally to using Visual Studio Code with Dev Containers for the development, you need access to a LLM (Large Language Model). If you have an AI subscription, e.g. from OpenAI, you can use that one. Have a look at the LLM Providers Overview to see which LLMs are currently supported by Theia. If you have a subscription for a LLM that is not listed here, check if it is compatible with the OpenAI API and try to configure it as a OpenAI Compatible Model.
If you do not have a subscription yet, but want to follow this tutorial, you can try a free alternative. So far I only found these two variants:
- Google AI (in case you have a Google account)
- Local LLM via Ollama
OpenAI offers a free tier, but this is only for the usage of ChatGPT. There is no free tier for the usage of the OpenAI API. You actually need to configure the billing setup in order to use it.
- If you have a Google account, you can try out the Google AI Studio
- Create a new project via Google AI Studio - Projects
- Click on Create a new project
- Provide a name like theia-evaluation
- Click on Create project
- Create a new API key via Google AI Studio - API Keys
- Click on Create API Key
- Give the key a name like theia
- Select the previously created theia-evaluation project
- Click on Create key
- Create a new project via Google AI Studio - Projects
- If you have a capable notebook or workstation, you can also try out a local LLM via Ollama
- Download and install Ollama for your operating system
- Pull a model that supports tool calls, e.g.
llama3.2ollama pull llama3.2
Since version 1.68.0 Theia also supports a GitHub Copilot language model integration.
Dependent on which LLM you want to use, I will show how it can be configured later.
Project Setup
As this tutorial is part of my Visual Studio Code Extension - Theia - Cookbook, I will use the Dev Container created with the Getting Started with Visual Studio Code Extension Development tutorial and extended in the Getting Started with Eclipse Theia tutorial.
- Clone the Visual Studio Code Extension - Theia - Cookbook GitHub Repository from the vscode_copilot branch. You can also use the theia_getting_started branch if you don’t want the Visual Studio Code Copilot Extension in your setup.
git clone -b vscode_copilot https://github.com/fipro78/vscode_theia_cookbook.git - Switch to the new folder and open Visual Studio Code
cd vscode_theia_cookbook code . - When asked, select Reopen in Container to build and open the project in the Dev Container
Update Dependencies
Developing applications that are based on web frameworks typically means that you have to handle dependency updates quite often. The reason is the high frequency in which libraries are updated. Sometimes it feels like the tutorials and blog posts that rely on a specific version of a library is outdated at the time it is published. The Eclipse Theia project also publishes new releases quite often, so it is a common task to update your dependencies. As several things happened since the Getting Started with Eclipse Theia tutorial, I will update the setup in the following section. It should be at least up-to-date at the time the tutorial is published, and describe in general the steps to follow for updating in the future.
Note:
You need at least to use Theia 1.68.0 to make all features work that are described and used in this tutorial.
Theia and Visual Studio Code can use Node 22 in the meanwhile. The Theia Prerequisites talk about the requirement Node.js >= 20 and < 24 and the VS Code Dev Container is based on typescript-node:22-bookworm. Therefore we first update the project setup to use Node 22.
- Open the file theia/package.json
- Update the
engingessection"engines": { "node": ">=20", "npm": ">=10" },
- Update the
- Open the file .devcontainer/devcontainer.json
- Update the
imagetotypescript-node:22-bookworm"image": "mcr.microsoft.com/devcontainers/typescript-node:1-22-bookworm",
- Update the
- Open the Dockerfile in the project root (used to containerize the application)
- Update the
NODE_VERSIONARG NODE_VERSION=22
- Update the
- Open the file .devcontainer/postCreateCommand.sh
- Install
npm-check-updatesto make dependency updates more comfortable.npm install -g npm yo generator-code @vscode/vsce @angular/cli generator-theia-extension npm-check-updatesNote:
This step is of course opinionated. There are also other ways to update dependencies, but I personally found this one quite comfortable.
- Install
- Rebuild the Dev Container (e.g. F1 -> Dev Containers: Rebuild Container)
After the Dev Container is rebuilt, lets update the dependencies of the Theia project(s) by using npm-check-updates.
You can also use different ways to update the dependencies, e.g. by manually search and replace the Theia package versions with the most current one,
or by executing npm outdated to get a list of outdated dependencies and the available newer versions, and then updating the versions dependency by dependency.
- Open a Terminal
- Switch to the theia folder
- Execute the following command to show the outdated dependencies.
ncuThis will show that
lernais quite outdated. Although that is not really an issue, let’s also update that dependency. - Execute the following command to update the outdated dependencies in the package.json
ncu -u - Open the file theia/lerna.json
- Change the content to the following
{
  "lerna": "9.0.0",
  "version": "0.0.0",
  "npmClient": "npm",
  "command": {
    "run": {
      "stream": true
    }
  }
}
- Change the content to the following
- Switch back to the Terminal
- Switch to the folder theia/browser-app
- Execute the following command to update the dependencies
ncu -u - Switch to the folder theia/theia-customization
- Execute the following command to update the dependencies
ncu -u - Switch to the folder theia/electron-app
- Execute the following command to update the dependencies in interactive mode
ncu -u -i - Uncheck the
electronpackage to avoid that it gets updated automatically.
This is necessary because the package@theia/electron@1.68.0has a peer dependency toelectron@38.4.0and a newer dependency would break the build. - Answer the question
Run npm install to install new versions?withnas we need to executenpm installfrom the theia parent folder. - Open the file theia/electron-app/package.json
- Update the
electronversion"devDependencies": { "electron": "^38.4.0" },
- Update the
- Switch back to Terminal to the theia folder
- Run
npm installto update the dependencies
Note:
Newer versions of @theia/electron might have a dependency to a newer electron version. You can find out which version is needed by looking into the @theia/electron - package.json and check for the peerDependencies.
Note:
If you get some strange errors after the dependency updates, try to cleanup the workspace first.
- Delete the folder theia/node_modules
- Delete the file theia/package-lock.json
- Run
npm installagain
Create the new Theia AI Extension project
In the following section we will create a new Theia extension to add custom AI features to our Theia application.
- Open a Terminal
- Switch to the theia folder
-
Create a new Theia extension by using the
theia-extensiongeneratoryo theia-extension ? The extension's type Empty ? The extension's name ai-extension -
Select
do not overwrite(n) for every file that comes up with a conflict. It would otherwise remove all changes we applied before. - Add the necessary modifications manually
- Update the theia/package.json
- Add a script to build the
ai-extensionand add the execution of that script tobuild:browserandbuild:electron -
Change
build:browserandbuild:electronto uselerna"scripts": { "build:ai-extension": "npm --prefix ai-extension run build", "build:customization": "npm --prefix theia-customization run build", "build:browser": "lerna run build --ignore electron-app", "build:electron": "lerna run build --ignore browser-app", },Note:
This configuration is helpful for this tutorial as we only have two extensions, and if you now executenpm run build:browserit will first build the ai-extension and the theia-customization and then the browser-app but not the electron-app. In bigger setups it might be more efficient to build the changed extension and then the application. Or to have dedicated build jobs for different scenarios. -
Add the new ai-extension module to the
workspacessection"workspaces": [ "ai-extension", "theia-customization", "browser-app", "electron-app" ]
- Add a script to build the
- Add the ai-extension module as a dependency to the browser-app and the electron-app
- Open the package.json
-
Add the dependency to the
dependenciessection"dependencies": { ..., "ai-extension": "0.0.0" },
-
Delete the newly created theia/.vscode folder
We already copied the content to the .vscode folder in the previous tutorial. - Switch back to Terminal to the theia folder
- Run
npm installto update the project after the manual modifications
- Update the theia/package.json
Add AI features
The code generator is generating basic project stubs. They do not contain the AI features already, so first we need to extend the browser-app and the electron-app to support AI.
-
Add Theia AI to the Theia application.
Note:
We add the dependencies to support AI Chat capabilities and MCP support in this tutorial. To also add AI support in the Editor and the Terminal, install the corresponding packages@theia/ai-editorand@theia/ai-terminal.Note:
We add the dependencies to support LLMs that use the Google API, the OpenAI API and Ollama in this tutorial. If you need additional LLM API support, have a look at LLM Providers Overview to see what is available. If you for example have a GitHub Copilot license and want to use that, add the@theia/ai-copilotmodule which was added with Theia 1.68.0.- Update the package.json of the browser-app and the electron-app
- Open a Terminal
-
Switch to the Theia Application directory (browser-app and electron-app)
- Add
@theia/ai-core-uito add UI Core - Add
@theia/ai-historyto add the AI history view - Add
@theia/ai-ideto add the Chat and the default agents - Add
@theia/ai-mcp-uito add MCP support - Add
@theia/ai-googleto add Google API support - Add
@theia/ai-ollamato add Ollama support -
Add
@theia/ai-openaito add OpenAI API supportnpm install @theia/ai-core-ui @theia/ai-history @theia/ai-ide @theia/ai-mcp-ui @theia/ai-google @theia/ai-ollama @theia/ai-openai
The additional required packages will be added transitively. If you want to use any other LLM than Google AI, Ollama or OpenAI, add the corresponding module for your LLM.
- Build and run the Theia browser application
If you created the tasks as explained in Optional: Define Tasks you can either- Press F1
- Select
Tasks: Run Task - Select
Build Theia Browserto build the Theia browser application - Select
Start Theia Browserto start the Theia browser application
- Select
- Use the Task Explorer Visual Studio Code Extension
- Expand npm in the Task Explorer view
- Run the
Build Theia Browsertask from the tree to build the Theia browser application - Run the
Start Theia Browsertask from the tree to start the Theia browser application
If you want to work with the Terminal and execute the
npmscripts manually- Open a Terminal
- Switch to the theia folder
- Run
npm run build:browserto build the Theia browser application - Run
npm run start:browserto start the Theia browser application
Note:
You can also use the Launch Configuration from the .vscode/launch.json via Run and Debug. This will start the application and enable debugging. But you first need to build the application via commandline or Task. - Press F1
- Update the package.json of the browser-app and the electron-app
Configure AI
- Open a browser on http://localhost:3000 and see the started Theia application.
- Open the settings page by pressing CTRL + ,
- Select the AI Features
- Check Enable AI
- Configure the LLM you want to use
- Google
- Api Key: Copy and paste your Google AI API key (see above)
For this tutorial we simply configure the API key via preferences as it is easier than setting up the environment. In a productive environment you should use the environment variableGOOGLE_API_KEYto set the key securely. - Models: Ensure to have models in the list that are currently available according to Gemini Models
- Api Key: Copy and paste your Google AI API key (see above)
- Ollama
- Ollama Host: http://localhost:11434
- Ollama Models: llama3.2
- Google
- Configure the Model Aliases
- Open the AI Configuration via Menu -> View -> AI Configuration
- Switch to the Model Aliases tab
- For every model alias select the model that you configured
- Instead of configuring everything via user interface, you can also directly paste one of the following configurations directly in the settings JSON
- Switch to the JSON view of the settings by clicking the curly braces on the upper right corner of the editor (Open Settings (JSON))
- Alternatively use the Command Palette (F1) and search for Preferences: Open Settings (JSON)
- Copy one of the following snippets and paste it in the editor
- Google
{ "ai-features.AiEnable.enableAI": true, "ai-features.google.apiKey": "<your-api-key>", "ai-features.google.models": [ "gemini-2.5-pro", "gemini-2.5-flash", "gemini-2.5-flash-preview-09-2025", "gemini-2.0-flash", "gemini-2.0-flash-lite" ], "ai-features.languageModelAliases": { "default/code": { "selectedModel": "google/gemini-2.5-flash" }, "default/universal": { "selectedModel": "google/gemini-2.5-flash" }, "default/code-completion": { "selectedModel": "google/gemini-2.5-flash" }, "default/summarize": { "selectedModel": "google/gemini-2.5-flash" } } } -
Ollama
{
  "ai-features.AiEnable.enableAI": true,
  "ai-features.ollama.ollamaHost": "http://localhost:11434",
  "ai-features.ollama.ollamaModels": ["llama3.2"],
  "ai-features.languageModelAliases": {
    "default/code": {
      "selectedModel": "ollama/llama3.2"
    },
    "default/universal": {
      "selectedModel": "ollama/llama3.2"
    },
    "default/code-completion": {
      "selectedModel": "ollama/llama3.2"
    },
    "default/summarize": {
      "selectedModel": "ollama/llama3.2"
    }
  }
}
- Google
- Open the AI Chat view if it is not open already via CTRL + ALT + I or Menu Bar -> View -> AI Chat
- Enter something in the chat like @Universal Tell me a bar joke and check if the AI configuration works
- Open the settings page by pressing CTRL + ,
Note:
If you want to use the GitHub Copilot language model integration, you need to click on the Copilot indicator in the status bar and follow the instructions in the dialog to authorize the application via the GitHub device authorization page. After the authorization succeeded, you can select one of the available Copilot language models in the AI Configuration.
Tool Functions
The first component you can contribute in Visual Studio Code to Copilot is a Language Model Tool. Such tools are used to extend the chat with domain-specific capabilities that can use the VSCode API to perform actions in Visual Studio Code.
In Visual Studio Code you configure the Language Model Tool in the contributes section of the package.json, implement the vscode.LanguageModelTool and register it via vscode.lm.registerTool() on activation of the extension. See Extending Copilot in Visual Studio Code - Language Model Tool for further details.
In Theia you implement a ToolProvider and bind it to the injection context. In this section we will create a Tool Function that creates a file in the current workspace that contains a joke as content.
Note:
Theia already contains a tool function with the name writeFileContent that can be used to create a file in the workspace. The implementation is WriteFileContent in case you are interested in the default implementation. So the following implementation is not necessary to achieve the result. It is intended as an example how the implementation of a Tool Function could look like.
- Open a Terminal
- Switch to the theia/ai-extension directory
-
Add
@theia/ai-coreas a dependencynpm install @theia/ai-core
- Open the file theia/ai-extension/src/browser/ai-extension-contribution.ts
- Implement a
ToolProviderwhere the important things to notice are- The definition of an ID which is used to call the Tool Function
- The implementation of the
ToolRequestthat is returned bygetTool()where thehandleris defined that represents the function
-
Replace the content with the following and adjust it if you want. This makes it easier to follow the tutorial instead of implementing everything by your own.
import {
  ToolProvider,
  ToolRequest,
  ToolInvocationContext,
} from "@theia/ai-core";
import { CommandRegistry } from "@theia/core";
import { BinaryBuffer } from "@theia/core/lib/common/buffer";
import { inject, injectable } from "@theia/core/shared/inversify";
import { FileService } from "@theia/filesystem/lib/browser/file-service";
import { WorkspaceService } from "@theia/workspace/lib/browser";
import { FileNavigatorCommands } from "@theia/navigator/lib/browser/navigator-contribution";

export const CREATE_JOKE_FILE_FUNCTION_ID = "jokeFileCreator";

@injectable()
export class JokeFileCreationFunction implements ToolProvider {
  static ID = CREATE_JOKE_FILE_FUNCTION_ID;

  @inject(WorkspaceService)
  protected workspaceService: WorkspaceService;

  @inject(FileService)
  protected readonly fileService: FileService;

  @inject(CommandRegistry)
  protected commandRegistry: CommandRegistry;

  getTool(): ToolRequest {
    return {
      id: JokeFileCreationFunction.ID,
      name: JokeFileCreationFunction.ID,
      description: `Create a file at the given path that contains a joke.`,
      parameters: {
        type: "object",
        properties: {
          path: {
            type: "string",
            description:
              "The name of the folder in the workspace where the joke file should be created.",
          },
          filename: {
            type: "string",
            description: "The name of the jokefile that should be created.",
          },
          joke: {
            type: "string",
            description: "The joke content to be written in the joke file.",
          },
        },
        required: ["path", "filename", "joke"],
      },
      handler: async (
        args: string,
        ctx: ToolInvocationContext,
      ): Promise<string> => {
        if (ctx?.cancellationToken?.isCancellationRequested) {
          return JSON.stringify({ error: "Operation cancelled by user" });
        }

        const { path, filename, joke } = JSON.parse(args);

        const wsRoots = await this.workspaceService.roots;
        if (wsRoots.length === 0) {
          throw new Error("No workspace has been opened yet");
        }
        const workspaceRoot = wsRoots[0].resource;
        const uri = workspaceRoot.resolve(path);

        try {
          await this.fileService.createFolder(uri);
        } catch (error) {
          return JSON.stringify({ error: error.message });
        }

        const fileUri = uri.resolve(filename);

        // ensure that we do not overwrite existing files
        if (await this.fileService.exists(fileUri)) {
          return JSON.stringify({
            error: `File ${fileUri} already exists`,
          });
        }

        try {
          await this.fileService.createFile(
            fileUri,
            BinaryBuffer.fromString(joke),
          );

          this.commandRegistry.executeCommand(
            FileNavigatorCommands.REFRESH_NAVIGATOR.id,
          );

          return `Successfully wrote a joke in the file ${fileUri}`;
        } catch (error) {
          return JSON.stringify({ error: error.message });
        }
      },
    };
  }
}
- Implement a
- Open the file theia/ai-extension/src/browser/ai-extension-frontend-module.ts
-
Replace the content with the following
import { JokeFileCreationFunction } from "./ai-extension-contribution";
import { bindToolProvider } from "@theia/ai-core/lib/common";
import { ContainerModule } from "@theia/core/shared/inversify";

export default new ContainerModule((bind) => {
  bindToolProvider(JokeFileCreationFunction, bind);
});
-
-
You need an open workspace to make the Tool Function work. To be able to open a workspace in the Theia application create a folder example in the home directory of the node user in the Dev Container
mkdir ~/example - Build the Theia browser application
- Run the Theia browser application
- Open the Theia browser application on http://localhost:3000
- Open the AI Configuration via Menu -> View -> AI Configuration
- Switch to the Tools tab
- Verify that there is an entry for
jokeFileCreatorthat is set to Always Allow
If you like to get a confirmation dialog before executing the tool, change the value to Confirm
- Click on Open Folder in the Explorer tab to open a workspace
- Select the created node/example folder
- In the AI Chat enter a prompt that uses the created tool function. This can be done by typing
~followed by the tool id, in our case~jokeFileCreator.@Universal create a file that contains a joke in the folder test. use a file name that relates to the joke. ~jokeFileCreator - Check in the response if the
jokeFileCreatorfunction was executed and if a file with a joke was created.
Note:
If you compare the prompt we use in Theia with the prompt used in the Visual Studio Copilot tutorial, you notice some differences:
- You specify a Theia Agent via
@Universal
In previous versions of Theia the@Orchestratoragent was called when no other agent was explicitly mentioned. This caused additional requests in the background to find a matching agent. Since 1.67.0 you can also select a default agent in the settings under AI Features -> Chat: Default Agent. This agent will be used when no other agent is mentioned explicitly using the@symbol. Note that specifying the default agent is done via agent ID without the leading@. - The Tool Function is specified via
~jokeFileCreatorwhile the Language Model Tool in Visual Studio Code is targeted via#jokeFileCreator - The prompt is more descriptive, otherwise it might fail, where in Copilot the values are somehow set correctly. But that might be related to the model that is used.
MCP Server
The Model Context Protocol (MCP), is an open protocol to standardize how AI applications connect with external tools and data sources. MCP servers can offer resources, prompts and tools that can be used by a client.
In this section we will cover how to add MCP servers to a Theia application and how to use the provided MCP tools.
There are basically two types of MCP servers:
- Local MCP servers (stdio transport)
A local MCP server runs on the same machine as the MCP client and is used to access local resources like files or run local scripts. Local servers are essential for tasks that require accessing local files or data that is not available remotely. - Remote MCP servers (streamable HTTP or server-sent events)
There are several ways to add MCP servers to Theia:
- Configure them via settings.json
- Programmatically via a Theia Extension
Note:
The usage of a mcp.json server configuration file, like in Visual Studio Code, is currently not supported, but proposed via this ticket.
If you are interested in the mcp.json format in Visual Studio Code, have a look at Extending Copilot in Visual Studio Code - MCP Server for further details.
In this section I will describe how to manually configure MCP servers via settings.json and programmatically via Theia extension.
We will install
- the Filesystem MCP Server as a local MCP Server
- the Fetch MCP Server as a remote MCP Server
- the GitHub MCP Server as a remote MCP Server that requires an authorization
Add MCP server via settings.json
In the following section we will add MCP servers via settings.json file. For this you need of course a running Theia application. At this point you don’t need to build anything, so simply start the Theia browser application or use the running instance if you did not stop the server from the previous steps.
Local MCP Server
- Run the Theia browser application
- Open the Theia browser application on http://localhost:3000
- Open the settings page by pressing CTRL + ,
- Switch to the JSON view of the settings by clicking the curly braces on the upper right corner of the editor (Open Settings (JSON))
- Alternatively use the Command Palette (F1) and search for Preferences: Open Settings (JSON)
-
Add the following content to configure the filesystem server as local MCP server.
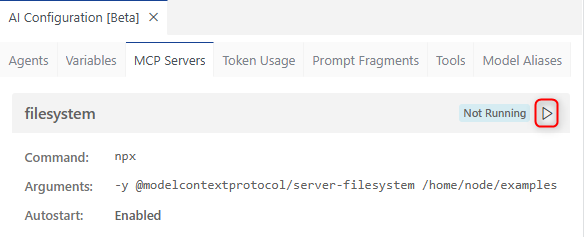
"ai-features.mcp.mcpServers": {
  "filesystem": {
    "command": "npx",
    "args": [
      "-y",
      "@modelcontextprotocol/server-filesystem",
      "/home/node/example"
    ]
  }
},
Note:
The Filesystem MCP Server supports Roots. Visual Studio Code as a MCP client supports roots and sets the workspace as such. At the time writing this tutorial, Theia as a MCP client does not support roots. There is a ticket that requests that feature also, so there is a good chance that Theia will support roots also in the future. Until then we need to configure the allowed directories via commandline parameter. In the above example this is the /home/node/example folder in the Dev Container we created in the previous section. If you did not create that folder, or you want to use another folder that should be accessible by the filesystem server, adjust the parameter on your needs.
- To start the filesystem MCP server you can either
- Use the command palette: F1 -> MCP: Start MCP Server -> filesystem
- Use the AI Configuration view: Menu -> View -> AI Configuration
- Open the MCP Servers tab
-
Click on the Play button for the filesystem MCP server
Starting the server will discover the capabilities and tools provided by the server. These tools can then be used for example in the Chat.
-
Test if the configuration works by entering the following to the AI Chat
@Universal list files in /home/node/example ~mcp_filesystem_list_directory -
You should now see that the
mcp_filesystem_list_directorytool from the filesystem (MCP Server) is executed to solve your request.
Note:
The name of the tool to use can be found either by typing ~ and go through the list, or from the AI Configuration - MCP Servers view, if you expand the Tools section and click on the Copy tool icon of the corresponding tool.
To compare the results with the Visual Studio Code Copilot Extension example, you can also try to execute one of the following prompts:
@Universal list allowed directories ~mcp_filesystem_list_allowed_directories
or a more extended one
@Universal list files in the allowed directories and all subdirectories ~mcp_filesystem_list_allowed_directories ~mcp_filesystem_list_directory
Remote MCP Server
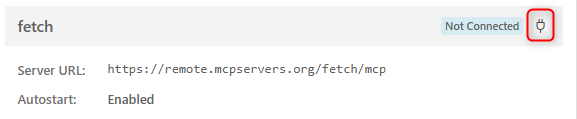
- Add the following content to the settings.json in the
ai-features.mcp.mcpServerssection to configure the fetch server as remote MCP server."fetch": { "serverUrl": "https://remote.mcpservers.org/fetch/mcp" } -
Click on the Connect button to connect to the fetch remote MCP server
-
Test if the configuration works by entering the following to the AI Chat
@Universal fetch the content from https://eclipse.dev/nattable ~mcp_fetch_fetch - You should now see that the
mcp_fetch_fetchtool from the fetch (MCP Server) is executed to solve your request.
Remote MCP Server with authorization
Most of the remote MCP servers require an authorization in order to work. Currently it is only possible to write the token in plain text into the settings.json file. As long as the settings.json is locally on your system, this is not an issue. But it can become an issue if you want to share your settings with team colleagues or store them on a central server. There is an open ticket that addresses this issue.
In the following section we will configure MCP servers with an authorization token in plain text in the settings.json.
To demonstrate this we use the GitHub MCP Server with a PAT (Personal Access Token). This is also described in Using the GitHub MCP Server.
- Create a Personal Access Token as described in Creating a personal access token (classic)
- Use repo as scope
You can use the GitHub MCP server locally via Docker. To make this work in a Dev Container you need the docker-in-docker feature added to the devcontainer.json
"features": {
  "ghcr.io/devcontainers/features/docker-in-docker:2": {},
}
The local GitHub MCP server can then be configured in the settings.json file like this:
"github": {
  "command": "docker",
  "args": [
      "run",
      "-i",
      "--rm",
      "-e",
      "GITHUB_PERSONAL_ACCESS_TOKEN",
      "ghcr.io/github/github-mcp-server"
  ],
  "env": {
      "GITHUB_PERSONAL_ACCESS_TOKEN": "<your-token>"
  }
}
The token is configured in the env section of the local MCP server configuration. Replace <your-token> with the PAT created before.
Instead of using the GitHub MCP server locally, you can directly use the GitHub hosted server as explained in A practical guide on how to use the GitHub MCP server. The token can be configured via the serverAuthToken property, which resolves to a Bearer authorization token. If Bearer is not correct for the specific server, you can change this via the serverAuthTokenHeader property.
"github": {
  "serverUrl": "https://api.githubcopilot.com/mcp/",
  "serverAuthToken": "<your-token>"
}
Alternatively you can configure the header also in the headers section directly, e.g. if you need to use a custom header for the authorization.
"github": {
  "serverUrl": "https://api.githubcopilot.com/mcp/",
  "headers": {
    "Authorization": "Bearer <your-token>"
  }
}
Note:
GitHub recommends to authenticate against the MCP remote servers via OAuth. At the time writing this tutorial there is no OAuth support for MCP servers available in Theia, so you need to stick with the Authorization token until the OAuth support is added in Theia.
As the GitHub MCP Server provides a huge set of tools, the tools are categorized and not all tools are enabled by default. If you for example want to use the GitHub Gist related tools, you need to enable that. This can either be done by using the explicit MCP URL
"github": {
  "serverUrl": "https://api.githubcopilot.com/mcp/x/gists",
  "serverAuthToken": "<your-token>"
}
or by setting the optional header X-MCP-Toolsets
"github": {
  "serverUrl": "https://api.githubcopilot.com/mcp/",
  "headers": {
    "Authorization": "Bearer <your-token>",
    "X-MCP-Toolsets": "gists"
  }
}
Further details about this are available in Remote GitHub MCP Server.
- Test if the GitHub MCP Server configuration works
- Start the server
- Enter the following in the chat
@Universal fetch the publications written by Dirk Fauth in the gists of fipro78. Provide the links to blog posts about VS Code and Eclipse Theia in the chat that are extracted from a related gists file. Use ~mcp_github_list_gists to list the available gists. Then use ~mcp_fetch_fetch to fetch the content of the found gists with a max-length parameter of 15000.
Add MCP server programmatically via Theia Extension
You can also register MCP server programmatically via a Theia extension. This way you can for example bundle AI extensions like agents or the direct usage of the AI API with the registration of MCP servers that are needed for the provided functionality. You can also share default MCP servers with an authorization token that is configured in an environment variable.
To register a MCP server programmatically you can either use the MCPFrontendService or the MCPServerManager directly, which is used by the MCPFrontendService internally. To retrieve environment variables you can use the EnvVariablesServer.
In the following section we will register the MCP servers from the section above programmatically.
Note:
Remember to remove the MCP server configuration from the settings.json or use different names for the MCP servers to avoid naming collisions.
- Open the file ai-extension/src/browser/ai-extension-contribution.ts
- Add the necessary import statements
import { CommandRegistry, MessageService } from "@theia/core"; import { FrontendApplicationContribution } from "@theia/core/lib/browser"; import { EnvVariablesServer } from "@theia/core/lib/common/env-variables"; import { LocalMCPServerDescription, MCPFrontendService, RemoteMCPServerDescription, } from "@theia/ai-mcp/lib/common"; - Add a new class
McpFrontendContributionthat implementsFrontendApplicationContribution - Get the
MCPFrontendServiceand theEnvVariablesServerinjected - Implement the
onStart()method- Register the
filesystemMCP server as local MCP server viaLocalMCPServerDescription - Register the
fetchMCP server as remote MCP server viaRemoteMCPServerDescription - Register the
githubMCP server as remote MCP server viaRemoteMCPServerDescriptionand add aresolvefunction to provide theGITHUB_TOKENenvironment variable
@injectable()
export class McpFrontendContribution implements FrontendApplicationContribution {
  @inject(EnvVariablesServer)
  private readonly envVariablesServer: EnvVariablesServer;

  @inject(MCPFrontendService)
  protected readonly mcpFrontendService: MCPFrontendService;

  @inject(MessageService)
  private readonly messageService: MessageService;

  async onStart(): Promise<void> {
    try {
      // add a local MCP server
      const fileSystemServer: LocalMCPServerDescription = {
        name: "filesystem",
        command: "npx",
        args: [
          "-y",
          "@modelcontextprotocol/server-filesystem",
          "/home/node/example",
        ],
      };
      this.mcpFrontendService.addOrUpdateServer(fileSystemServer);

      // add a remote MCP server
      const fetchServer: RemoteMCPServerDescription = {
        name: "fetch",
        serverUrl: "https://remote.mcpservers.org/fetch/mcp",
      };
      this.mcpFrontendService.addOrUpdateServer(fetchServer);

      // get the GITHUB_TOKEN environment variable
      const githubTokenVar =
        await this.envVariablesServer.getValue("GITHUB_TOKEN");
      // add a remote MCP server with resolve method
      const githubServer: RemoteMCPServerDescription = {
        name: "github",
        serverUrl: "https://api.githubcopilot.com/mcp/",
        serverAuthToken: githubTokenVar?.value,
        headers: {
          "X-MCP-Toolsets": "gists",
        },
      };
      this.mcpFrontendService.addOrUpdateServer(githubServer);
    } catch (error) {
      console.error("Error configuring MCP server:", error);
      this.messageService.error(
        "Failed to configure MCP server. Please check the console for details.",
      );
    }
  }
}
Alternatively it is possible to get the token interactively by implementing
resolve()of theRemoteMCPServerDescription:- Get the
QuickInputServiceinjected
@inject(QuickInputService) protected readonly quickInputService: QuickInputService;- Change the
githubServerdefinition- Remove the
serverAuthToken - Add a
resolvefunction that asks for the authentication token by using theQuickInputService
- Remove the
const githubServer: RemoteMCPServerDescription = { name: "github", serverUrl: "https://api.githubcopilot.com/mcp/", headers: { "X-MCP-Toolsets": "gists", }, resolve: async (serverDescription) => { console.log("Resolving GitHub MCP server description"); // Prompt user for authentication token const authToken = await this.quickInputService.input({ prompt: "Enter authentication token for GitHubMCP server", password: true, value: "serverAuthToken" in serverDescription ? serverDescription.serverAuthToken || "" : "", }); if (authToken) { // Return updated server description with new token return { ...serverDescription, serverAuthToken: authToken, } as RemoteMCPServerDescription; } // If no token provided, return original description return serverDescription; }, }; this.mcpFrontendService.addOrUpdateServer(githubServer); - Register the
Note:
If you want to automatically start the programmatically registered MCP servers, you need to call the corresponding API at the end:this.mcpFrontendService.startServer(fileSystemServer.name); this.mcpFrontendService.startServer(fetchServer.name); this.mcpFrontendService.startServer(githubServer.name); - Add the necessary import statements
- Open the file ai-extension/src/browser/ai-extension-frontend-module.ts
- Register the
McpFrontendContribution
import { McpFrontendContribution, JokeFileCreationFunction, } from "./ai-extension-contribution"; import { bindToolProvider } from "@theia/ai-core/lib/common"; import { FrontendApplicationContribution } from "@theia/core/lib/browser"; import { ContainerModule } from "@theia/core/shared/inversify"; export default new ContainerModule((bind) => { bindToolProvider(JokeFileCreationFunction, bind); bind(McpFrontendContribution).toSelf().inSingletonScope(); bind(FrontendApplicationContribution).toService(McpFrontendContribution); }); - Register the
- Build the Theia browser application
- Run the Theia browser application
- Open the Theia browser application on http://localhost:3000
- Open the AI Configuration via Menu -> View -> AI Configuration
- Switch to the MCP Servers tab
- Start the MCP servers if they are not configured to
autostart - In the AI Chat view use prompts like in the section before to verify that the MCP servers are registered and working correctly.
Further information about MCP in Theia:
Agents
Custom agents in Theia allow the creation of custom workflows and extending the Theia IDE with new capabilities. An agent in Theia AI is comparable to the Chat Participant in Visual Studio Code Copilot. So it is a specialized assistant to extend the IDE with domain specific experts knowledge. In comparison to Visual Studio Code, this is not limited to the chat, it can also be integrated into other parts of the IDE like the editor, the terminal or a custom widget. Similar to the Chat Participant in Visual Studio Code, an agent can use the available and exposed Theia AI to access and integrate in the Theia application. This applies of course to agents that are implemented and contributed programmatically.
Note:
Defining a custom agent via configuration file similar to custom agents in Visual Studio Code will be described in Further customizations.
Implement a Custom Agent
In this section we will implement a Custom Agent. In the section after this one, we will extend the agent to have more influence on the processing, access the Theia API or add agent specific variables and tools.
- Create a new file ai-extension/src/browser/ai-extension-joker-agent.ts
- Create a new class
JokerChatAgentthat extendsAbstractStreamParsingChatAgent- Define a
BasePromptFragmentthat basically consists of anidand atemplate - Set the required fields according to your needs
- Define the
LanguageModelRequirementfor the purposechatand by default usesdefault/universalmodel alias - Set the
promptsand define a simplePromptVariantSetbased on the single `BasePromptFragment - Add the Tool Function
jokeFileCreatorthat we created before to thefunctions
- Define the
- Copy and paste the following code to the new file to make it easy to proceed
import { AbstractStreamParsingChatAgent } from "@theia/ai-chat"; import { BasePromptFragment, LanguageModelRequirement, } from "@theia/ai-core"; import { CREATE_JOKE_FILE_FUNCTION_ID } from "./ai-extension-contribution"; import { injectable } from "@theia/core/shared/inversify"; export const jokerTemplate: BasePromptFragment = { id: "joker-system-default", template: ` # Instructions You are the Joker, the arch enemy of Batman. To attack Batman, you tell a joke that is so funny, it distracts him from his mission. To keep the distraction going on, write the joke to a file. Use **~{${CREATE_JOKE_FILE_FUNCTION_ID}}** to write the joke to a file. If the user does not provide a path, create a new folder "bat-jokes" in the current workspace folder and store the file in that folder. Choose a filename that is related to the joke itself. `, }; @injectable() export class JokerChatAgent extends AbstractStreamParsingChatAgent { id: string = "Joker"; name: string = "Joker"; languageModelRequirements: LanguageModelRequirement[] = [ { purpose: "chat", identifier: "default/universal", }, ]; protected defaultLanguageModelPurpose: string = "chat"; override description = "This agent creates a file with a joke about batman."; override iconClass: string = "codicon codicon-feedback"; protected override systemPromptId: string = "joker-system"; override prompts = [ { id: "joker-system", defaultVariant: jokerTemplate, variants: [] }, ]; override functions = [CREATE_JOKE_FILE_FUNCTION_ID]; } - Define a
- Create a new class
- Open the file ai-extension/src/browser/ai-extension-frontend-module.ts
- Import the necessary dependencies
- Register the
JokerChatAgentvia dependency injection - Register it as an
Agent -
Register it as a
ChatAgentimport { McpFrontendContribution, JokeFileCreationFunction, } from "./ai-extension-contribution"; import { Agent, bindToolProvider } from "@theia/ai-core/lib/common"; import { ChatAgent } from "@theia/ai-chat/lib/common"; import { FrontendApplicationContribution } from "@theia/core/lib/browser"; import { ContainerModule } from "@theia/core/shared/inversify"; import { JokerChatAgent } from "./ai-extension-joker-agent"; export default new ContainerModule((bind) => { bindToolProvider(JokeFileCreationFunction, bind); bind(McpFrontendContribution).toSelf().inSingletonScope(); bind(FrontendApplicationContribution).toService(McpFrontendContribution); bind(JokerChatAgent).toSelf().inSingletonScope(); bind(Agent).toService(JokerChatAgent); bind(ChatAgent).toService(JokerChatAgent); });
- Build the Theia browser application
- Run the Theia browser application
- Open the Theia browser application on http://localhost:3000
- Open the AI Configuration via Menu -> View -> AI Configuration
- Switch to the Agents tab
- Verify that the
Jokeragent is listed
- In the AI Chat enter a prompt that uses the
@Jokeragent.@Joker tell me a joke about batman -
Check in the response if the
jokeFileCreatorfunction was executed and if a file with a joke was created.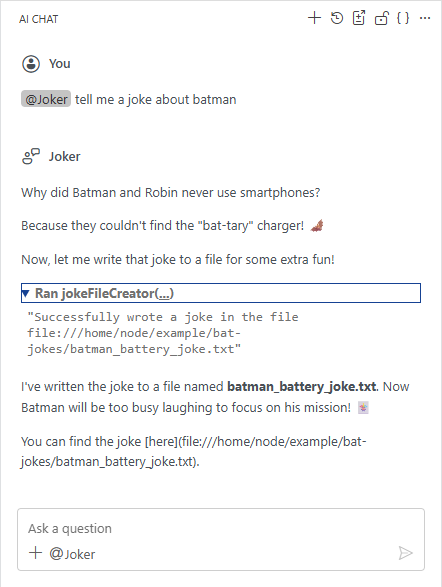
Further information about Custom Agents in Theia AI can be found here:
Advanced Theia AI Agent features
The above agent implementation is pretty simple, and actually you can achieve the same by creating a Custom Agent via configuration file, as the agent basically only consists of a specialized prompt. The advantage of a programmatically registered Custom Agent is:
- it can be integrated and delivered with the Theia application, without the need to have a user to define a customAgents.yml file
- you can use the Theia API to, for example customize the response rendering, access the platform to perform additional tasks, start a related MCP server in case it is not already started but needed for the processing.
We will have a look at those features in the following sections.
Prompt Variants
Theia supports a feature called Prompt Variants which enables tool builders to define multiple prompts per agents that a user can switch between. To demonstrate that we will add a new Prompt Variant to the JokerChatAgent that does not use the Tool Function to write the joke into a file.
- Open the file ai-extension/src/browser/ai-extension-joker-agent.ts
-
Define a new
BasePromptFragmentwith a simplified promptexport const jokerTemplateSimple: BasePromptFragment = { id: "joker-system-simple", template: ` # Instructions You are the Joker, the arch enemy of Batman. To attack Batman, you tell a joke that is so funny, it distracts him from his mission. `, }; -
Extend the
promptsfield to specify the prompt variantsoverride prompts = [ { id: "joker-system", defaultVariant: jokerTemplate, variants: [jokerTemplate, jokerTemplateSimple], }, ];
-
- Build the Theia browser application
- Run the Theia browser application
- Open the Theia browser application on http://localhost:3000
- Open the AI Configuration via Menu -> View -> AI Configuration
- Switch to the Agents tab
- Select the
Jokeragent - Select the joker-system-simple entry in the Prompt Templates combobox
- In the AI Chat enter a prompt that uses the
@Jokeragent.@Joker tell me a joke about batman - Check that now there is only a joke in the response, but no file is generated.
By using Prompt Variants you are able to provide users different ways how an agent works. In Theia Prompt Variants are for example used to switch the @Coder chat agent to the Agent mode. This is explained in Theia Coder Agent Mode: From AI Assistant to Autonomous Developer that also has a video linked to show it in more detail.
Note:
A user is even able to adjust prompt templates via the AI Configuration. By clicking the Edit button next to the selected Prompt Template, the Prompt Template can be modified, which will create a .prompttemplate file in the .theia/prompt-templates folder in the user home.
Agent-specific Variables
Additionally to Tool Functions that can be used in prompts, you can define Variables that can be resolved at runtime. There are Global Variables and Agent-specific Variables. Global Variables are available to all agents. Theia provides some Global Variables like for example #selectedText for the currently selected text or #currentFileContent for the whole content of the currently opened file.
You can see which Global Variables are available in the AI Configuration on the Variables tab. To use a Global Variable you can type a # in the AI Chat and then select it from the list of available variables, e.g. open a joke file that was created before and write something like the following to the chat:
explain #currentFileContent
I will not go into detail on how to implement Global Variables here. The Global Variables section in the Theia documentation and the implementation of the #today variable.
For creating custom agents programmatically, it can be interesting to define Agent-specific Variables. Such variables can be filled by any Theia API and enables extended use cases, like adding data to a prompt dynamically and even adding data before the work is delegated to another agent.
In this section we will implement another chat agent that uses Agent-specific Variables and is able to write content into a file in the workspace. The following implementation is used to get a better understanding of a programmatically defined agent and the usage of Agent-specific Variables.
- Create a new file ai-extension/src/browser/ai-extension-writer-agent.ts
- Create a new class
WriterChatAgentthat extendsAbstractStreamParsingChatAgent - Specify a prompt that
- uses the variable placeholders
{{folder}}and{{content}} - uses the
jokeFileCreatorTool Function
- uses the variable placeholders
- Define the
agentSpecificVariablesfield to declare the variablesfolderandcontentwhich enables to keep track of used variables and even shows that information on the agent configuration page. - Implement
getSystemMessageDescription()where the variables are resolved- Extract the values from the
request - If they are not present in the
request, define a default value
- Extract the values from the
import { AbstractStreamParsingChatAgent, SystemMessageDescription, } from "@theia/ai-chat"; import { AIVariableContext, BasePromptFragment, LanguageModelRequirement, } from "@theia/ai-core"; import { injectable } from "@theia/core/shared/inversify"; import { CREATE_JOKE_FILE_FUNCTION_ID } from "./ai-extension-contribution"; export const writerTemplate: BasePromptFragment = { id: "writer-system-default", template: ` # Instructions You are an agent that operates in the current workspace of the Theia IDE. You are able to persist the provided content into a file by using ~{${CREATE_JOKE_FILE_FUNCTION_ID}}. Derive the filename out of the provided content if no filename is provided. The file should be created in the folder {{folder}} in the current workspace. The content to persist is as follows: {{content}} `, }; @injectable() export class WriterChatAgent extends AbstractStreamParsingChatAgent { id: string = "Writer"; name: string = "Writer"; languageModelRequirements: LanguageModelRequirement[] = [ { purpose: "chat", identifier: "default/universal", }, ]; protected defaultLanguageModelPurpose: string = "chat"; override description = "This is an agent that is able to persist content into a file in the workspace."; override iconClass: string = "codicon codicon-new-file"; protected override systemPromptId: string = "writer-system"; override prompts = [ { id: "writer-system", defaultVariant: writerTemplate, variants: [] }, ]; override functions = [CREATE_JOKE_FILE_FUNCTION_ID]; override agentSpecificVariables = [ { name: "folder", description: "The folder in which the file should be created.", usedInPrompt: true, }, { name: "content", description: "The content to persist into the file.", usedInPrompt: true, }, ]; protected override async getSystemMessageDescription( context: AIVariableContext, ): Promise<SystemMessageDescription | undefined> { // extract data from the context let request = (context as any).request; let folder = request.getDataByKey(`folder`) as string; let content = request.getDataByKey(`content`) as string; // provide default values if not set if (!folder) { folder = "temp"; } if (!content) { content = "Lorem ipsum dolor sit amet."; } const variableValues = { folder: folder, content: content, }; // get the resolved prompt const resolvedPrompt = await this.promptService.getResolvedPromptFragment( this.systemPromptId, variableValues, context, ); // return the system message description return resolvedPrompt ? SystemMessageDescription.fromResolvedPromptFragment(resolvedPrompt) : undefined; } } - Create a new class
- Open the file ai-extension/src/browser/ai-extension-frontend-module.ts
- Register the new
WriterChatAgent
bind(WriterChatAgent).toSelf().inSingletonScope(); bind(Agent).toService(WriterChatAgent); bind(ChatAgent).toService(WriterChatAgent); - Register the new
- Build the Theia browser application
- Run the Theia browser application
- Open the Theia browser application on http://localhost:3000
- In the AI Chat enter a prompt that uses the
@Writeragent.@Writer write a file
You should see that a new file is generated in a new folder temp that contains the text Lorem ipsum dolor sit amet.
Further information about variables in Theia AI can be found here:
Agent-to-Agent Delegation (programmatically)
You can delegate the processing from one agent to another by using the delegateToAgent Tool Function. This is described in Agent-to-Agent Delegation in the Theia documentation, and I describe this also later in Agent-to-Agent Delegation (function). As in some cases it might be interesting to delegate to another agent programmatically, I will describe this approach in the following section. Delegating to another agent can be done by using the ChatAgentService Theia API.
In the following section we will extend the JokerChatAgent to programmatically forward to the WriterChatAgent if the joker-system-simple prompt template was selected.
- Open the file ai-extension/src/browser/ai-extension-joker-agent.ts
- Get the
ChatAgentServiceinjected@inject(ChatAgentService) protected chatAgentService: ChatAgentService; - Override
addContentsToResponse()- Check if the selected variant was the joker-system-simple template by using the
PromptService - Add the content and the folder data to the
request - Get the
WriterChatAgentby using theChatAgentService - Delegate the request to the
WriterChatAgent
protected override async addContentsToResponse( response: LanguageModelResponse, request: MutableChatRequestModel ): Promise<void> { await super.addContentsToResponse(response, request); const selectedVariantId = this.promptService.getSelectedVariantId( this.systemPromptId ); if (selectedVariantId === "joker-system-simple") { // extract information from the result and add it to the request const responseText = await getTextOfResponse(response); request.addData("content", responseText); request.addData("folder", "bat-jokes"); const agent = this.chatAgentService.getAgent("Writer"); if (!agent) { throw new Error(`Chat agent "Writer" not found.`); } return await agent.invoke(request); } } - Check if the selected variant was the joker-system-simple template by using the
-
Update the import statements to fix the compile errors
import {
  AbstractStreamParsingChatAgent,
  ChatAgentService,
  MutableChatRequestModel,
} from "@theia/ai-chat";
import {
  BasePromptFragment,
  getTextOfResponse,
  LanguageModelRequirement,
  LanguageModelResponse,
} from "@theia/ai-core";
import { CREATE_JOKE_FILE_FUNCTION_ID } from "./ai-extension-contribution";
import { inject, injectable } from "@theia/core/shared/inversify";
- Get the
- Build the Theia browser application
- Run the Theia browser application
- Open the Theia browser application on http://localhost:3000
- Open the AI Configuration via Menu -> View -> AI Configuration
- Switch to the Agents tab
- Select the
Jokeragent - Ensure that the joker-system-simple entry is selected in the Prompt Templates combobox
- In the AI Chat enter a prompt that uses the
@Jokeragent.@Joker a joke about scarecrow - Check that now there is a joke in the response and a file is generated.
The above implementation is of course a pretty simple one with the intention to show how it basically works. A more advanced example on how to programmatically forward from one agent to another can be seen in the @Orchestrator chat agent implementation provided by Theia itself.
And if you are interested in the implementation of the delegateToAgent Tool Function, have a look here.
Custom Response Part Rendering
Another interesting feature when implementing a Custom Agent in Theia, is the ability to fully customize the chat response rendering. This can be done by overriding AbstractChatAgent#addContentsToResponse() and adding additional content of type ChatResponseContent to the response.
There are already several default implementations of ChatResponseContent available that can be used to customize the response:
CodeChatResponseContentCommandChatResponseContentErrorChatResponseContentHorizontalLayoutChatResponseContentInformationalChatResponseContentMarkdownChatResponseContentProgressChatResponseContentQuestionResponseContentTextChatResponseContentThinkingChatResponseContentToolCallChatResponseContent
Those default interfaces and implementations are located in chat-model.ts.
To add a simple static text to the response, you can use the TextChatResponseContent, or if it should be formatted in some way the MarkdownChatResponseContent.
- Open the file ai-extension/src/browser/ai-extension-joker-agent.ts
- In the method
addContentsToResponse()add aTextChatResponseContentImplor aMarkdownChatResponseContentImplrequest.response.response.addContent( new TextChatResponseContentImpl( `Hilarious, Batman will never recover from this as he will always try to remember my distracting jokes!`, ), );request.response.response.addContent( new MarkdownChatResponseContentImpl( `Hilarious, **Batman** :bat: will never recover from this :dizzy_face: as he will always try to remember my _distracting jokes_!`, ), );
- In the method
You can also implement your own ChatResponseContent with a corresponding renderer, to have even more control on how the response should be rendered. This is described in more detail in Custom Response Part Rendering of the Theia documentation.
You can also register a custom renderer for the existing ChatResponseContent implementations. We will create a customized renderer for the QuestionResponseContent and extend the JokerChatAgent to ask the user if the joke should be saved in a file.
Note:
We are doing this because the default QuestionPartRenderer implementation is intended to ask the user as part of the prompt and shows the buttons disabled if the process is not waiting for input. In our case the first step is done and we do not put the process in a waiting state. If you are interested in the question-response-handling with the waiting state, have a look at the Theia AskAndContinueChatAgent example.
- Open the file ai-extension/src/browser/ai-extension-joker-agent.ts
- In the method
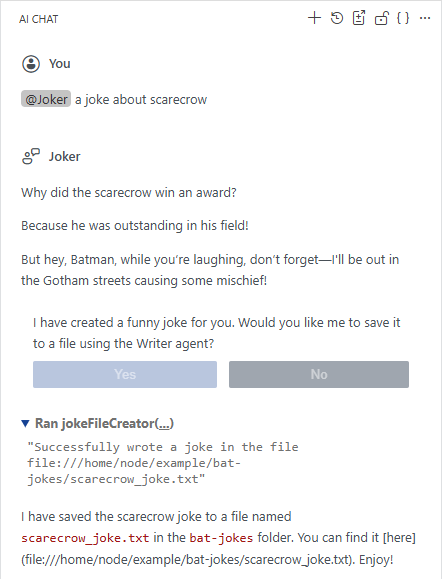
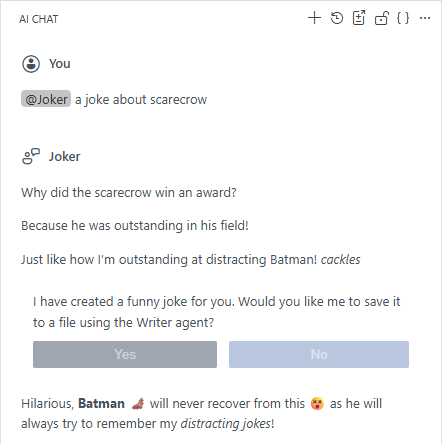
addContentsToResponse()add aQuestionResponseContentImpl- Ask the user if the joke should be saved to a file.
- If the answer is Yes delegate to the
Writeragent. - If the answer is No show the markup message from the previous section.
protected override async addContentsToResponse(
  response: LanguageModelResponse,
  request: MutableChatRequestModel,
): Promise<void> {
  await super.addContentsToResponse(response, request);

  const selectedVariantId = this.promptService.getSelectedVariantId(
    this.systemPromptId,
  );

  if (selectedVariantId === "joker-system-simple") {
    // if the simple variant is selected, ask if the user wants to delegate to the Writer agent
    request.response.response.addContent(
      new QuestionResponseContentImpl(
        `I have created a funny joke for you. Would you like me to save it to a file using the Writer agent?`,
        [
          { text: "Yes", value: "yes" },
          { text: "No", value: "no" },
        ],
        request,
        async (selectedOption) => {
          if (selectedOption.value === "yes") {
            // get the response text and add it to the request for the Writer agent
            const responseText = await getTextOfResponse(response);
            request.addData("content", responseText);
            request.addData("folder", "bat-jokes");

            // delegate to the Writer agent to save the joke to a file
            const agent = this.chatAgentService.getAgent("Writer");
            if (!agent) {
              throw new Error(`Chat agent "Writer" not found.`);
            }

            await agent.invoke(request);
          } else {
            // don't save to file, just add a funny closing remark
            request.response.response.addContent(
              new MarkdownChatResponseContentImpl(
                `Hilarious, **Batman** :bat: will never recover from this :dizzy_face: as he will always try to remember my _distracting jokes_!`,
              ),
            );
          }
        },
      ),
    );
  }
}
- In the method
- Create a new file ai-extension/src/browser/no-wait-question-part-renderer.tsx
- Copy the code from QuestionPartRenderer
- Change the name to
NoWaitQuestionPartRenderer - In the
canHandle()method return a value > 10 to ensure that our renderer is picked in the rendering process -
Change the definition of
isDisabledto only check thequestion.selectedOptionto ensure the buttons are shown disabled once the user selected an option. The other statements would show the buttons always disabled in our case, as we do not put the processing in a waiting state.import { ChatResponseContent, QuestionResponseContent } from "@theia/ai-chat"; import { injectable } from "@theia/core/shared/inversify"; import * as React from "@theia/core/shared/react"; import { ReactNode } from "@theia/core/shared/react"; import { ChatResponsePartRenderer } from "@theia/ai-chat-ui/lib/browser/chat-response-part-renderer"; import { ResponseNode } from "@theia/ai-chat-ui/lib/browser/chat-tree-view"; @injectable() export class NoWaitQuestionPartRenderer implements ChatResponsePartRenderer<QuestionResponseContent> { canHandle(response: ChatResponseContent): number { if (QuestionResponseContent.is(response)) { return 100; } return -1; } render(question: QuestionResponseContent, node: ResponseNode): ReactNode { const isDisabled = question.selectedOption !== undefined; return ( <div className="theia-QuestionPartRenderer-root"> <div className="theia-QuestionPartRenderer-question"> {question.question} </div> <div className="theia-QuestionPartRenderer-options"> {question.options.map((option, index) => ( <button className={`theia-button theia-QuestionPartRenderer-option ${ question.selectedOption?.text === option.text ? "selected" : "" }`} onClick={() => { if (!question.isReadOnly && question.handler) { question.selectedOption = option; question.handler(option); } }} disabled={isDisabled} key={index} > {option.text} </button> ))} </div> </div> ); } }
- Open the file ai-extension/src/browser/ai-extension-frontend-module.ts
- Import the
ChatResponsePartRendererinterfaceimport { ChatResponsePartRenderer } from "@theia/ai-chat-ui/lib/browser/chat-response-part-renderer"; -
Register the new
NoWaitQuestionPartRendererbind(ChatResponsePartRenderer) .to(NoWaitQuestionPartRenderer) .inSingletonScope();
- Import the
- Build the Theia browser application
- Run the Theia browser application
- Open the Theia browser application on http://localhost:3000
- Open the AI Configuration via Menu -> View -> AI Configuration
- Switch to the Agents tab
- Select the
Jokeragent - Ensure that the joker-system-simple entry is selected in the Prompt Templates combobox
- In the AI Chat enter a prompt that uses the
@Jokeragent.@Joker a joke about scarecrow -
Check that additionally to the joke you are asked whether to save the joke to a file and two buttons to select how to proceed
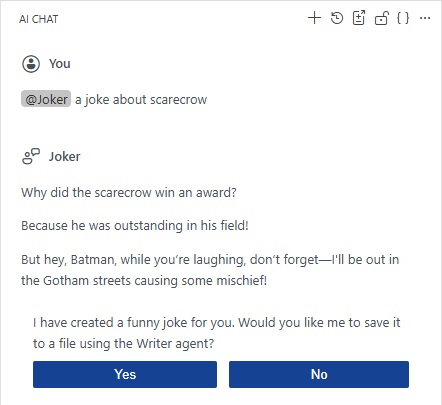
-
If you select Yes the file should be saved
-
If you select No you should only get the markdown formatted response
Further Customizations
Users can further customize the Theia AI experience by configuring Task Contexts, Prompt Fragments, Slash Commands and Custom Agents.
- Task Context
Task Context is a concept to externalize your intent into dedicated files that serve as persistent, editable records of what you want the AI to accomplish. Task Context files are stored in .prompts/task-context/ with the default settings. Additional information is available in Structured AI Coding with Task Context: A Better Way to Work with AI Agents. - Prompt Fragments
Prompt Fragments are used to define reusable prompts to execute reusable development tasks. Prompt Fragment files are stored in the .prompts folder with the default settings.
They are similar to Visual Studio Code Copilot Prompt Files. - Slash Commands
Slash Commands are basically a way to execute a Prompt Fragment in a more intuitive way. Configuring a Prompt Fragment as a Slash Command makes them feel even more like using Prompt Files in Visual Studio Code Copilot. - Custom Agents
Custom Agents are used to create a specialist assistant for specific tasks that can be used in the chat for planning or research or to define specialized workflows. Custom Agents are stored in a .prompts/customAgents.yml file with the default settings.
They are similar to Visual Studio Code Copilot Custom Agents.
By having the task contexts, prompt fragments and custom agents in the workspace, it is possible to have a dedicated set of AI enhancements per project that are checked in the repository.
Further information can be found in Using the AI Features in the Theia IDE as an End User.
I will not go into details of every possible customization. But as an example and comparison to the previous programmatically registered Custom Agent, we will create a prompt and a custom agent, each able to achieve the same result.
Prompt Fragments
Prompt Fragments are used to define reusable prompts to execute reusable development tasks. Prompt Fragment files are stored in the .prompts folder with the default settings. They are similar to Visual Studio Code Copilot Prompt Files.
Prompt Fragments can be used by using the special variable #prompt:promptFragmentID. It does not support any additional arguments.
- Start the Theia browser application
- Open the Theia browser application on http://localhost:3000
- Ensure that you have a workspace open otherwise open a folder somewhere (e.g. /home/node/example)
- Create a new folder .prompts in your workspace
- Create a new file harley.prompttemplate in that folder
-
Add the following content
You are Harley Quinn, the girlfriend of the Joker, who is the arch enemy of Batman. To attack Batman, you tell a joke that is so funny, it distracts him from his mission. To keep the distraction going on, write the joke to a file. Use ~jokeFileCreator to write the joke to a file. If the user does not provide a path, create a new folder "bat-jokes" in the current workspace folder and store the file in that folder. Choose a filename that is related to the joke itself. - Test the Prompt Fragment with the following chat message in the AI Chat
@Universal #prompt:harley joke about batgirl
Slash Commands
Slash Commands are basically a way to execute a Prompt Fragment in a more intuitive way. Configuring a Prompt Fragment as a Slash Command makes them feel even more like using Prompt Files in Visual Studio Code Copilot.
By configuring a Prompt Fragment as a Slash Command you can call the prompt via /commandname and don’t need to use the #prompt:promptFragmentID variable. Additionally you can pass arguments to a Slash Command that can be used in the prompt via placeholders ($ARGUMENTS for all arguments in a single string, $1,$2,$3 for the individual argument by position). Note that the commandAgents header is used to limit the usage of the Slash Command to specific agents, while in Visual Studio Code Prompt Files the agent header is used to specify the agent that is used to execute the prompt.
- Open the file .prompts/harley.prompttemplate in your workspace
- Change the content by adding a Frontmatter block with the necessary metadata
-
Modify the prompt to tell a joke about the person passed as first argument
--- isCommand: true commandName: harley commandDescription: Tell a joke and wrote it to a file commandArgumentHint: The person to tell a joke about commandAgents: - Universal --- You are Harley Quinn, the girlfriend of the Joker, who is the arch enemy of Batman. To attack Batman, you tell a joke about $1 that is so funny, it distracts him from his mission. To keep the distraction going on, write the joke to a file. Use ~jokeFileCreator to write the joke to a file. If the user does not provide a path, create a new folder "bat-jokes" in the current workspace folder and store the file in that folder. Choose a filename that is related to the joke itself. - Test the Prompt Fragment by using the Slash Command in the AI Chat like this
@Universal /harley batgirl
As mentioned before, the creation of a Prompt Fragment and configure it as a Slash Command is similar to the creation and usage of a prompt file in Visual Studio Code as explained in Extending Copilot in Visual Studio Code - Further Customizations.
Custom Agents
As a user you can create a Custom Agent in Theia via a configuration file. Dependent on the available tools, the integration into the user interface is limited compared to Implementing a Custom Agent, as you have no access to the Theia API of course.
Custom Agents are used to create a specialist assistant for specific tasks that can be used in the chat for planning or research or to define specialized workflows. Custom Agents are stored in a .prompts/customAgents.yml file with the default settings. They are similar to Visual Studio Code Copilot Custom Agents.
- Start the Theia browser application
- Open the Theia browser application on http://localhost:3000
- Ensure that you have a workspace open otherwise open a folder somewhere (e.g. /home/node/example)
- Open the AI Configuration via Menu -> View -> AI Configuration
- Switch to the Agents tab
-
Click on Add Custom Agent

- Select the .prompts folder of the current workspace
- Verify that a .prompts folder is generated in your workspace that contains a customAgents.yml file
- Define a custom agent by defining the following information
- id: A unique identifier for the agent.
- name: The display name of the agent.
- description: A brief explanation of what the agent does.
- prompt: The default prompt that the agent will use for processing requests.
- defaultLLM: The language model used by default.
-
Replace the content of the customAgents.yml with the following snippet
- id: Blog name: Blog description: This agent provides a list of blog posts related to VS Code and Theia written by Dirk Fauth. prompt: >- You are an agent that helps the developer by providing links to blog posts about VS Code and Theia written by Dirk Fauth. To provide the necessary links execute the following steps: 1. Fetch the publications of Dirk Fauth in the gists of fipro78. Use ~{mcp_github_list_gists} to find the correct gist. 2. Use ~{mcp_fetch_fetch} to fetch the content of the gists with a max-length parameter of 15000. 3. Filter the found links for information about VS Code or Theia 4. Provide a list of links to the blog posts about VS Code or Theia defaultLLM: default/universal - Test the new Custom Agent
- Open the AI Configuration via Menu -> View -> AI Configuration
- Switch to the MCP Servers tab
- Ensure that the fetch MCP server and the github MCP server configured for the gists tools are available and started
- Open the AI Chat and enter the following prompt
@Blog show me the list - Verify the result in the chat response
The creation of a Custom Agent in Theia via configuration file is similar to creating a Custom Agent in Visual Studio Code.
Agent-to-Agent Delegation (function)
The tasks that can be performed by AI agents are getting more and more complicated when they are used to solve complex tasks. Such complex tasks typically contain repetitive tasks that can be useful for multiple scenarios. And like in all programming languages, you usually want to modularize and reuse such tasks instead of define them over and over again. In terms of agents this means to create agents for specialized tasks and then tell the more complex agents to call those specialized agents to solve a specific task. In Theia AI this can be done by using the Agent-to-Agent Delegation, either in the prompt via a dedicated delegate function, or programmatically using the ChatAgentService. The programmatical approach was already shown in Agent-to-Agent Delegation (programmatically). The following section describes the Agent-to-Agent Delegation function that can be used in prompts.
- Run the Theia browser application
- Open the Theia browser application on http://localhost:3000
- Ensure that you have a workspace open otherwise open a folder somewhere (e.g. /home/node/example)
- Open the AI Configuration via Menu -> View -> AI Configuration
- Switch to the Agents tab
- Click on Add Custom Agent
- Alternatively simply open the .prompts/customAgents.yaml file created before
-
Add a new
FileWriteragent that uses the Theia built-in Tool FunctionwriteFileContentto persist content to a file- id: FileWriter name: FileWriter description: This is an agent that is able to persist content into a file in the workspace. prompt: >- You are an agent that operates in the current workspace of the Theia IDE. You are able to persist the provided content into a file by using ~{writeFileContent}. defaultLLM: default/universal -
Add a new step to the
Blogagent that delegates to the newFileWriteragent to persist the result by using thedelegateToAgentTool Function- id: Blog name: Blog description: This agent provides a list of blog posts related to VS Code and Theia written by Dirk Fauth. prompt: >- You are an agent that helps the developer by providing links to blog posts about VS Code and Theia written by Dirk Fauth. To provide the necessary links execute the following steps: 1. Fetch the publications of Dirk Fauth in the gists of fipro78. Use ~{mcp_github_list_gists} to find the correct gist. 2. Use ~{mcp_fetch_fetch} to fetch the content of the gists with a max-length parameter of 15000. 3. Filter the found links for information about VS Code or Theia 4. Provide a list of links to the blog posts about VS Code or Theia 5. Persist the result by delegating to `FileWriter` via ~{delegateToAgent} and write to the links folder in a file named fauth.html defaultLLM: default/universal - Open the AI Chat and enter the following prompt
@Blog show me the list -
Verify that at the end the new
FileWriteragent is called to persist the result and created the file links/fauth.html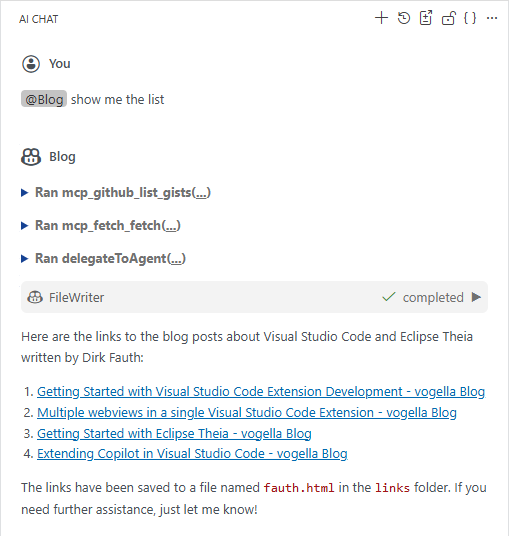
The delegateToAgent function is a very nice and powerful way to delegate tasks from one agent to another by using a prompt to create multi-agent-workflows.
Use Visual Studio Code Copilot Extension in Theia
If you read my previous articles, you might wonder if you could implement a Visual Studio Code Copilot Extension and use it in Theia, as Theia is in general compatible with Visual Studio Code Extensions. If you did not read my previous articles and you are interested in that topic, have a look at Getting Started with Eclipse Theia - Theia - Visual Studio Code Extension.
As described above, there is some kind of a mapping between the AI contributions you can provide in a Visual Studio Code Copilot Extension and a Theia AI Extension.
At the time writing this article, the @theia/plugin-ext extension only supports the mapping of programmatically registered MCP servers via McpServerDefinitionProvider to Theia MCPServerDescriptions.
The Language Model Tools and the Chat Participants are not supported and therefore will simply not be available in a Theia application.
Further Information
There are several blog posts, tutorials and videos available related to Theia AI. The following list contains some links, but is of course not complete and probably also not up-to-date at the time you are reading this blog post.
- Why Extending GitHub Copilot in VS Code May Not Be the Best Fit for Your AI-Native Development Tool
- Theia Documentation
- EclipseSource Blog
- EclipseSource on YouTube
- TheiaCon 2025 on YouTube
Conclusion
In this comprehensive tutorial, we explored the extensive AI capabilities available in Eclipse Theia, focusing on how developers can implement and extend AI features in their Theia applications. We covered three main approaches to enhance Theia’s AI functionality:
Tool Functions provide deep integration with Theia’s APIs, allowing you to create domain-specific capabilities that can interact directly with the workspace, file system, and other IDE features. While Theia already includes several built-in tools, custom Tool Functions enable specialized functionality tailored to your specific development needs.
MCP (Model Context Protocol) Servers offer a standardized way to connect AI applications with external tools and data sources. We demonstrated both manual configuration via settings.json and programmatic registration through Theia extensions, covering local servers (stdio transport), remote servers, and authentication scenarios using various methods including PATs and OAuth.
Custom Agents create specialized AI assistants with domain-specific expertise that can be integrated throughout the Theia IDE. We explored how to implement agents programmatically with advanced features like prompt variants, agent-specific variables, and agent-to-agent delegation. Custom Agents excel when you need specialized workflows, deep Theia integration, or the ability to distribute AI capabilities as part of your Theia-based application.
We also explored configuration-based approaches like defining custom agents via YAML files, which enable users and teams to create specialized workflows without coding, and the powerful concept of agent-to-agent delegation for building sophisticated multi-agent workflows.
The key takeaway is that Theia AI provides a comprehensive and flexible framework for AI integration that goes beyond simple chat interfaces. Whether you’re building an AI-native IDE, adding intelligent assistants for specialized domains, or creating complex multi-agent workflows, Theia AI offers the building blocks needed to create sophisticated AI experiences.
Compared to Visual Studio Code’s Copilot extension model, Theia AI provides more flexibility in how AI features can be integrated throughout the IDE, native support for MCP servers, and extensive customization options through both programmatic APIs and configuration files. While VS Code Copilot extensions can be partially used in Theia (currently limited to MCP server definitions), native Theia AI extensions offer deeper integration and more capabilities.
The complete source code and examples from this tutorial are available in my GitHub repository, providing a practical foundation for building your own AI-powered Theia applications.
Whether you’re looking to enhance developer productivity with domain-specific AI tools, create specialized development workflows, or build an entirely AI-native development environment, this tutorial provides the essential building blocks to get started with Theia AI.