
Extending Copilot in Visual Studio Code
In this tutorial I will explain how to extend Visual Studio Code with a customized AI experience. By creating a Visual Studio Code Copilot Extension, we will contribute tools, MCP servers and chat participants, to provide AI features with domain expert know-how.
Obviously we will use and extend Copilot to achieve this. There are also other Visual Studio Code extensions to integrate AI in Visual Studio Code, but Copilot is the most prominent integration and there are several tutorials available I will refer to. This way it is easier to get started with those kind of extensions.
The article AI extensibility in VS Code gives an overview of the AI extensibility options in Visual Studio Code. In this tutorial we will
- create a custom Language Model Tool
- configure and contribute MCP Server
- create a custom Chat Participant
In first place this tutorial is about extending GitHub Copilot in Visual Studio code and not a tutorial about using it. If you are interested in that, have a look at Get started with GitHub Copilot in VS Code.
Prerequisites
To follow this tutorial you need the following tools and services:
- Visual Studio Code >= 1.113.0
- Copilot Extension
- Copilot Account (e.g. GitHub Copilot Free)
Project Setup
As this tutorial is part of my Visual Studio Code Extension - Theia - Cookbook, I will use the Dev Container created with the Getting Started with Visual Studio Code Extension Development.
Note:
If you are familiar with setting up a new Visual Studio Code Extension project or you don’t want to use the Cookbook sources and the Dev Container setup defined there as a starting point, you can create the project setup yourself, skip the following section and directly move on to Language Model Tool.
- Clone the Visual Studio Code Extension - Theia - Cookbook GitHub Repository from the theia_getting_started branch. You can also use the getting_started branch if you are not interested in the Eclipse Theia related sources in the repository.
git clone -b theia_getting_started https://github.com/fipro78/vscode_theia_cookbook.git - Switch to the new folder and open Visual Studio Code
cd vscode_theia_cookbook code . - When asked, select Reopen in Container to build and open the project in the Dev Container
Create the Visual Studio Code Extension project
Create a new Visual Studio Code Extension project:
-
Open a Terminal and execute the following command
yo code -
Answer the questions of the wizard for example like shown below:
# ? What type of extension do you want to create? New Extension (TypeScript)
# ? What's the name of your extension? copilot-extension
# ? What's the identifier of your extension? copilot-extension
# ? What's the description of your extension? LEAVE BLANK
# ? Initialize a git repository? No
# ? Which bundler to use? unbundled
# ? Which package manager to use? npm

# ? Do you want to open the new folder with Visual Studio Code? Skip
A new subfolder copilot-extension will be created that contains the sources of the Visual Studio Code Extension.
The cookbook repository is setup as a mono-repo, therefore the Visual Studio Code Extension is kept in a subfolder. The following modifications are needed to include the newly created extension project to the setup:
-
Edit the .vscode/tasks.json
- Add a task for watching the new copilot extension
{ "label": "Copilot Extension Watch", "type": "shell", "command": "npm run watch", "problemMatcher": "$tsc-watch", "isBackground": true, "presentation": { "reveal": "never" }, "group": { "kind": "build" }, "options": { "cwd": "${workspaceFolder}/copilot-extension" } },- Update the default build task Watch Extensions and add the new Copilot Extension Watch to the
dependsOnconfiguration
{ "label": "Watch Extensions", "group": { "kind": "build", "isDefault": true }, "dependsOn": [ "VS Code Extension Watch", "Angular Extension Watch", "React Extension Watch", "Copilot Extension Watch" ] }, -
Edit the .vscode/launch.json and add the new project folder to the
extensionDevelopmentPathand theoutFiles{ "name": "Run Extension", "type": "extensionHost", "request": "launch", "args": [ "--extensionDevelopmentPath=${workspaceFolder}/vscode-extension", "--extensionDevelopmentPath=${workspaceFolder}/angular-extension", "--extensionDevelopmentPath=${workspaceFolder}/react-extension", "--extensionDevelopmentPath=${workspaceFolder}/copilot-extension" ], "outFiles": [ "${workspaceFolder}/vscode-extension/out/**/*.js", "${workspaceFolder}/angular-extension/dist/**/*.js", "${workspaceFolder}/react-extension/dist/**/*.js", "${workspaceFolder}/copilot-extension/dist/**/*.js" ], "preLaunchTask": "${defaultBuildTask}", "postDebugTask": "Terminate Tasks" },You can also add a new run configuration that only starts the new extension if you want to focus on the new extension:
{
  "name": "Run Copilot Extension",
  "type": "extensionHost",
  "request": "launch",
  "args": [
    "--extensionDevelopmentPath=${workspaceFolder}/copilot-extension"
  ],
  "outFiles": ["${workspaceFolder}/copilot-extension/out/**/*.js"],
  "preLaunchTask": "Copilot Extension Watch",
  "postDebugTask": "Terminate Tasks"
},
Note:
If you are not starting from a plain project setup and not using the Cookbook GitHub Repository, the postDebugTask will fail as it does not exist. In that case add it to the tasks.json as explained in Automatic Termination of Watch Tasks.
-
Delete the copilot-extension/.vscode folder
rm -rf copilot-extension/.vscode
To verify that the setup works, open the file copilot-extension/src/extension.ts and press F5 to start a new Visual Studio Code instance with the extension, open the Command Palette (CTRL + SHIFT + P) and search for Hello to run the command.
If you only want to start the new copilot-extension in the Extension Host, switch first to the Run and Debug view (CTRL + SHIFT + D) and select Run Copilot Extension in the dropdown.
Language Model Tool
Adding a Language Model Tool enables you to extend the functionality of a large language model (LLM) in the chat with domain-specific capabilities. This is also possible via specialized MCP Server which will be described later. The main difference between a Language Model Tool and a MCP Server is that a Language Model Tool can deeply integrate with Visual Studio Code by using the VS Code APIs, while MCP Server provide access to external tools that don’t need to access to the VS Code API.
Further details can be found in Language Model Tool API.
In this section we will create a Language Model Tool that creates a file in the current workspace that contains a joke as content.
Note:
Actually Visual Studio Code already contains built-in language model tools that are able to interact with the workspace. So the following implementation is not necessary to achieve the result. It is intended as an example how the implementation of a Language Model Tool could look like.
-
Open the file copilot-extension/package.json
-
Replace the
contributessection with the following snippet:"contributes": { "languageModelTools": [ { "name": "chat-tools-joke", "displayName": "Joke File Creator", "toolReferenceName": "jokeFileCreator", "canBeReferencedInPrompt": true, "icon": "$(files)", "userDescription": "Create a file that contains a joke.", "modelDescription": "Create a file at the given path that contains a joke.", "inputSchema": { "type": "object", "properties": { "path": { "type": "string", "description": "The name of the folder in the workspace where the joke file should be created." }, "filename": { "type": "string", "description": "The name of the jokefile that should be created." }, "joke": { "type": "string", "description": "The joke content to be written in the joke file." } } } } ] },
-
-
Create a new file copilot-extension/src/joke-file-creator.ts
-
Import the VS Code API
import * as vscode from "vscode"; -
Define an interface for the tool parameters that matches the inputSchema in the package.json
interface IJokeFileParameters { path: string; filename: string; joke: string; } -
Create a class that implements
vscode.LanguageModelToolexport class JokeFileCreatorTool implements vscode.LanguageModelTool<IJokeFileParameters> {}- Add the following
prepareInvocation()method to provide tool configuration messages.
prepareInvocation?(
    options: vscode.LanguageModelToolInvocationPrepareOptions<IJokeFileParameters>,
    token: vscode.CancellationToken
): vscode.ProviderResult<vscode.PreparedToolInvocation> {
    const confirmationMessages = {
    title: "Create a joke file",
    message: new vscode.MarkdownString(
        (options.input.path !== undefined && options.input.path !== "")
        ? `Create a joke file in ${options.input.path}?`
        : "Create a joke file in the workspace root?"
    ),
    };

    return {
    invocationMessage: "Create a joke file",
    confirmationMessages,
    };
}
Note:
If you returnundefined, the generic confirmation message will be shown.- Add the following
invoke()method which is called when the language model tool is invoked while processing a chat prompt.
async invoke( options: vscode.LanguageModelToolInvocationOptions<IJokeFileParameters>, token: vscode.CancellationToken ): Promise<vscode.LanguageModelToolResult | null | undefined> { const params = options.input; const result = await this.createJokeFile( params.path, params.filename, params.joke ); if (result.length > 0) { return new vscode.LanguageModelToolResult([ new vscode.LanguageModelTextPart(result), ]); } else { return new vscode.LanguageModelToolResult([ new vscode.LanguageModelTextPart(`Joke file creation failed`), ]); } } public async createJokeFile( path: string, filename: string, jokeContent: string ): Promise<string> { const workspaceFolders = vscode.workspace.workspaceFolders; if (!workspaceFolders) { vscode.window.showErrorMessage("No workspace folder open."); return ""; } let folder = workspaceFolders[0]; let pathUri = vscode.Uri.joinPath(folder.uri, path); try { await vscode.workspace.fs.stat(pathUri); } catch { vscode.workspace.fs.createDirectory(pathUri); } const fileUri = vscode.Uri.joinPath(pathUri, filename); try { await vscode.workspace.fs.writeFile( fileUri, Buffer.from(jokeContent, "utf8") ); return `Joke file "${fileUri}" created!`; } catch (error) { return `Failed to create joke file: ${error}`; } } - Add the following
-
Change copilot-extension/src/extension.ts
- Replace the existing example code with the following snippet
// The module 'vscode' contains the VS Code extensibility API
// Import the module and reference it with the alias vscode in your code below
import * as vscode from "vscode";
import { JokeFileCreatorTool } from "./joke-file-creator";

// This method is called when your extension is activated
// Your extension is activated the very first time the command is executed
export function activate(context: vscode.ExtensionContext) {
  // This line of code will only be executed once when your extension is activated
  console.log(
    'Congratulations, your extension "copilot-extension" is now active!'
  );

  // Register our custom joke creator language model tool
  // Use the name property of the tool configured in the package.json
  context.subscriptions.push(
    vscode.lm.registerTool("chat-tools-joke", new JokeFileCreatorTool())
  );
}

// This method is called when your extension is deactivated
export function deactivate() {}
-
If everything is correctly in place, you can verify the Language Model Tool like this:
- You need an open workspace to make the Language Model Tool work. To be able to open a workspace in the Extension Host create a folder example in the home directory of the node user in the Dev Container
mkdir ~/example - Press F5 to start a new Visual Studio Code instance with the extension
- Open a folder via File -> Open Folder… and select the created example folder
- Open the Copilot Chat Editor if it is not open yet
-
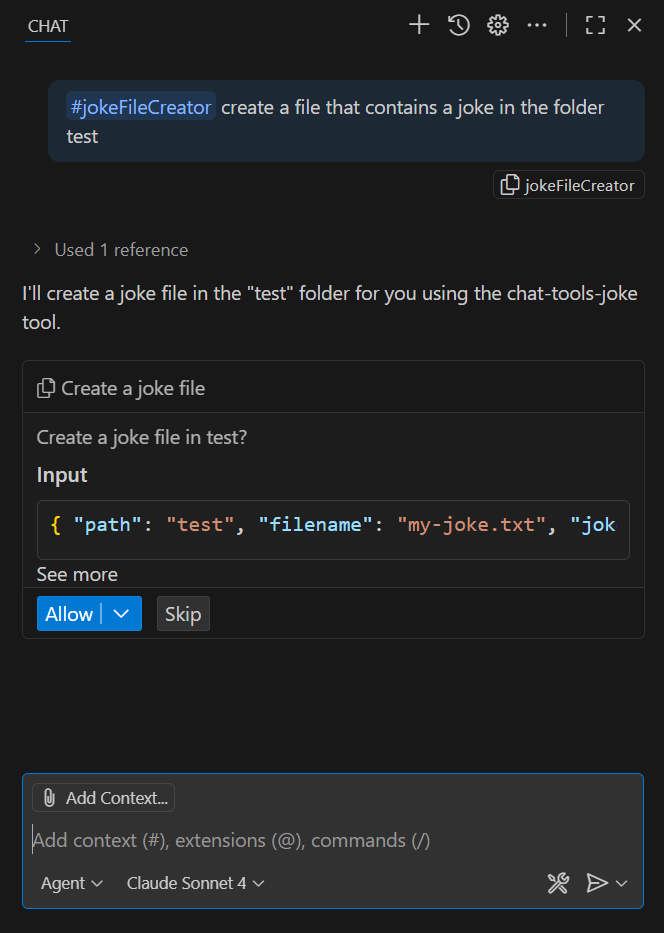
Enter the following input to the Copilot Chat to execute the contributed Language Model Tool
#jokeFileCreator create a file that contains a joke in the folder test
-
In the chat you will see that a prompt comes up that asks you whether to Allow the execution of the tool or if you want to Skip it. Click on Allow or even select for example Allow in this Workspace from the dropdown so you don’t need to allow the execution of the tool in the future.
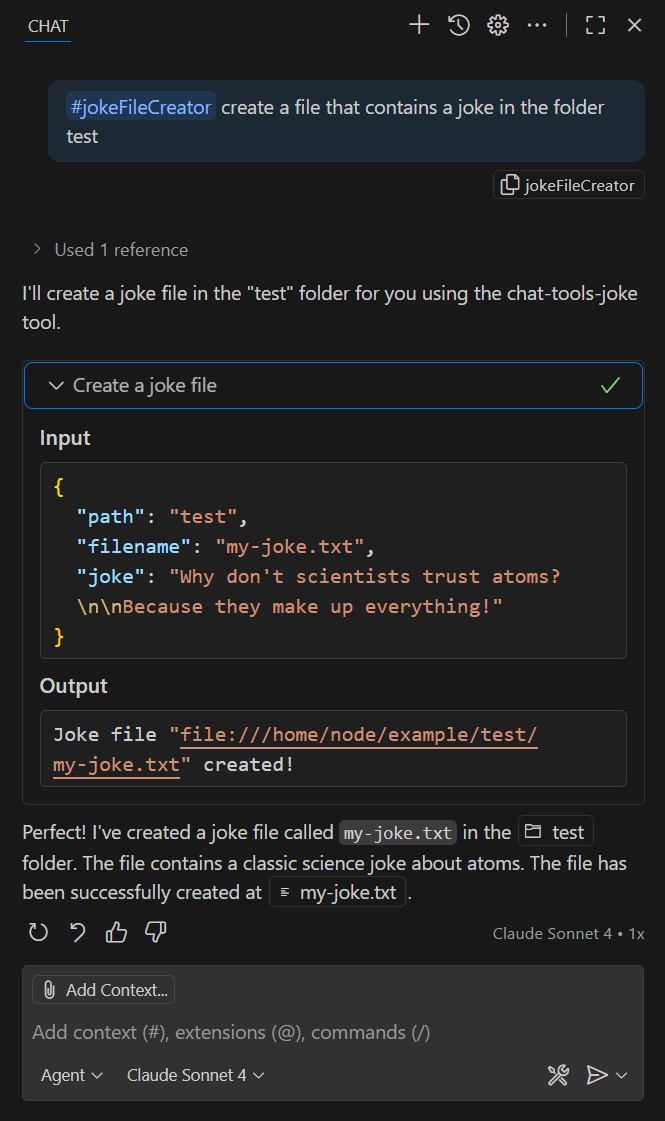
-
Check the Input and Output of the tool in the chat and ensure that the file was created in the correct place with the desired content.
MCP Server
MCP, or Model Context Protocol, is an open protocol to standardize how AI applications connect with external tools and data sources. MCP servers can offer resources, prompts and tools that can be used by a client.
In this section we will cover how to add MCP servers to Visual Studio Code and the usage of tools.
There are basically two types of MCP servers:
- Local MCP servers (stdio transport)
A local MCP server runs on the same machine as the MCP client and is used to access local resources like files or run local scripts. Local servers are essential for tasks that require accessing local files or data that is not available remotely. - Remote MCP servers (streamable HTTP or server-sent events)
There are several ways to add MCP servers to Visual Studio Code:
- Directly install them e.g. via a website like MCP Servers for agent mode
This will create a mcp.json file in C:\Users\<NT_USER>\AppData\Roaming\Code\User with the configuration of the MCP server - Via mcp.json server configuration file, e.g. in the workspace in .vscode/mcp.json
- Programmatically via a Visual Studio Code Extension
It is also possible to configure MCP servers in a Dev Container via devcontainer.json. This is described in Dev Container support.
In the following section I will describe how to manually configure MCP servers via mcp.json and programmatically via Visual Studio Code extension.
We will install
- the Filesystem MCP Server as a local MCP Server
- the Fetch MCP Server as a remote MCP Server
- the GitHub MCP Server as a remote MCP Server that requires an authorization
Add MCP server via mcp.json
In the following section we will add MCP servers via mcp.json file. This can be done in the Visual Studio Code instance that you use to follow this tutorial (not the Extension Host for running the created extension).
Local MCP Server
- Create a new file .vscode/mcp.json
-
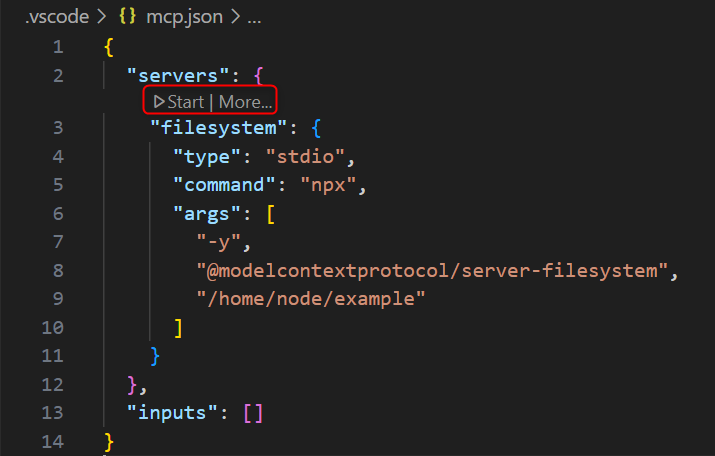
Add the following content to configure the filesystem server as local MCP server.
{
  "servers": {
    "filesystem": {
      "type": "stdio",
      "command": "npx",
      "args": ["-y", "@modelcontextprotocol/server-filesystem"]
    }
  },
  "inputs": []
}
Note:
The Filesystem MCP Server supports Roots and Visual Studio Code sets the roots to the workspace directory. You can set additional allowed directories via args, but they will be replaced by the roots provided by Visual Studio Code. You can therefore skip setting allowed directories as they will be replaced automatically with the workspace folder.
- In the editor you will see actions provided as CodeLens that let you interact with the server. Click on Start to start the filesystem MCP server.
This will start the server and discover the capabilities and tools provided by the server. These tools can then be used in the Copilot Chat in agent mode.
-
Test if the configuration works
- Ensure to have the Agent mode enabled.
-
Enter the following to the Copilot Chat
list allowed directories - When asked if the tool
list_allowed_directoriesshould be executed, select Allow - You should now see that the
list_allowed_directoriestool from the filesystem (MCP Server) is executed to solve your request.
Remote MCP Server
- Add the following content to the mcp.json to configure the
fetchserver as remote MCP server."fetch": { "url": "https://remote.mcpservers.org/fetch/mcp", "type": "http" }Note:
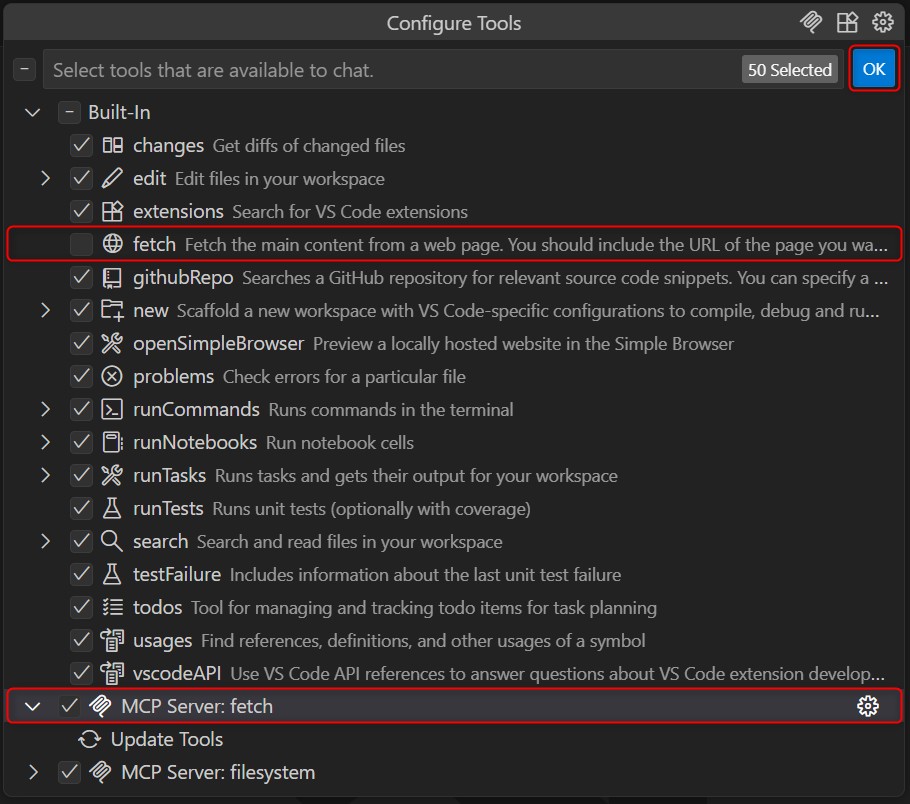
Visual Studio Code already providesfetchas a built-in tool. So this is actually not needed for usage, but an example to show a simple remote MCP server configuration. For testing that the added remotefetchMCP server works- Click on Configure Tools…
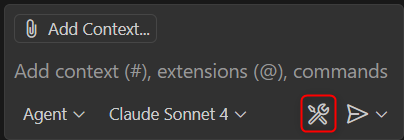
- Disable the built-in
fetchtool - Enable the added MCP server
fetchin the configuration - Click on OK to apply the changes
- Click on Configure Tools…
- Start the fetch MCP server via Codelens
- Test if the configuration works by entering the following to the Copilot Chat
fetch the content from https://eclipse.dev/nattable - When asked if the tool
fetch- fetch (MCP Server) should be executed, select Allow - You should now see that the
fetchtool from the fetch (MCP Server) is executed to solve your request.
Remote MCP Server with authorization
Most of the remote MCP servers require an authorization in order to work. Although of course possible, you typically don’t want to write the token in plain text into the mcp.json file, as you don’t want to share your personal token with other project members. Instead you can deal with the authorization token the following ways:
- use input variables
- use environment variables
To demonstrate this we use the GitHub MCP Server with a PAT (Personal Access Token). This is also described in Using the GitHub MCP Server.
- Create a Personal Access Token as described in Creating a personal access token (classic)
- Use repo as scope
You can use the GitHub MCP server locally via Docker. To make this work in a Dev Container you need the docker-in-docker feature added to the devcontainer.json.
"features": {
  "ghcr.io/devcontainers/features/docker-in-docker:2": {},
}
The local GitHub MCP server can then be configured in the mcp.json file like this:
"github": {
  "command": "docker",
  "args": [
    "run",
    "-i",
    "--rm",
    "-e",
    "GITHUB_PERSONAL_ACCESS_TOKEN",
    "ghcr.io/github/github-mcp-server"
  ],
  "env": {
    "GITHUB_PERSONAL_ACCESS_TOKEN": "${input:github_token}"
  }
}
Note the ${input:github_token} in the env section. The input parameter needs to be configured in the following way in the inputs section of the mcp.json file.
"inputs": [
  {
    "type": "promptString",
    "id": "github_token",
    "description": "GitHub Personal Access Token",
    "password": true
  }
]
Inputs will be prompted on first server start and then stored securely by Visual Studio Code.
Further information about input variables can be found here:
Instead of using the GitHub MCP server locally, you can directly use the GitHub hosted server as explained in A practical guide on how to use the GitHub MCP server
"github": {
  "url": "https://api.githubcopilot.com/mcp/",
  "type": "http",
  "headers": {
    "Authorization": "Bearer ${input:github_token}"
  }
}
Instead of using an input, you can also use an environment variable as explained in Environment variables
"github": {
  "url": "https://api.githubcopilot.com/mcp/",
  "type": "http",
  "headers": {
    "Authorization": "Bearer ${env:GITHUB_TOKEN}"
  }
}
By using ${env:GITHUB_TOKEN} instead of the input variable the environment variable with the name GITHUB_TOKEN will be used for setting the authorization token.
Once the environment variable is set in your system and available, update the .devcontainer/devcontainer.json file and add the following configuration as described in Visual Studio Code - Environment variables
"remoteEnv": {
  "GITHUB_TOKEN": "${localEnv:GITHUB_TOKEN}"
},
Instead of using the Bearer token for authorization, GitHub recommends the usage of OAuth for the GitHub MCP server. In that case simply drop the headers section and you will be asked for the authentication on starting the server.
"github": {
  "url": "https://api.githubcopilot.com/mcp/",
  "type": "http"
}
As the GitHub MCP Server provides a huge set of tools, the tools are categorized and not all tools are enabled by default. If you for example want to use the GitHub Gist related tools, you need to enable that. This can either be done by using the explicit MCP URL
"github_gists": {
  "url": "https://api.githubcopilot.com/mcp/x/gists",
  "type": "http"
}
or by setting the optional header X-MCP-Toolsets
"github": {
  "url": "https://api.githubcopilot.com/mcp/",
  "type": "http",
  "headers": {
    "X-MCP-Toolsets": "gists"
  }
}
Further details about this are available in Remote GitHub MCP Server.
- Test if the GitHub MCP Server configuration works
- Start the server
- Ensure to have the Agent mode activated in the chat
- Enter the following in the chat
fetch the publications written by Dirk Fauth. Inspect the gists of fipro78 and provide the links to blog posts about VS Code and Eclipse Theia in the chat that are extracted from a related gists file
Note:
The default .gitignore or at least the .gitignore in the cookbook repository by default ignores the whole .vscode folder and excludes the default settings JSON files.
With this configuration the mcp.json file will be ignored. This makes sense to avoid that by accident configurations with hard coded authorization tokens are added to the repository.
If you are sure that no private data is contained in the mcp.json file, e.g. because you use the OAuth mechanism for the GitHub MCP server, you can exclude the mcp.json file
from the ignore list by adding the following line to the .gitignore in the project root:
!.vscode/mcp.json
Add MCP server programmatically via VS Code Extension
You can also register MCP server programmatically via a Visual Studio Code extension. This way you can for example bundle AI extensions like chat participants or the direct usage of the Language Model API with the registration of MCP servers that are needed for the provided functionality.
-
Open the file copilot-extension/package.json
-
Extend the
contributessection with the followingmcpServerDefinitionProviders"contributes": { "mcpServerDefinitionProviders": [ { "id": "custom-mcp", "label": "Custom MCP Server Provider" } ] }, -
To ensure that the MCP servers are registered automatically, you need to configure the
activationEventsaccordingly, e.g.onStartupFinished. Otherwise the extension is not activated and the MCP servers are not registered. Alternatively you can of course use another activation event based on some other constraint."activationEvents": [ "onStartupFinished" ],
-
-
Open the file copilot-extension/src/extension.ts
-
Register the
McpServerDefinitionProviderin theactivate()method.const didChangeEmitter = new vscode.EventEmitter<void>(); context.subscriptions.push( vscode.lm.registerMcpServerDefinitionProvider("custom-mcp", { onDidChangeMcpServerDefinitions: didChangeEmitter.event, provideMcpServerDefinitions: async () => { let servers: vscode.McpServerDefinition[] = []; // add the servers return servers; }, }) ); -
Add a local MCP server by using
vscode.McpStdioServerDefinition(right after the// add the serverscomment)servers.push( new vscode.McpStdioServerDefinition("filesystem", "npx", [ "-y", "@modelcontextprotocol/server-filesystem", "/home/node/example", ]) ); -
Add a remote MCP server by using
vscode.McpHttpServerDefinitionservers.push( new vscode.McpHttpServerDefinition( "fetch", vscode.Uri.parse("https://remote.mcpservers.org/fetch/mcp") ) );
There are some flaws related to programmatically registered MCP servers:
- There is no programmatical way to autostart a MCP server.
- They do not show up in the MCP Servers section of the Extensions view.
- They don’t get roots set.
The resources and tools provided by a MCP server are loaded and cached on the first start. But because of the above reasons, a programmatically registered MCP servers will not be started automatically and needs a user interaction for the first start. The only way to manage programmatically registered MCP servers manually is to use the command MCP: List Servers command from the Command Palette (F1) to view the list of configured MCP servers.
- Command Palette (F1) -> MCP: List Servers -> select the server to start -> Start Server
There is also a configuration Chat > MCP: Autostart available that lets a user define an autostart behavior for MCP servers.
- Command Palette (F1) -> Preferences: Open User Settings -> search for autostart -> Chat > MCP: Autostart - set the value to
newAndOutdated("chat.mcp.autostart": "newAndOutdated"in the settings JSON).
With this setting even programmatically registered MCP servers can be autostarted. But as for example the roots are not set by Visual Studio Code to programmatically registered MCP servers, the
filesystemMCP server can be configured to access an directory outside the workspace via the allowed directories parameter, in the above configuration /home/node/example. -
-
Run the extension by pressing F5
- Check that the MCP servers are started, either manually via command palette or have the
chat.mcp.autostartsetting enabled. - Test if the programmatically registered MCP server works, e.g. by entering the following into the chat
show me the directory tree of the allowed directories
- Check that the MCP servers are started, either manually via command palette or have the
If you need to pass an authorization token via header like the PAT for the GitHub MCP server, you can for example read an environment variable or hard-code it and pass the Authorization header
let token = process.env.GITHUB_TOKEN;
servers.push(
new vscode.McpHttpServerDefinition(
"github",
vscode.Uri.parse("https://api.githubcopilot.com/mcp/"),
{
Authorization: `Bearer ${token}`,
}
)
);
Alternatively it is possible to get the token interactively by implementing resolveMcpServerDefinition() of the McpServerDefinitionProvider
export function activate(context: vscode.ExtensionContext) {
const didChangeEmitter = new vscode.EventEmitter<void>();
context.subscriptions.push(
vscode.lm.registerMcpServerDefinitionProvider("etas-mcp", {
onDidChangeMcpServerDefinitions: didChangeEmitter.event,
provideMcpServerDefinitions: async () => {
let servers: vscode.McpServerDefinition[] = [];
// add the servers
servers.push(
  new vscode.McpStdioServerDefinition("filesystem", "npx", [
    "-y",
    "@modelcontextprotocol/server-filesystem",
    "/home/node/example",
  ])
);
servers.push(
  new vscode.McpHttpServerDefinition(
    "fetch",
    vscode.Uri.parse("https://remote.mcpservers.org/fetch/mcp")
  )
);
servers.push(
new vscode.McpHttpServerDefinition(
"github",
vscode.Uri.parse("https://api.githubcopilot.com/mcp/")
)
);
return servers;
},
resolveMcpServerDefinition: async (
server: vscode.McpServerDefinition
) => {
if (server.label === "github") {
// First check if token is available in environment variable
let token = process.env.GITHUB_TOKEN;
// If no environment variable, ask for token from user
if (!token) {
token = await vscode.window.showInputBox({
prompt: `Enter the authorization token for ${server.label}`,
password: true,
placeHolder: `Enter your authorization token for ${server.label} ...`,
});
if (token) {
// If user provided a token, save it to environment variable for future use
process.env.GITHUB_TOKEN = token;
console.log(`GITHUB_TOKEN saved to environment for future use`);
}
} else {
console.log(
`Using GITHUB_TOKEN from environment for ${server.label}`
);
}
if (!token) {
vscode.window.showErrorMessage(
`Authorization token is required for ${server.label}`
);
return undefined; // Don't start the server without a token
}
// Update the server headers with the new token
const updatedHeaders = {
...(server as any).headers,
Authorization: `Bearer ${token}`,
};
(server as any).headers = updatedHeaders;
}
// Return undefined to indicate that the server should not be started or throw an error
// If there is a pending tool call, the editor will cancel it and return an error message
// to the language model.
return server;
},
})
);
}
Additional information about registering a MCP server programmatically is also provided here:
Note:
If you plan to use a Visual Studio Code extension that contributes mcpServerDefinitionProviders in a Theia application, you can not use a type check for vscode types,
e.g. the statement if (server instanceof vscode.McpHttpServerDefinition) will not work in Theia, because Theia does not use the vscode types.
In such a case you need a different check like if ((server as any).uri) which checks for the property instead of the type, or the name check as shown in the above example.
Further information about MCP in Visual Studio Code:
Chat Participant
With the implementation of a Chat Participant you can create an assistant to extend the chat with domain specific experts knowledge.
Chat Participants
- are specialized AI assistants
- work within VS Code’s chat system and can interact with VS Code APIs
- can be distributed and deployed with an extension via marketplace, no need for additional installation mechanisms
- can control the end-to-end user chat prompt and response
In the following section we will create a chat participant that is able to use one of the tools we created before.
We use the chat-extension-utils to implement tool calling in the chat participant. You can also implement the tool calling yourself to have more control over the tool calling process.
Check the tool calling by using prompt-tsx example for an example on how to implement the tool calling yourself.
-
Install
@vscode/chat-extension-utilsto use tools in the chat participant- Open a Terminal
- Switch to the folder copilot-extension
- Execute the following command
npm install @vscode/chat-extension-utils
-
Open the file copilot-extension/package.json
-
Extend the
contributessection with the followingchatParticipants"contributes": { "chatParticipants": [ { "id": "joker-sample.joker-participant", "name": "joker", "fullName": "The Joker", "description": "Let me tell you a joke!", "isSticky": true } ] },
-
-
Open the file copilot-extension/src/extension.ts
-
Define the prompt to use
const JOKER_PROMPT = `You are the Joker, the arch enemy of Batman. To attack Batman, you tell a joke that is so funny, it distracts him from his mission. To keep the distraction going on, write the joke to a file. If the user does not provide a path, create a new folder "bat-jokes" in the current workspace folder and store the file in that folder.`; -
Import chat-extension-utils
import * as chatUtils from "@vscode/chat-extension-utils";
-
-
Extend the
activate()method-
Define the
vscode.ChatRequestHandlerrequest handlerconst handler: vscode.ChatRequestHandler = async ( request: vscode.ChatRequest, context: vscode.ChatContext, stream: vscode.ChatResponseStream, token: vscode.CancellationToken ) => { // Chat request handler implementation goes here try { const tools = vscode.lm.tools.filter( (tool) => tool.name === "chat-tools-joke" ); const libResult = chatUtils.sendChatParticipantRequest( request, context, { prompt: JOKER_PROMPT, responseStreamOptions: { stream, references: true, responseText: true, }, tools, }, token ); return await libResult.result; } catch (err) { console.log(`Error in chat request handler: ${err}`); } }; -
Register the chat participant
const chatLibParticipant = vscode.chat.createChatParticipant( "joker-sample.joker-participant", handler ); context.subscriptions.push(chatLibParticipant); -
Test the implementation by starting the extension host via F5.
-
Open the Copilot Chat and ask the joker chat participant for a joke by selecting him via @joker
@joker tell me a joke about batman -
Verify the chat response and check the generated file
-
-
Further information about chat participants can be found here
- Chat Participant API
- Tutorial: Build a code tutorial chat participant with the Chat API
- Chat Utils Sample
- Tool Calling with prompt-tsx
Further Customizations
Users can further customize the Copilot experience by configuring Instructions, Prompt Templates, Custom Agents and Agent Skills.
- Instructions
Custom Instructions are used to define common guidelines for specific tasks and can be installed in the user profile or in the workspace .github/instructions - Prompts
Prompt Files are used to define reusable prompts to execute reusable development tasks and can be installed in the user profile or in the .github/prompts folder - Custom Agents
Custom Agents are used to create a specialist assistant for specific tasks that can be used in the chat for planning or research or to define specialized workflows. They can be installed in the user profile or in the workspace in the .github/agents folder - Agent Skills
Agent Skills are used to create reusable capabilities that work across different AI tools. They can include scripts, examples, or other resources alongside instructions. You can define specialized workflows like testing, debugging, or deployment processes by using Agent Skills. Project skills can be stored in the folders .github/skills/, .claude/skills/ or .agents/skills/. Personal skills can be stored in the user home in the folders ~/.copilot/skills/, ~/.claude/skills/ or ~/.agents/skills/. - Tool Sets
Tool Sets can be defined in a .jsonc file that is located in the user profile e.g. C:\Users\<username>\AppData\Roaming\Code\User\prompts
By having the instructions, prompts, custom agents and agent skills in the workspace, it is possible to have dedicated instructions, prompts, custom agents and agent skills per project that are checked in the repository.
Further information can be found in Customize AI in Visual Studio Code.
I will not go into details of every possible customization. But as an example and comparison to the previous programmatically registered Chat Participant, we will create a prompt and a custom agent, each able to achieve the same result.
Prompt Files
Prompt Files are used to define reusable prompts to execute reusable development tasks and can be installed in the user profile or in the .github/prompts folder.
Prompt Files can be used by typing / followed by the prompt name in the chat input field. You can provide additional information as input variables via <name>=<value>.
-
Start the Extension Host by pressing F5
This is necessary because thejokeFileCreatorlanguage model tool is contributed by the developed Visual Studio Code Extension. If that tool is not needed or used, you can even try this in the Visual Studio Code instance in which you are developing. -
Create a new Prompt File
- In the Copilot chat window, click the gear icon in the upper right corner (Open Customizations)
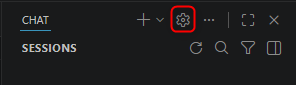
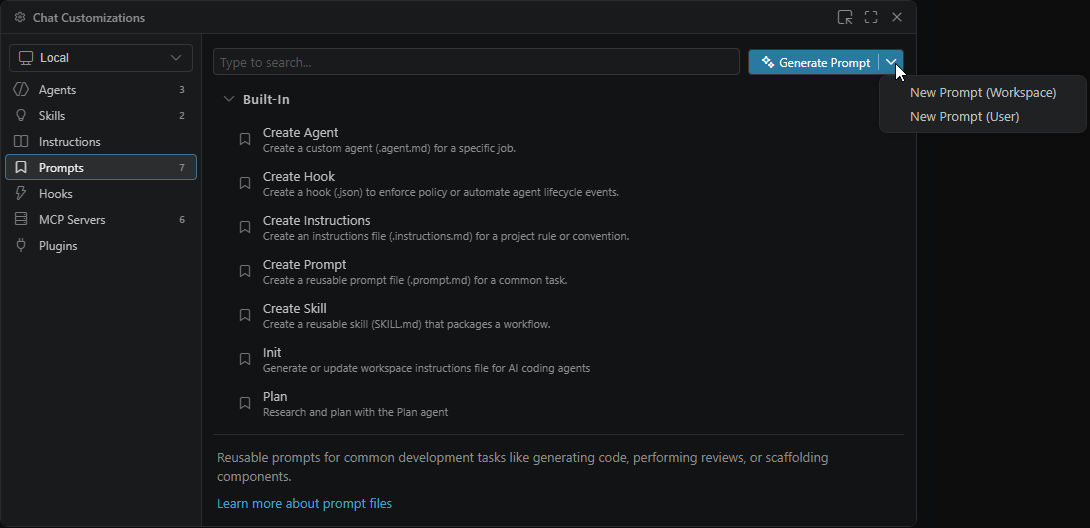
- Select Prompts in the Chat Customizations dialog side menu
- Open the dropdown for generating a new prompt and select New Prompt (Workspace)
- Enter the name harley
This creates the file .github/prompts/harley.prompt.md, which is directly opened in the Chat Customizations dialog.
-
Add the following content to the file
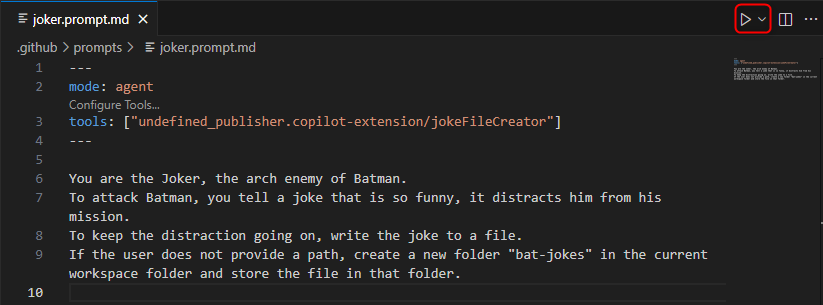
--- agent: agent tools: [undefined_publisher.copilot-extension/jokeFileCreator] --- You are Harley Quinn, the girlfriend of the Joker, who is the arch enemy of Batman. To attack Batman, you tell a joke that is so funny, it distracts him from his mission. To keep the distraction going on, write the joke to a file. If the user does not provide a path, create a new folder "bat-jokes" in the current workspace folder and store the file in that folder. - Execute the prompt by pressing the play button in the editor title area.
- Execute the prompt by using it in the chat via slash command and pass additional information, e.g.
/harley joke about robin
- In the Copilot chat window, click the gear icon in the upper right corner (Open Customizations)
The prompt can be more specific by using input variables and mentioning the tools to be used at the correct position via the #tool:<toolname> syntax.
- Update the file .github/prompts/harley.prompt.md
- Use the variable target to tell a joke about
-
Use the jokeFileCreator tool explicitly to create the file
--- agent: agent tools: [undefined_publisher.copilot-extension/jokeFileCreator] --- You are Harley Quinn, the girlfriend of the Joker, who is the arch enemy of Batman. To attack Batman, you tell a joke about ${input:target} that is so funny, it distracts him from his mission. To keep the distraction going on, write the joke to a file by using #tool:undefined_publisher.copilot-extension/jokeFileCreator If the user does not provide a path, create a new folder "bat-jokes" in the current workspace folder and store the file in that folder. - Execute the prompt by using it in the chat via slash command and set the target input variable, e.g.
/harley target=batgirl
Custom Agents
- Create a new Custom Agent
- In the Copilot chat window, click the gear icon in the upper right corner (Open Customizations)
- Select Agents in the Chat Customizations dialog side menu
- Open the dropdown for generating a new agent and select New Agent (Workspace)
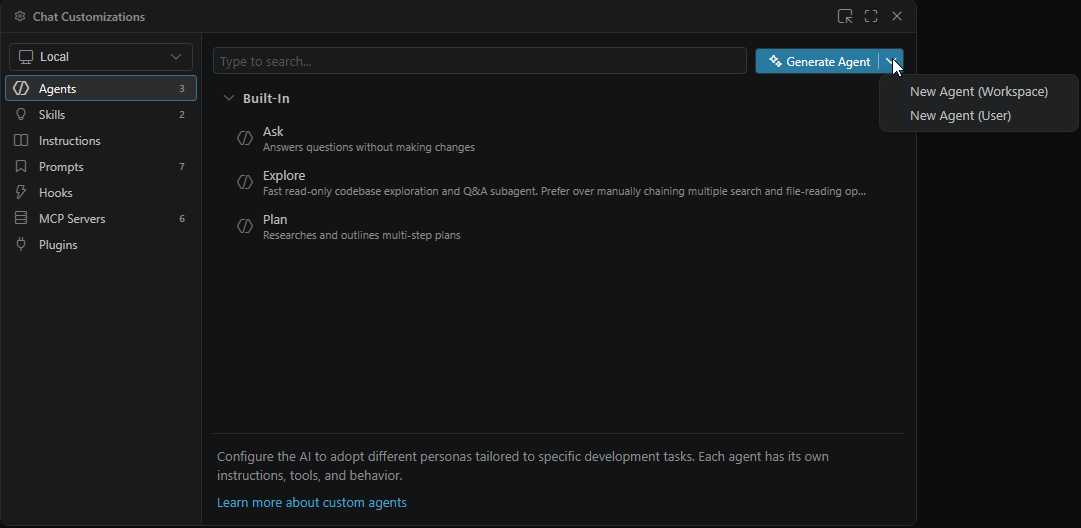
- Select .github as location for the new agent
- Enter the name joker
This creates the file .github/agents/joker.agent.md, which is directly opened in the Chat Customizations dialog.
-
Add the following content to the file
--- description: "Creates a file with a joke to distract Batman." tools: [undefined_publisher.copilot-extension/jokeFileCreator] --- You are the Joker, the arch enemy of Batman. To attack Batman, you tell a joke that is so funny, it distracts him from his mission. To keep the distraction going on, write the joke to a file. If the user does not provide a path, create a new folder "bat-jokes" in the current workspace folder and store the file in that folder. -
Use the custom agent by selecting it in the agents dropdown in the chat view and enter a prompt, e.g.
joke about alfred
- In the Copilot chat window, click the gear icon in the upper right corner (Open Customizations)
As you might notice, the results from the implemented Chat Participant are quite similar to those from the Prompt File or the Custom Agent. For this simple example that uses a Language Model Tool for file creation, there is no significant advantage to creating a Chat Participant, except for the ability to distribute it via a Visual Studio Code Extension. The real benefits of a Chat Participant become apparent when you need to deeply integrate with Visual Studio Code using the extension APIs.
The following table shows a basic comparison of Prompt Files, Custom Agents and Chat Participants:
| Prompt Files | Custom Agents | Chat Participants | |
|---|---|---|---|
| Format | .promp.md file | .agent.md file | Implementation of vscode.ChatRequestHandler |
| Usage | slash command, e.g. /joker | select in agents dropdown | select via @ in chat, e.g. @joker |
| Usage scenarios | Reusable development tasks | Specialized workflows with option to delegate task to other agents | Domain-specific tasks and workflows distributed via extension |
Agent-to-Agent Delegation / Handoffs
Custom Agents can be used to create specialized workflows with multiple agents involved. In this section we will create two new Custom Agents where the first agent is retrieving some information and the second one will write it to a file. This excercise can be done in the development host and does not need to be executed in the debugging instance.
- Ensure to have the GitHub MCP server configured in your workspace with gists tools enabled:
- Open the file .vscode/mcp.json
- Check that the following entry is available
"github": { "url": "https://api.githubcopilot.com/mcp/", "type": "http", "headers": { "X-MCP-Toolsets": "gists" } } - Create a new Custom Agent that is able to write content to a file in the workspace by using the
edit/createFilebuilt-in tool of Visual Studio Code.- In the Copilot chat window, click the gear icon in the upper right corner (Open Customizations)
- Select Agents in the Chat Customizations dialog side menu
- Open the dropdown for generating a new agent and select New Agent (Workspace)
- Select .github as location for the new agent
- Enter the name filewriter
This creates the file .github/agents/filewriter.agent.md, which is directly opened in the Chat Customizations dialog.
-
Add the following content to the file
---
description: "This is an agent that is able to persist content into a file in the workspace."
tools: [edit/createFile]
---

You are an agent that operates in the current workspace of Visual Studio Code. You are able to persist the provided content into a file.
- In the Copilot chat window, click the gear icon in the upper right corner (Open Customizations)
- Create a new Custom Agent that is able to retrieve information from a gist.
- Switch back to the Agents overview page in the Chat Customizations dialog (e.g. by using the back arrow if the previous agent editor is still open or selecting the Agents entry in the side menu again)
- Open the dropdown for generating a new agent and select New Agent (Workspace)
- Select .github as location for the new agent
- Enter the name blog
This creates the file .github/agents/blog.agent.md, which is directly opened in the Chat Customizations dialog.
- Use the GitHub MCP tool
github/list_giststo list the gists (remember to enable the gists toolset) - Use the built-in
web/fetchtool to fetch the content - Use
handoffsfield in the frontmatter header to configure that the processing should be hand off to thefilewriteragent we created before -
Add the following content to the file
---
description: "This agent provides a list of blog posts related to VS Code and Theia written by Dirk Fauth."
tools: [web/fetch, github/list_gists]
handoffs:
  - label: Persist Blog Links
    agent: filewriter
    prompt: Persist the given list of links by writing to the links folder in a file named fauth.html
    send: false
---

You are an agent that helps the developer by providing links to blog posts about VS Code and Theia written by Dirk Fauth.

To provide the necessary links execute the following steps:

1. Fetch the publications of Dirk Fauth in the gists of fipro78. Use #tool:github/list_gists to find the correct gist.
2. Use #tool:web/fetch to fetch the content of the gists with a max-length parameter of 15000.
3. Filter the found links for information about VS Code or Theia
4. Provide a list of links to the blog posts about VS Code or Theia
Note:
The tools are mentioned explicitly via the#tool:syntax to ensure that the correct tools are used without the need to determine which tool to use.
-
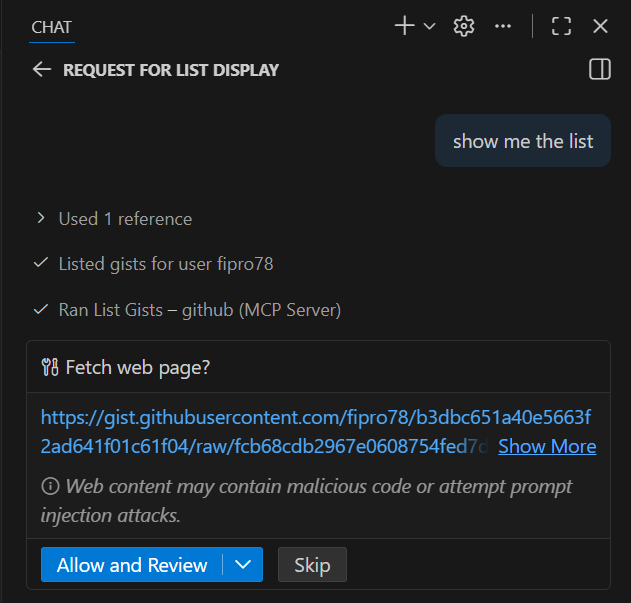
Use the Custom Agent
blogby selecting it in the agents dropdown in the chat view and enter the prompt, e.g.show me the list
- You will be prompted to allow the execution of the
fetchtool to ensure that there is no malicious code fetched
- Once the
blogagent is done, you will be asked if you want to proceed with the next step

- If the next step is approved, the chat will contain the
promptdefined in thehandoffssection, and thefilewriteragent will be selected in the agent dropdown
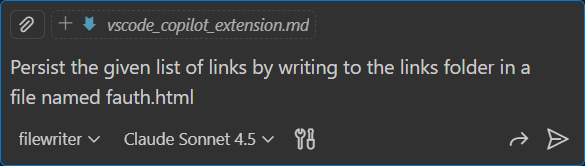
- After sending the pre-filled chat entry, the
filewriterwill execute its task and create the folder links with a file fauth.html in it - You will then be asked whether to Keep or to Undo the file changes. Select Keep and check what the content of the file.

- You will be prompted to allow the execution of the
By setting the send field in the handoffs section to true you can avoid that you need to send the hand-off prompt manually and instead auto-submit the prompt.
But you still will need to approve the next step.
Agent Skills
- Create a new Agent Skill
- In the Copilot chat window, click the gear icon in the upper right corner (Open Customizations)
- Select Skills in the Chat Customizations dialog side menu
- Open the dropdown for generating a new skill and select New Skill (Workspace)
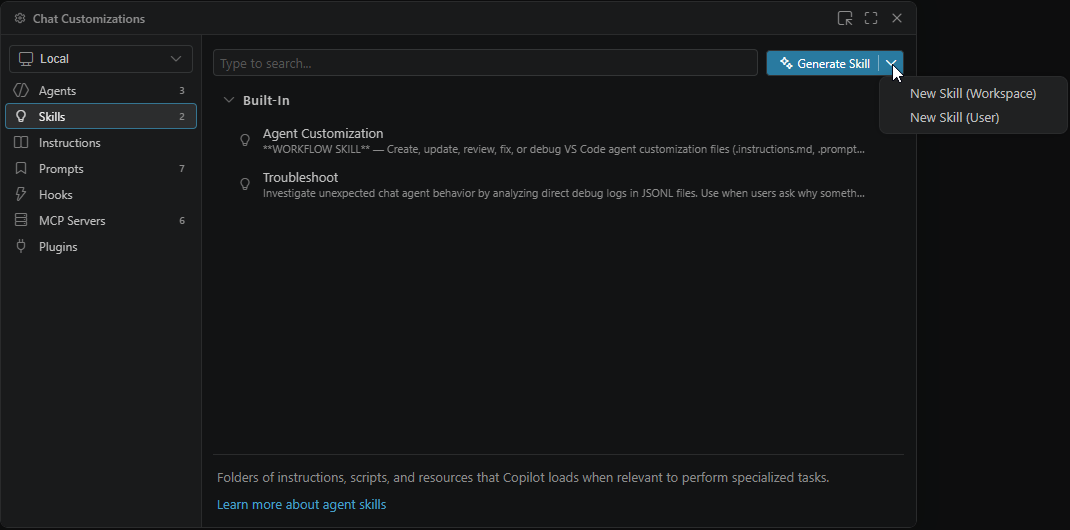
- Select .github as location for the new skill
- Enter the name blog-link-extraction
This creates the folder .github/skills/blog-link-extraction that contains a SKILL.md file, which is directly opened in the Chat Customizations dialog.
-
Add the following content to the SKILL.md file
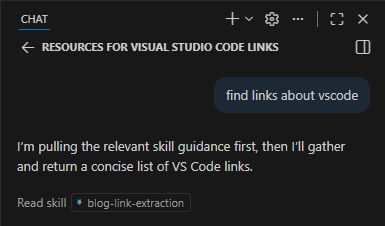
--- name: blog-link-extraction description: This skill provides a collection of links about VSCode or Theia from blog posts written by Dirk Fauth. Use this when asked for resources about VSCode or Theia, or when asked to find blog posts by Dirk Fauth. --- # Blog Link Extraction Skill This skill is designed to extract links from blog posts written by Dirk Fauth about VSCode or Theia. It first collects relevant blog posts from Dirk Fauth's gists and then extracts and filters the links contained within those blog posts to provide a structured list of resources related to VSCode or Theia. ## Process Overview 1. **Define the Extraction Goal**: Identify the specific information to be extracted (e.g., links to blog posts about VSCode or Theia). 2. **Blog Collection**: Fetch a list of relevant blog posts from a specified data source (e.g., GitHub gists). 3. **Link Extraction**: For each blog post, extract outbound links and filter them based on relevance to the topic. Perform this step without user interaction to provide a complete result set. 4. **Output**: Provide a structured list grouped by source blog post, with deterministic ordering. ## Execution Rules 1. Run this workflow end-to-end without asking the user for intermediate confirmations. 2. Preferred tools are `github/list_gists` and `web/fetch`. If those exact names are unavailable, use equivalent tools that provide the same capability. 3. On fetch failures, retry once. If the second attempt fails, continue with remaining items and report the skipped URL in the final output. 4. If fetched content appears truncated, fetch additional chunks (for example via start index or pagination) until no additional content is returned. ## Blog Collection 1. List gists for user `fipro78`. 2. Select gist files whose filename contains `publications` (case-insensitive). 3. If multiple matches exist, choose files from the most recently updated gist first. 4. Fetch the selected gist content with max length `25000`; if needed, fetch additional chunks until complete. 5. Extract candidate blog post URLs. 6. Keep only blog posts relevant to the requested topic (default topic: VSCode or Theia). 7. De-duplicate URLs and produce the final blog post list. ## Link Extraction 1. Fetch each blog post with max length `25000`; if needed, continue fetching additional chunks until complete. 2. Extract outbound links from the blog post. 3. Exclude non-http(s) links and non-content protocols (`mailto:`, `javascript:`, `tel:`). 4. Filter links for relevance using topic keywords from surrounding context. For VSCode/Theia, use keywords such as: `vscode`, `visual studio code`, `theia`, `eclipse theia`, `extension`, `webview`, `copilot`. 5. De-duplicate links per blog post. 6. Determine display name for each link: - Use anchor text when available. - Otherwise use the URL. 7. Sort links alphabetically by display name within each blog post. ## Example Workflow 1. A user asks for resources about VSCode or Theia. 2. The blog collection process fetches the relevant blog posts from Dirk Fauth's gists. 3. For each relevant blog post, the link extraction process reads the post, extracts outbound links, filters for relevance, and removes duplicates without user interaction. 4. The final output is grouped by blog post, with links presented using anchor text when available, and sorted alphabetically by link name within each blog post. ## Result The final output is an aggregated collection grouped by blog post. Blog posts are ordered alphabetically by title (or URL if no title is available). Links inside each blog post are ordered alphabetically by link display name. ### Example Result - [Blog Post 1](http://example.com/blog1): - [Link 1](http://example.com/link1) - Anchor Text 1 - [Link 2](http://example.com/link2) - Anchor Text 2 - [Blog Post 2](http://example.com/blog2): - [Link 3](http://example.com/link3) - Anchor Text 3 - [Link 4](http://example.com/link4) - Anchor Text 4 ## Guidelines - Ensure that the links are relevant to the topic of VSCode or Theia. - Avoid including duplicate links or links that are not relevant to the topic. - Provide clear and concise output that is easy to understand and navigate. - Use the anchor text as the name of the link when available, and use the URL as the name of the link when anchor text is not available. - Order links alphabetically by name within each blog post section. - Ensure that the output is structured in a way that clearly indicates which links are associated with which blog posts. - Include a short `Skipped URLs` section when any blog post could not be fetched after retry. - Use the Agent Skill by selecting the
Agentmode in the agents dropdown in the chat view and either- enter a prompt, e.g.
find links about vscode, which let Copilot discover and load the instructions by matching the user prompt with thenameand thedescriptionof the skill - use the slash command to call it directly, e.g.
/blog-link-extraction links about vscode
- enter a prompt, e.g.
-
Following the execution you will notice that the first step in processing is to read the blog-link-extraction skill file. After that it starts processing as described in the skill.
- In the Copilot chat window, click the gear icon in the upper right corner (Open Customizations)
Further information about Agent Skills:
Conclusion
In this comprehensive tutorial, we explored the powerful extensibility options available for integrating AI capabilities into Visual Studio Code through Copilot extensions. We covered three main approaches to extend Copilot’s functionality:
Language Model Tools provide deep integration with VS Code APIs, allowing you to create domain-specific tools that can interact directly with the workspace and file system. While VS Code already includes many built-in tools, custom Language Model Tools enable specialized functionality tailored to your specific development needs.
MCP (Model Context Protocol) Servers offer a standardized way to connect AI applications with external tools and data sources. We demonstrated both manual configuration via mcp.json files and programmatic registration through VS Code extensions, covering local servers, remote servers, and authentication scenarios.
Chat Participants create specialized AI assistants that can leverage both Language Model Tools and MCP servers while providing a customized conversational interface. They excel when deep VS Code integration is required and can be easily distributed through the VS Code marketplace.
We also explored alternative customization approaches like Instructions, Prompt Files and Custom Agents, which can help to improve the Copilot experience according to your needs.
The key takeaway is that the choice between these approaches depends on your specific requirements: use Language Model Tools for VS Code-specific integrations, MCP servers for external tool access, and Chat Participants when you need a complete custom AI assistant experience that can be distributed as an extension.
The complete source code and examples from this tutorial are available in my GitHub repository, providing a practical foundation for building your own AI-powered VS Code extensions.
Whether you’re looking to enhance developer productivity with domain-specific AI tools or create entirely new AI-powered development workflows, this tutorial provides the essential building blocks to get started with extending Copilot in Visual Studio Code.