Analyzing Android performance issues. This tutorial describes the available tools in Android to perform a performance analysis of Android applications.
1. Overview
It is very important for Android applications to perform all operations as fast as possible. This description lists the available tools to trace and optimize your Android application.
2. Android Basics
The following assumes that you have already basic knowledge in Android development. Please check the https://www.vogella.com/tutorials/Android/article.html - Android development tutorial to learn the basics.
3. StrictMode
You should avoid performing long running operations on the UI thread. This includes file and network access.
To ensure this you can use StrictMode. StrictMode is available as of API 9 (Android 2.3.3) and allows to setup thread policies for your application.
Via StrictMode you can instruct the Android system to crash your application if it performs long running operations, e.g. I/O in the user interface thread.
The following code shows how to use StrictMode. As the activity violates these settings it will crash.
package de.vogella.android.strictmode;

import java.io.BufferedWriter;
import java.io.OutputStreamWriter;

import android.app.Activity;
import android.os.Bundle;
import android.os.StrictMode;

public class TestStrictMode extends Activity {
    @Override
    public void onCreate(Bundle savedInstanceState) {
        super.onCreate(savedInstanceState);
        // Activate StrictMode
        StrictMode.setThreadPolicy(new StrictMode.ThreadPolicy.Builder()
                .detectAll()
                .detectDiskReads()
                .detectDiskWrites()
                .detectNetwork()
                 // alternatively .detectAll() for all detectable problems
                .penaltyLog()
                .penaltyDeath()
                .build());
        StrictMode.setVmPolicy(new StrictMode.VmPolicy.Builder()
                .detectLeakedSqlLiteObjects()
                .detectLeakedClosableObjects()
                // alternatively .detectAll() for all detectable problems
                .penaltyLog()
                .penaltyDeath()
                .build());

        // Test code
        setContentView(R.layout.main);
        super.onCreate(savedInstanceState);
        setContentView(R.layout.main);
        String eol = System.getProperty("line.separator");
        try {
            BufferedWriter writer =
                    new BufferedWriter(
                            new OutputStreamWriter(
                            openFileOutput("myfile",
                            MODE_WORLD_WRITEABLE)));
            writer.write("This is a test1." + eol);
            writer.write("This is a test2." + eol);
            writer.write("This is a test3." + eol);
            writer.write("This is a test4." + eol);
            writer.write("This is a test5." + eol);
            writer.close();
        } catch (Exception e) {
            e.printStackTrace();
        }
    }
}
StrictMode should only be used during development and not in your live application.
4. Developer Settings
Developer Settings
in your
Setting
application of your Android phone allow to set configurations which
simplify the
analysis of your application. For example you can enable
that the touch area is highlighted.
If you have a phone with Android 4.2, try going to the About section in the Settings and tap the Build number entry 7 times.
If you phone does not have this option try using an emulator.
In some cases you need to restart the application to make the setting work.
5. Traceview
5.1. Introduction
Traceview is a graphical viewer to see logs created by an Android application. Via Traceview you can measure the performance of your application to identify performance problems.
Traceview is located as standalone tool in the tools folder of your Android SDK installation folder and it also integrated into Eclipse via the Android Developer Tools (ADT).
5.2. Using Traceview from Android Studio
Android Studio supports tracing via the Android Device Monitor. Use to open it.
To start tracing an application select your application process in
the
Devices
view
and
select the
Start Method Profiling button as depicted in the following screenshot.
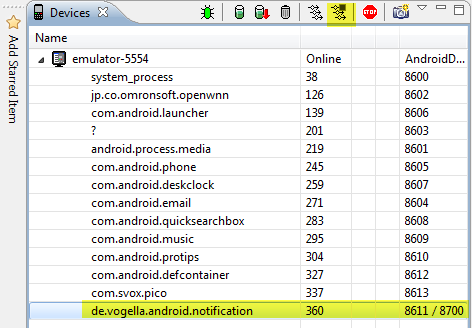
Use your application and re-press the same button to stop profiling. This will open a new editor which shows you the tracing results.
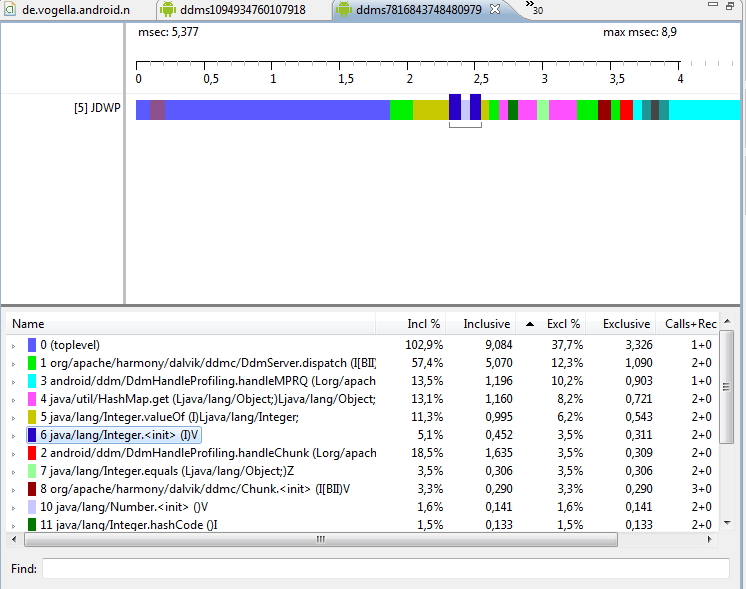

You can zoom into the graphic to get more details. To zoom out, double-click on the time line.
5.3. Using TraceView from the command line
To start tracing some code put the following code snippet around it.
android.os.Debug.startMethodTracing("yourstring");

// ... your code is here

android.os.Debug.stopMethodTracing();
The parameter "yourstring" tells the system that it should store the data under "/sdcard/yourstring.trace". To save data on the sdcard your application needs the WRITE_EXTERNAL_STORAGE permission. After running your application you can copy the results from the device via the adb command line tool.
adb pull /sdcard/yourstring.trace
traceview yourstring
This will start Traceview which allow you to analyze your performance data via a graphical way. The DDMS view has also a trace button available. This will trace the running application and does not require an additional authorization.
6. Exercise: Traceview
6.1. Create example project
Create an Android application with the top level package called
com.vogella.android.traceview.
Add the following key to your values/strings.xml file.
<?xml version="1.0" encoding="utf-8"?>
<resources>

    <string name="app_name">Traceview Example</string>
    <string name="action_settings">Settings</string>
    <string name="hello_world">Hello world!</string>
    <string name="number_template"><b>Random number: %1$s</b></string>

</resources>
Create the following layout file called rowlayout.xml.
<?xml version="1.0" encoding="utf-8"?>
<LinearLayout xmlns:android="http://schemas.android.com/apk/res/android"
    android:layout_width="match_parent"
    android:layout_height="?android:attr/listPreferredItemHeight"
    android:orientation="horizontal" >

    <LinearLayout
        android:layout_width="wrap_content"
        android:layout_height="wrap_content"
        android:orientation="vertical" >

        <LinearLayout
            android:layout_width="wrap_content"
            android:layout_height="wrap_content"
            android:orientation="vertical" >

            <TextView
                android:id="@+id/textView1"
                android:layout_width="wrap_content"
                android:layout_height="wrap_content"
                android:text="Entry"
                android:textAppearance="?android:attr/textAppearanceListItem" />

            <TextView
                android:id="@+id/textView2"
                android:layout_width="wrap_content"
                android:layout_height="wrap_content"
                android:text="Stub"
                android:textAppearance="?android:attr/textAppearanceListItemSmall" />
        </LinearLayout>
    </LinearLayout>

    <ImageView
        android:id="@+id/imageView1"
        android:layout_width="10dp"
        android:layout_height="?android:attr/listPreferredItemHeight"
        android:background="@android:color/black" />

    <TextView
        android:id="@+id/textView3"
        android:layout_width="wrap_content"
        android:layout_height="wrap_content"
        android:layout_marginTop="20dp"
        android:text="Medium Text"
        android:textAppearance="?android:attr/textAppearanceMedium" />

</LinearLayout>
Implement the following
adapter
for your
ListView.
package com.vogella.android.traceview;

import java.util.Collections;
import java.util.List;

import android.content.Context;
import android.content.res.Resources;
import android.os.Debug;
import android.text.Html;
import android.view.LayoutInflater;
import android.view.View;
import android.view.ViewGroup;
import android.widget.ArrayAdapter;
import android.widget.TextView;

public class MyArrayAdapter extends ArrayAdapter<String> {

    private List<String> values;
    private Context context;

    public MyArrayAdapter(Context context, List<String> values) {
        super(context, R.layout.rowlayout);
        this.context = context;
        this.values = values;
    }

    @Override
    public View getView(int position, View convertView, ViewGroup parent) {
        Debug.startMethodTracing("getViewOfTrace");
        // Ensure sorted values
        Collections.sort(values);
        LayoutInflater inflater = (LayoutInflater) context
                .getSystemService(Context.LAYOUT_INFLATER_SERVICE);
        View view = inflater.inflate(R.layout.rowlayout, parent, false);
        Resources res = context.getResources();
        String text = String.format(res.getString(R.string.number_template),
                values.get(position));
        CharSequence styledText = Html.fromHtml(text);
        TextView textView = (TextView) view.findViewById(R.id.textView3);
        textView.setText(styledText);
        Debug.stopMethodTracing();
        return view;
    }
}
Implement a
ListView
in the
activity
which shows 1000 random generated strings.
package com.vogella.android.traceview;

import java.math.BigInteger;
import java.security.SecureRandom;
import java.util.ArrayList;
import java.util.List;

import android.app.ListActivity;
import android.os.Bundle;

public class MainActivity extends ListActivity {

    @Override
    protected void onCreate(Bundle savedInstanceState) {
        super.onCreate(savedInstanceState);
        List<String> list = createValues();
        MyArrayAdapter adapter = new MyArrayAdapter(this, list);
        setListAdapter(adapter);
    }

    private static List<String> createValues() {
        SecureRandom random = new SecureRandom();
        List<String> list = new ArrayList<String>();
        for (int i = 0; i < 1000; i++) {
            String string = new BigInteger(130, random).toString(32);
            list.add(string);
        }
        return list;
    }

}
Add the permission to write on external storage to your application.
6.2. Perform trace
Run your application. Afterwards connect to your device via adb and copy the resulting performance trace to your drive. Analyze the result.
6.3. Solve performance problems
Improve the performance based on the measurements of Traceview. Here are some pointers what to improve.
-
Replace the bold styling in the
getView()method with the correspondingandroid:textStyle="boldattribute in your layout to avoid theHtml.fromHtml()call. -
Move the sorting to another place
-
Reuse convertView in your Adapter, if not null
-
Avoid the findViewById() method call by using the HolderPattern in your ListView
| The layout is also not optimized. We reuse this exercise in the exercise for the HierarchyView |
7. Hierarchy Viewer
The
Hierarchy View
perspective
allows you to visualize the
View
hierarchy of your Android application and helps you to identify
unnecessary
layers in this hierarchy.
You can open the Hierarchy View via
In the
Windows
view
you can select the process for which you want to analyze the view
hierarchy.
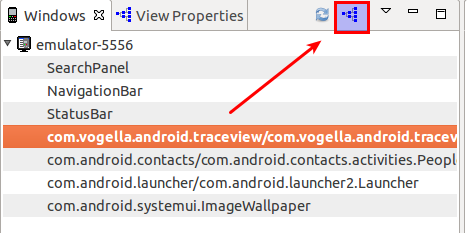
The currently active layout is analyzed and displayed.
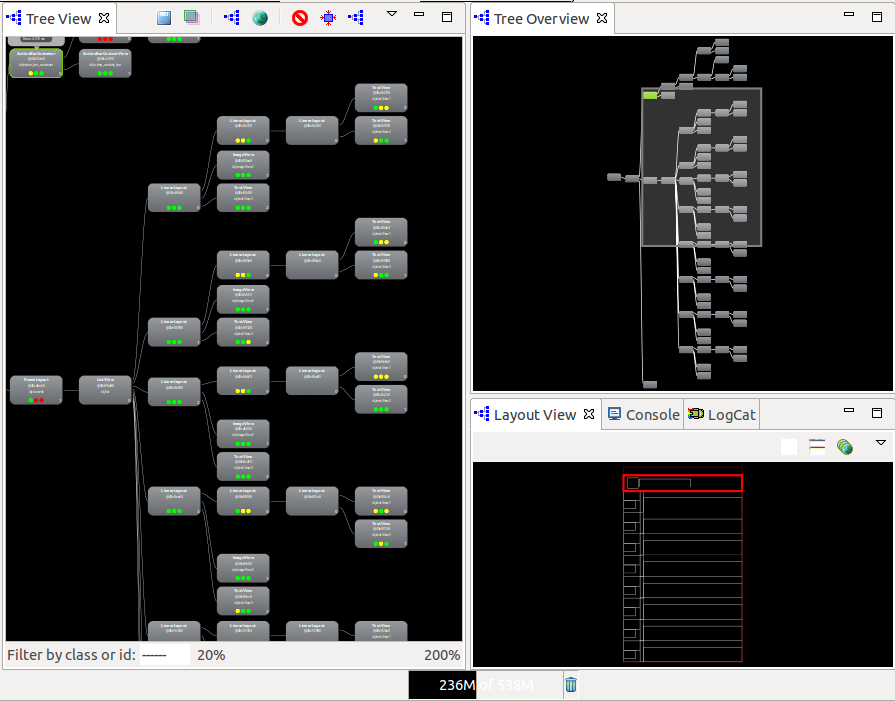
The
Tree View
view
show three light bulbs for the views. The first one indicates the time
for calculating the size of the view, the second one indicates the
time for creating the layout and the third one for drawing the view.
Performance intensive work is indicated with the yellow or red color.
8. Exercise: Hierarchy Viewer
Continue to use the same example as in the Traceview Excercise.
Open the Hierarchy View perspective and analyze the view layer.
While none of these layout layers is very performance intensive it contains redundant layers and unnecessary views. Remove the unnecessary view layers.
9. Layout optimization
You should optimize your layout. The following gives an example how to
use
FrameLayout
with an
ImageView
and one
TextView
to create result despicted in the next screenshot. It uses the
possibility to position
the
TextView
in the layout and to style parts of its text content differently.
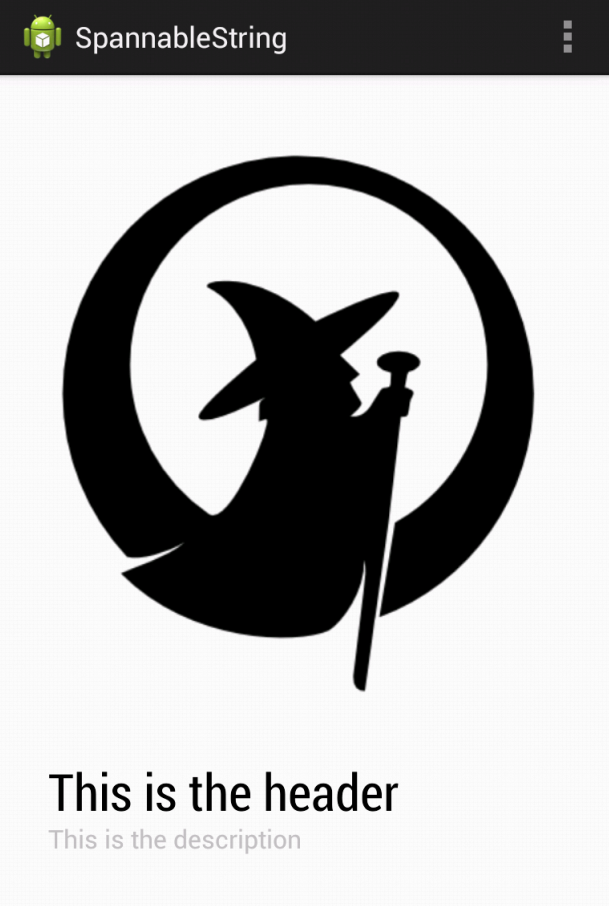
Create a project called com.vogella.android.textview.spannablestring.
Add two news styles to your styles.xml file.
<resources xmlns:android="http://schemas.android.com/apk/res/android">

    <!--
        Base application theme, dependent on API level. This theme is replaced
        by AppBaseTheme from res/values-vXX/styles.xml on newer devices.
    -->
    <style name="AppBaseTheme" parent="android:Theme.Light">
        <!--
            Theme customizations available in newer API levels can go in
            res/values-vXX/styles.xml, while customizations related to
            backward-compatibility can go here.
        -->
    </style>

    <!-- Application theme. -->
    <style name="AppTheme" parent="AppBaseTheme">
        <!-- All customizations that are NOT specific to a API-level are here. -->
    </style>

    <style name="textHeader">
        <item name="android:padding">4dip</item>
        <item name="android:textAppearance">?android:attr/textAppearanceLarge</item>
        <item name="android:textColor">#000000</item>
        <item name="android:fontFamily">sans-serif-condensed</item>
    </style>

    <style name="textbody">
        <item name="android:padding">4dip</item>
        <item name="android:textAppearance">?android:attr/textAppearanceSmall</item>
        <item name="android:textSize">16sp</item>
        <item name="android:textColor">#c0c0c0</item>
    </style>

</resources>
Create the following layout.
<FrameLayout xmlns:android="http://schemas.android.com/apk/res/android"
    xmlns:tools="http://schemas.android.com/tools"
    android:id="@+id/FrameLayout1"
    android:layout_width="match_parent"
    android:layout_height="match_parent"
    >

    <TextView
        android:id="@+id/input"
        android:layout_width="wrap_content"
        android:layout_height="wrap_content"
        android:layout_gravity="bottom"
        android:layout_margin="16dp"
        android:text="@string/hello_world"
        android:textSize="32sp" />

    <ImageView
        android:id="@+id/imageView1"
        android:layout_width="match_parent"
        android:layout_height="match_parent"
        android:contentDescription="image"
        android:src="@drawable/vogella" />

</FrameLayout>
Style your text in the
TextView
via separate
TextAppearanceSpan
as demonstrated in the following code.
package com.vogella.android.textview.spannablestring;

import android.app.Activity;
import android.os.Bundle;
import android.text.Spannable;
import android.text.SpannableString;
import android.text.style.TextAppearanceSpan;
import android.view.Menu;
import android.widget.TextView;

public class MainActivity extends Activity {

    @Override
    protected void onCreate(Bundle savedInstanceState) {
        super.onCreate(savedInstanceState);
        setContentView(R.layout.activity_main);
        TextView textView = (TextView) findViewById(R.id.input);
        String header = "This is the header";
        String description = "This is the description";

        Spannable styledText = new SpannableString(header + "\n" + description);
        TextAppearanceSpan span1 = new TextAppearanceSpan(this,
                R.style.textHeader);
        TextAppearanceSpan span2 = new TextAppearanceSpan(this,
                R.style.textbody);
        styledText.setSpan(span1, 0, header.length(),
                Spannable.SPAN_EXCLUSIVE_EXCLUSIVE);
        styledText.setSpan(span2, header.length() + 1, header.length() + 1
                + description.length(), Spannable.SPAN_EXCLUSIVE_EXCLUSIVE);
        textView.setText(styledText);
    }

    @Override
    public boolean onCreateOptionsMenu(Menu menu) {
        // Inflate the menu; this adds items to the action bar if it is present.
        getMenuInflater().inflate(R.menu.main, menu);
        return true;
    }

}
The resulting layout is much faster than a layout based on
RelativeLayout. Also HTML styling was avoid as the HTML parser is relatively
expensive.
10. Memory Dumps
You can create a memory snapshot and analyze it with the https://www.vogella.com/tutorials/EclipseMemoryAnalyzer/article.html - Eclipse Memory Analyzer.
11. Systrace
Systrace
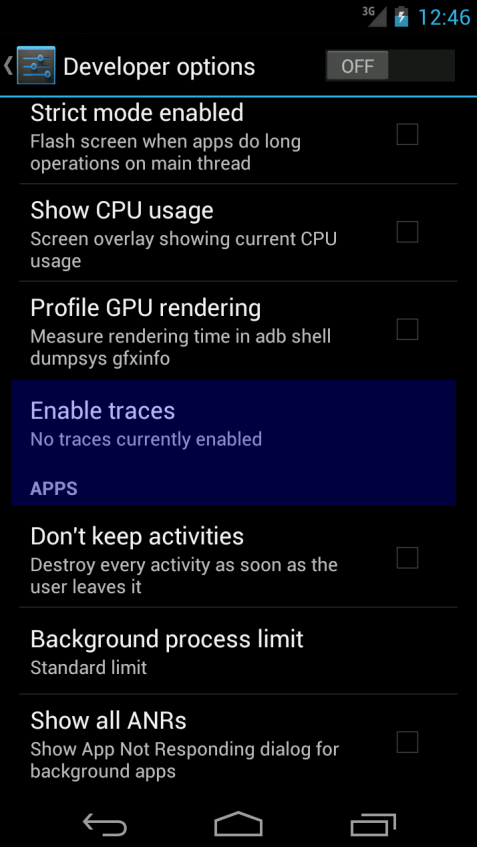
allows to measure the performance directly at kernel level. To enable
systrace, select the Developer options and select the
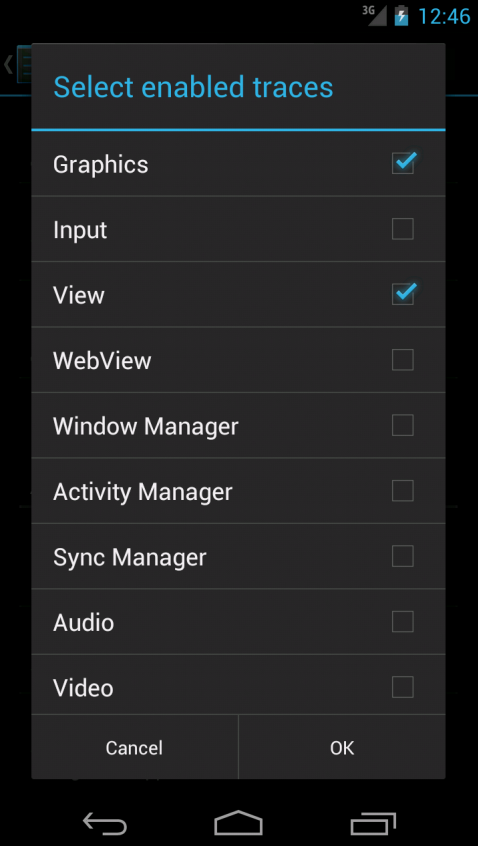
Enable traces
entry. In the next dialog you can define what
type of events should be
profiled, e.g.
Graphics and View.
To use systrace, open a terminal and run systrace.py from the android_sdk_installdir/tools/systrace directory. You may have to set it to executable (chmod a+x systrace.py on Linux).
You can also start
Systrace
directly from Eclipse via the
DDMS
perspective.

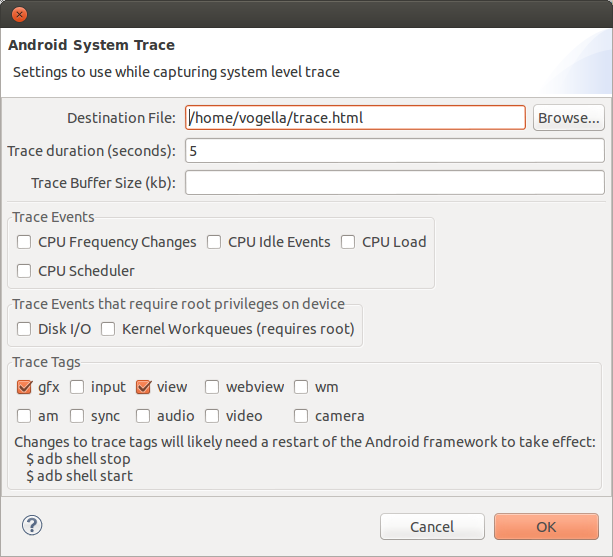
Systrace captures events for 5 seconds. As result Systrace creates a HTML file which allows you to analyze potential issues.
12. Simulating pixel density
You can use the command line to simulate different device densities and display resolutions.
This allows you to use a device with a high device density and resolution to simulate other devices.
// Set the display size
adb shell am display-size 600x800

// Set the display density
adb shell am display-density 80
13. Android templates
You can define your own templates for the Android project creation wizard. See the following links for more information.
Additional code templates - https://github.com/jgilfelt/android-adt-templates
14. Profile GPU rendering
In the
Developer options
in the
Setting
or your Android device you can activate
Profile GPU rendering. With this option the system tracks the time it took to draw the last
128 frames.
After activating this and restarting your application you can get the information via the following command.
adb shell dumpsys gfxinfo your_packageTo measure the frame rate of your application, e.g. by scrolling on a list view. In most cases you need to interact with your application to trigger that it re-draws itself.
In the resulting log, look for a section called Profile data in ms.
15. Analyzing Overdraw
Overdraw
happens if you draw something on top of something else. For
example an
activity
has a
Window
as background. If a
TextView
it added to the application, the
TextView
is drawn on top of the
Window.
Overdrawn is therefore intended to happen. But unnecessary overdraw should be avoid to have the best performance possible.
Unnecessary overdraw can be caused by complex view hierarchies. In general a 2x overdraw (a pixel gets drawn three times) is standard and expected but more should be avoided.
You can enable a visualization of overdraw via the
Development Settings
with the
Show GPU overdraw
setting. This section adds colors to your screen based on the number
of overdraws. The following table explains the used color schema.
| Color | Meaning |
|---|---|
No color |
No overdraw |
Blue |
1x overdraw, pixel was painted twice |
Green |
2x |
Light red |
3x, might indicate a problem, small red areas are still ok |
Dark red |
4x, pixel was pained 5 times or more, indicates a problem. |
After visualization of potential problematic areas, you can
analyze
your
View
hierarchy with the
Hierarchy Viewer.
16. Useful open source tools for application analysis
16.1. Using Leak Canary to find memory leaks
Leak Canary can be integrated into an Android application and can detect automatically leaks of activities and
fragments. The usage is very simple, you add it as dependency to your Gradle build file and initialize the library
in your application class. This registers a life cycle listener for your activities and traces if their
destroy
method is called in the right point in time.
As Leak Canary is an Open Source project it is likely to change very quickly. See https://github.com/square/leakcanary - Leak Canarys Github page for instructions how to use it.
16.2. Using AndroidDevMetrics to display performance data
AndroidDevMetrics you can see how fast the most common operations like object initialization (in Dagger 2 graph), or Activity lifecycle methods (onCreate(), onStart(), onResume()) are.
As AndroidDevMetrics is an Open Source project. See https://github.com/frogermcs/androiddevmetrics - AndroidDevMetrics Github page for instructions how to use it.
17. Android Animation Resources
17.1. vogella Java example code
If you need more assistance we offer Online Training and Onsite training as well as consulting

