This tutorial describes the usage and the core concepts of using Maven for building Java applications.
1. What is Apache Maven?
Apache Maven is a powerful build tool primarily for Java software projects. It is implemented in Java which makes it platform-independent.
Build tools perform the compilation, testing, packaging and deployment of the final product. The advantages of performing these steps automatically instead of a human performing these steps is that the build is reproducible, faster and less error-prone.
Maven can also perform related activities, e.g., create web sites, upload build results or generate reports.
Maven also supports the creation of the initial folder structure for applications to make it easy to get started.
The key features of Maven are:
-
Convention over configuration: avoid as much configuration as possible by choosing real-world default values and supplying project templates (archetypes).
-
Dependency management: support the definition and usage of dependencies to other libraries and projects. During the build, the Maven build system resolves the dependencies and it also builds the dependent projects if needed.
-
Extensible via plug-ins: The Maven build system is extensible via plug-ins that allow keeping the Maven core small. The Maven core does not, for example, know how to compile Java source code, this is handled by the compiler plug-in.
The dependencies can be sourced from the local file system, from the Internet or public repositories. Maven Central is an open repository for Java libraries, which is used by default to search for required libraries. The local repository is found in the .m2/repository folder of the user’s home directory, Maven uses this directory to cache downloaded artifacts.
2. How to use this Maven tutorial
This tutorial covers the core concepts of the Maven build tool.
If you do not care about understanding the underlying technology, just ensure you installed the command line tooling and jump to Maven examples.
You may want to primarily use an IDE for Maven. Modern IDEs contain great support for Maven, e.g., the Eclipse IDE support. This tutorial covers the command line usage and a deeper understanding of Maven itself, if you are more interested in using the Maven tooling from the IDE, please see the Maven with Eclipse tutorial.
3. Installing Maven
To run a Maven build from the command line, you need to install the Maven command-line tool. To verify if Maven is already installed, type the following command in your terminal:
mvn -versionIf you see output that includes Apache Maven, you already have Maven installed.
At the time of this writing, Tycho requires at least Maven 3.9.11.
If that is your version you can skip this section.
3.1. Requirements
You need to have a Java SDK installed and set the JAVA_HOME environment variable to point to a valid Java SDK.
Downloading and installing Maven on Windows and Mac
For a manual installation you can download Maven from the Maven Download page.
Extract the downloaded distribution to a selected folder on your computer and add the M2_HOME environment variable pointing to this directory.
Add M2_HOME/bin to your path variable.
See Official Maven installation for a detailed installation guide.
Downloading and installing Maven on Linux
For Linux most distributions include Maven in their main repositories. On Ubuntu you can use the following command on the command line to install it.
sudo apt-get install maven3.2. Validate installation
To validate that Maven was correctly installed, open a console and use the following command:
mvn -versionYou should receive output feedback showing the version of Maven installed. It also includes the used Java version.
Maven home: /home/vogella/.sdkman/candidates/maven/current
Java version: 21, vendor: Eclipse Adoptium, runtime: /home/vogella/.sdkman/candidates/java/21-tem
Default locale: en_US, platform encoding: UTF-8
OS name: "linux", version: "6.2.0-36-generic", arch: "amd64", family: "unix"
3.3. Optional: Code completion for bash shells
The bash shell is the default shell on Linux.
See https://github.com/juven/maven-bash-completion for a bash shell extension for the command line to have code completion for Maven commands. This should also work with the git bash from Windows.
3.4. Proxy settings
To configure your proxy, add a file named .m2/settings.xml to your user home with the proxy settings, similar to the following:
<settings>
  <proxies>
   <proxy>
      <id>example-proxy</id>
      <active>true</active>
      <protocol>http</protocol>
      <host>proxy.example.com</host>
      <port>8080</port>
      <username>proxyuser</username>
      <password>somepassword</password>
      <nonProxyHosts>www.google.com|*.example.com</nonProxyHosts>
    </proxy>
  </proxies>
</settings>
User and password are only required if your proxy requests basic authentication.
4. Core concepts of Maven
By default, the configuration of a Maven project is done via at least one pom.xml configuration file.
This name pom file is derived from the term Project Object Model.
Maven uses a declarative style of describing the build, i.e., you describe what should be built, not how it is built. This allows Maven to use defaults for performing the build steps.
The pom file defines:
-
identifiers for the project to be built
-
properties relevant for build configuration
-
plugins that provide functionality for the build via a build section.
-
library and project dependencies via the dependencies section
Each project has its own pom file. You can configure Maven to build one project or multiple projects. A multi-project typically defines a pom file in the root of the directory and lists the individual projects in a modules section.
The result of a build is called artifact and can be, for example, an executable JAR file or zip file.
A minimal pom file for a single project is listed in following snippet. This project does not define any properties, dependencies, or any additional plugins.
<?xml version="1.0" encoding="UTF-8"?>

<project xmlns="https://maven.apache.org/POM/4.0.0" xmlns:xsi="https://www.w3.org/2001/XMLSchema-instance" xsi:schemaLocation="https://maven.apache.org/POM/4.0.0 https://maven.apache.org/xsd/maven-4.0.0.xsd">
  <modelVersion>4.0.0</modelVersion>                    (1)

  <groupId>com.vogella.maven.first</groupId>            (2)
  <artifactId>com.vogella.maven.first</artifactId>      (3)
  <version>1.0-SNAPSHOT</version>                       (4)

  <name>com.vogella.maven.first</name>

  <properties>
    <project.build.sourceEncoding>UTF-8</project.build.sourceEncoding>
    <maven.compiler.source>11</maven.compiler.source>   (5)
    <maven.compiler.target>11</maven.compiler.target>   (5)
  </properties>

</project>| 1 | 4.0.0 is the latest version of the pom file structure, usable for Maven 2.x or 3.x |
| 2 | Unique identifier of the organization or the project |
| 3 | Name of the project that is built |
| 4 | Defines the currently version of the project |
| 5 | Set Java compiler level for the Java project |
The groupId, artifactId and version attributes are further explained in the next section. For a full reference of possible entries in the pom file, see Maven pom reference.
4.1. Project identifiers via the group, artifact and version (GAV)
A Maven project uses the groupId, artifactId, version (also known as GAV), and the packaging property to uniquely identify a Maven component. These attributes are explained in the following table.
| Name | Description |
|---|---|
groupId |
Defines a unique base name of the organization or group that created the project. This is normally a reverse domain name or the name of an open-source project. For the generation of new projects, the groupId also defines the package of the main class. |
artifactId |
Defines the unique name of the project within the groupId. If you generate a new project via Maven this is also used as root folder for the project. |
version |
This defines the version of the project. If a new version of the project is built, this version should change so that consumers can see that a different version is used. |
packaging |
Defines the packaging method. This could be e.g., a jar, war or ear file. If the packaging type is pom, Maven does not create anything for this project, it is just metadata. |
For example, you can use the GAV to specify which exact version of a library you want to use.
The full Maven coordinates are often written in the following format: groupId:artifactId:packaging:version.
4.2. Parent pom and effective pom
Each pom file inherits from a parent (super) pom. If no explicit parent pom is defined it inherits from the base pom of Maven.
Maven always executes against an effective pom. This is a combination of settings from this project’s pom.xml, all parent pom, a super-pom defined within Maven, user-defined settings, and active profiles.
To see the effective pom, use the following command:
mvn help:effective-pom4.3. Dependencies
4.3.1. Maven repositories and dependency resolution
A repository is a collection of libraries and project artifacts stored in a directory structure similar to the Maven coordinates of the project.
During the initial phase of a build Maven validates, if you have the specified version of all required artifact dependencies and Maven plug-ins. If required, it retrieves them from a Maven repository.
If necessary, Maven downloads these artifacts and plug-ins into a local repository. The default local repository is located in the home directory of the user in the .m2/repository folder. If an artifact or a plug-in is available in the local repository, Maven uses it for the build to avoid unnecessary network traffic.
Maven uses a default remote repository location (https://repo1.maven.org/maven2) from which it downloads the core Maven plugins and dependencies. You can configure Maven to use more repositories and replace the default one.
Every project can define dependencies using the unique identifier (GAV) of the library it requires.
<dependencies>
    <dependency>
      <groupId>junit</groupId>
      <artifactId>junit</artifactId>
      <version>4.12</version>
      <scope>test</scope>
    </dependency>
 </dependencies>
During the build, the Maven system tries to resolve the dependencies of the modules that are built. To resolve dependencies, Maven uses the following sources in the given order:
-
Projects that are included in the same Maven run (the so called Maven reactor)
-
Local repository
-
Maven central repository
Maven supports direct and transitive dependencies. Direct dependencies are the ones that are explicitly included in the pom file of the project. Transitive dependencies are dependencies required by our direct dependencies.
Maven handles direct and transitive dependencies.
For this, you specify in the pom file the external libraries your project depends on using their GAV (groupId, artifactId and version) then Maven downloads them, puts them in your local Maven repository and make them available for the project build. The transitive dependencies of the required libraries are also made available.
The following listing shows a pom file with a dependency to JUnit5.
<?xml version="1.0" encoding="UTF-8"?>

<project xmlns="https://maven.apache.org/POM/4.0.0" xmlns:xsi="https://www.w3.org/2001/XMLSchema-instance" xsi:schemaLocation="https://maven.apache.org/POM/4.0.0 https://maven.apache.org/xsd/maven-4.0.0.xsd">
  <modelVersion>4.0.0</modelVersion>

  <groupId>com.vogella.maven.first</groupId>
  <artifactId>com.vogella.maven.first</artifactId>
  <version>1.0-SNAPSHOT</version>

  <name>com.vogella.maven.first</name>

  <properties>
    <project.build.sourceEncoding>UTF-8</project.build.sourceEncoding>
    <maven.compiler.source>11</maven.compiler.source>
    <maven.compiler.target>11</maven.compiler.target>
  </properties>

  (1)
  <build>
    <plugins>
      <plugin>
        <artifactId>maven-surefire-plugin</artifactId>
        <version>2.22.2</version>
      </plugin>
      <plugin>
        <artifactId>maven-failsafe-plugin</artifactId>
        <version>2.22.2</version>
      </plugin>
    </plugins>
  </build>

  (2)
  <dependencies>
    <dependency>
      <groupId>org.junit.jupiter</groupId>
      <artifactId>junit-jupiter-api</artifactId>
      <version>5.7.2</version>
      <scope>test</scope>
    </dependency>
    <dependency>
      <groupId>org.junit.jupiter</groupId>
      <artifactId>junit-jupiter-engine</artifactId>
      <version>5.7.2</version>
      <scope>test</scope>
    </dependency>
  </dependencies>

</project>| 1 | This build section is required as starting with version 2.22.0, Maven Surefire and Maven Failsafe provide native support for executing tests on the JUnit Platform. |
| 2 | This defines dependencies for the software tests (via the scope attribute) to JUnit5 (also known as JUnit Jupiter) |
Maven will download the defined dependencies and their transitive dependencies from the Maven central repository and add them to the user’s local Maven repository. If the dependencies are already found in your local repository, Maven will use these and not download them again.
You can also define an external location (outside of a Maven repository) for a library.
<dependency>
  <groupId>mylib</groupId>
  <artifactId>mylib</artifactId>
  <scope>system</scope>   (1)
  <version>1.0</version>
  <systemPath>${basedir}\libs\mylibrary.jar</systemPath>
</dependency>| 1 | Requires that the library is defined via a system path |
You can also define snapshot dependencies. These are libraries that are constantly under development. Maven downloads these snapshots on every build, even if a matching version is already available in the local repository.
<version>1.0-SNAPSHOT</version>4.3.2. Excluding transitive dependencies
Sometimes your dependencies have conflicting transitive dependencies. For example, library A requires library C in version 1.0.0 and library B requires it in version 1.1.0. To use library C in version 1.0.0 you can exclude C from the dependencies of A.
Let’s say, for example, B is the com.vogella.example artifactId.
<dependency>
  <groupId>com.vogella.group</groupId>
  <artifactId>com.vogella.example</artifactId>
  <version>1.0</version>
  <scope>compile</scope>
  <exclusions>
    <exclusion>
      <groupId>c.groupId</groupId>
      <artifactId>c.artifactId</artifactId>
    </exclusion>
  </exclusions>
</dependency>
5. Maven plug-ins, goals and the lifecycle
5.1. Maven lifecycle
Maven builds follow a specified lifecycle. The build lifecycle is divided into build phases The build phases are divided into build goals.
Maven has three default lifecycle phases:
-
default (cannot be executed)
-
clean
-
site
You can execute a full lifecycle via command like clean or site.
You can also execute build phases like verify or single goals like dependency:copy-dependencies.
The following lists gives an overview of the important Maven lifecycle phases:
| Build phase | Description |
|---|---|
validate |
checks if the project is correct and all information is available |
compile |
compiles the source code into binary artifacts |
test |
executes the tests |
package |
takes the compiled code and package it, for example into a JAR file |
integration-test |
takes the packaged result and executes additional tests that require the packaging |
verify |
performs checks if the package is valid |
install |
install the result of the package phase into the local Maven repository |
deploy |
deploys the package to a target, i.e. remote repository |
For a complete list of the Maven phases see https://maven.apache.org/guides/introduction/introduction-to-the-lifecycle.html.
If you execute a build phase, all build phases before that build phase are executed in the above sequence. All relevant goals are executed during this process.
A goal is relevant for a phase, if the Maven plug-in or the pom binds this goal to the corresponding lifecycle phase.
5.2. Plugins and goals
Maven plugins provide the functionalities that are used in the Maven build.
Each Maven plugins provides one or more goals. A goal is a “unit of work” in Maven. It is possible to execute goals independently or as part of a larger chain of goals.
Goals can define parameters, which may have default values. The goals are executed based on the information found in the pom of the project, e.g., the compiler:compile goal checks the pom for relevant parameters. Goals can be attached to a lifecycle phase.
5.3. Packages and goal bindings
Each packaging contains a list of bindings for goals to a particular lifecycle phase. For example, the jar packaging binds the following goals to the lifecycle phases.
| Life cycle phase | Goal binding |
|---|---|
process-resources |
resources:resources |
compile |
compiler:compile |
process-test-resources |
resources:testResources |
test-compile |
compiler:testCompile |
test |
surefire:test |
package |
jar:jar |
install |
install:install |
deploy |
deploy:deploy |
5.4. Adding goals to lifecycle phases
You can add goals to lifecycle phases by configuring more Maven plug-ins and adding them to a lifecycle in your pom file. You need to specify which goal should be executed. If the plug-in does not specify the default lifecycle it should run, you must also specify the lifecycle phase it should run.
<plugin>
   <groupId>com.vogella.example</groupId>
   <artifactId>vogella-some-maven-plugin</artifactId>
   <version>1.0</version>
   <executions>
     <execution>
       <phase>verify</phase>
       <goals>
         <goal>checklinks</goal>
       </goals>
     </execution>
   </executions>
 </plugin>
6. Maven and version control systems
Maven generates its output into the target folder of each project. This build output should not get included in your version control system.
Add this directory to your ignore resources. For example, if you use Git as version control system, add the "target/" entry to your .gitignore file in the root of each project.
7. Running a Maven build via the command line
To build a Maven project via the command line, you use the mvn command from the command line.
The command must be executed in the directory that contains the relevant pom file.
You pass the build lifecycle, phase or goal as parameter to this command.
Maven reads the pom file and resolves the dependencies of the project. Maven validates if the dependencies are available in a local repository and if they are available these are used.
If the dependency is not available in the build reactor or the local repo, Maven downloads the dependent artifacts from the central repository or the specified ones into the local repository.
Maven executes all lifecycle phases until the specified one.
For example, the mvn clean install command triggers the jar packaging.
This includes compiling the sources, executing the tests and packaging the compiled files in a JAR file.
As a last step the install phase installs the resulting artifact into the local repository, so it can be used as dependencies by other Maven builds.
Maven creates the build result in the target folder.
mvn install (1)
| 1 | compile, build and install the build result |
To ensure that the build target is removed before a new build, add the clean target.
mvn clean installIf you have a multi project build, you can also instruct Maven to perform a parallel build.
mvn clean install -T4 (1)
| 1 | -T4 defines that 4 processes are available |
By default, Maven checks online if the dependencies have been changed.
If you want to use your local repository, you can use the -o to tell Maven to work offline.
mvn -o clean install7.1. Dealing with build failure
If you are running a complex multi-module project build, you can define how the Maven build system should react to errors in one module.
-
-fae, --fail-at-end - fails the build after all modules are build; allow all non-impacted builds to continue
-
-ff, --fail-fast - Stop at first module build failure
-
-fn, --fail-never - NEVER fail the build, regardless of module build result
The -fn and -fae options are useful to verify builds that are running within a continuous integration tool like Jenkins and to see all errors in the build.
7.2. Defining default command line parameters via maven.config
Starting with Maven 3.3.1, you can define default command line parameters in a .mvn/maven.config file located in the project’s root directory.
This feature is useful for ensuring that specific parameters are always applied when running the build, such as -T for parallel builds or defining specific properties.
To use this, create a .mvn folder in your project’s root directory (if it doesn’t already exist) and add a maven.config file inside it.
Add the command line parameters you want to apply by default to this file.
For example:
-T3 --fail-at-endWith this configuration, running mvn clean verify is equivalent to running mvn -T3 --fail-at-end clean verify.
7.3. Scaffolding a project with Maven
Maven supports project scaffolding, based on project templates (called archetype). This is provided by the archetype plug-in. Maven provides archetypes for almost anything, from a simple Java application to a complex web application.
The goal of this scaffolding is to allow a fast start into the Maven world. It provides the "standardized" folder structure of software projects.
You can create a project by executing the generation goal on the archetype plugin via the following command: mvn archetype:generate.
mvn archetype:generate This starts the generation process in the interactive mode and asks you for several settings.
8. Maven Wrapper
You can provide a script that automatically downloads the correct version of Maven so that users of the Maven command line do not have to download and install it themselves. This functionality is provided by the Maven wrapper.
|
The wrapper will be provided in the next standard Maven release (either 3.7.0 or 4.0.0). |
8.1. Creating a Maven Wrapper
Create a Maven Wrapper for a project with the latest available Maven version.
cd {your-project}
mvn -N io.takari:maven:wrapper|
You can create a Maven Wrapper for a project with a specified Maven version by using the maven property. |
The wrapper goal creates the following files:
-
mvnw (shell script for Unix systems)
-
mvnw.cmd (batch file for windows)
-
.mvn/wrapper/maven-wrapper.jar (Maven Wrapper JAR)
-
.mvn/wrapper/maven-wrapper.properties (Maven Wrapper properties)
The Maven Wrapper files can be added to your version control system (vcs), for example your Git repo.
|
The |
8.2. Using the Maven Wrapper
To run the Maven Wrapper the mvnw for Linux / Mac systems or mvnw.bat for Windows systems can be used.
UNIX:
./mvnw clean packageWINDOWS:
mvnw.cmd clean package9. Exercise: Create and build a Java project with Maven
In this exercise, you create a Java project with the Maven command line tooling and build this project. You use the scaffolding functionality of Maven to create a Java project.
9.1. Project generation
Create a separate folder for this exercise.
To avoid the interactive mode, all required properties are passed directly to the command. Otherwise, Maven asks for all the required parameters. Enter the following into one line in the command shell (the backslash masks the line breaks).
mvn archetype:generate -DgroupId=com.vogella.maven.first \
-DartifactId=com.vogella.maven.first   \
-DarchetypeArtifactId=maven-archetype-quickstart \
-DarchetypeVersion=1.4 \
-DinteractiveMode=false
With this command Maven generates a Java project based on a predefined template.
|
If this is the first time you execute this goal, Maven has to download the required plug-ins and artifacts for the project generation from the Maven central repository. Therefore, the first run is longer than consecutive runs. It also produces additional output compared to a second run. |
You have generated a whole Maven project structure with Java source code.
9.2. Review generated project
Validate that Maven generated a project on your file system similar to the following structure.
.
└── com.vogella.maven.first
    ├── pom.xml
    └── src
        ├── main
        │   └── java
        │       └── com
        │           └── vogella
        │               └── maven
        │                   └── first
        │                       └── App.java
        └── test
            └── java
                └── com
                    └── vogella
                        └── maven
                            └── first
                                └── AppTest.java
Maven created an App.java class in the ./src/main/ folder, which is just a simple "Hello World" program. It also created an example test class in ./src/test/. In the root folder there is a pom.xml file.
9.3. Update your Java version to Java 11
Open the pom.xml file and update your compiler settings to use Java 11.
  <properties>
    <project.build.sourceEncoding>UTF-8</project.build.sourceEncoding>
    <maven.compiler.source>11</maven.compiler.source>
    <maven.compiler.target>11</maven.compiler.target>
  </properties>
9.4. Compile your sources
Now you want to compile your Java sources. For this, switch on the command line into your project’s root directory and trigger the following Maven command.
mvn compileThe output should be similar to the following.
[INFO] Scanning for projects...
[INFO]
[INFO] ----------< com.vogella.maven.first:com.vogella.maven.first >-----------
[INFO] Building com.vogella.maven.first 1.0-SNAPSHOT
[INFO] --------------------------------[ jar ]---------------------------------
Downloading from central: https://repo.maven.apache.org/maven2/junit/junit/4.11/junit-4.11.pom
Downloaded from central: https://repo.maven.apache.org/maven2/junit/junit/4.11/junit-4.11.pom (2.3 kB at 7.1 kB/s)
[INFO]
[INFO] --- maven-resources-plugin:3.0.2:resources (default-resources) @ com.vogella.maven.first ---
[INFO] Using 'UTF-8' encoding to copy filtered resources.
[INFO] skip non existing resourceDirectory /home/vogella/temp/com.vogella.maven.first/src/main/resources
[INFO]
[INFO] --- maven-compiler-plugin:3.8.0:compile (default-compile) @ com.vogella.maven.first ---
[INFO] Changes detected - recompiling the module!
[INFO] Compiling 1 source file to /home/vogella/temp/com.vogella.maven.first/target/classes
[INFO] ------------------------------------------------------------------------
[INFO] BUILD SUCCESS
[INFO] ------------------------------------------------------------------------
[INFO] Total time:  1.731 s
[INFO] Finished at: 2021-01-25T12:49:07+01:00
[INFO] ------------------------------------------------------------------------
Maven now runs through all lifecycle phases, which were needed by the compile phase.
It resolves the dependencies, loads the JUnit artifact and builds the sources.
It also executes the JUnit test.
9.5. Create a JAR file
Now you want to create an executable JAR file out of your project.
The package goal creates a deployable JAR file.
To ensure previous build artifacts are removed, you can use the clean goal.
mvn clean package9.6. Validate
Afterwards, you can run the packed program.
java -cp target/com.vogella.maven.first-1.0-SNAPSHOT.jar com.vogella.maven.first.AppThe output should be Hello World! on the command line.
9.7. Running the test
Instead of running a full build with packaging, it is also possible to just run the test phases of the Maven lifecycle.
mvn testYour output should include the output of your test similar to the following.
[INFO]  T E S T S
[INFO] -------------------------------------------------------
[INFO] Running com.vogella.maven.first.AppTest
[INFO] Tests run: 1, Failures: 0, Errors: 0, Skipped: 0, Time elapsed: 0.031 s - in com.vogella.maven.first.AppTest
[INFO]
[INFO] Results:
[INFO]
[INFO] Tests run: 1, Failures: 0, Errors: 0, Skipped: 0
[INFO]
[INFO] ------------------------------------------------------------------------
[INFO] BUILD SUCCESS
[INFO] ------------------------------------------------------------------------
[INFO] Total time:  1.678 s
[INFO] Finished at: 2021-01-25T12:52:42+01:00
[INFO] ------------------------------------------------------------------------
9.8. Remove all build results / Clean the project
To remove all build artifacts (the ./target/ folder), use the clean command.
mvn clean9.9. Update your dependencies to use JUnit 5
Change your pom file to use JUnit Jupiter.
<?xml version="1.0" encoding="UTF-8"?>

<project xmlns="https://maven.apache.org/POM/4.0.0" xmlns:xsi="https://www.w3.org/2001/XMLSchema-instance" xsi:schemaLocation="https://maven.apache.org/POM/4.0.0 https://maven.apache.org/xsd/maven-4.0.0.xsd">
  <modelVersion>4.0.0</modelVersion>

  <groupId>com.vogella.maven.first</groupId>
  <artifactId>com.vogella.maven.first</artifactId>
  <version>1.0-SNAPSHOT</version>

  <name>com.vogella.maven.first</name>

  <properties>
    <project.build.sourceEncoding>UTF-8</project.build.sourceEncoding>
    <maven.compiler.source>11</maven.compiler.source>
    <maven.compiler.target>11</maven.compiler.target>
  </properties>

  (1)
  <build>
    <plugins>
      <plugin>
        <artifactId>maven-surefire-plugin</artifactId>
        <version>2.22.2</version>
      </plugin>
      <plugin>
        <artifactId>maven-failsafe-plugin</artifactId>
        <version>2.22.2</version>
      </plugin>
    </plugins>
  </build>

  (2)
  <dependencies>
    <dependency>
      <groupId>org.junit.jupiter</groupId>
      <artifactId>junit-jupiter-api</artifactId>
      <version>5.7.2</version>
      <scope>test</scope>
    </dependency>
    <dependency>
      <groupId>org.junit.jupiter</groupId>
      <artifactId>junit-jupiter-engine</artifactId>
      <version>5.7.2</version>
      <scope>test</scope>
    </dependency>
  </dependencies>
</project>
Run your build, it should fail, as your unit test is still using an older JUnit version.
Change your unit test to the following.
package com.vogella.maven.first;

import static org.junit.jupiter.api.Assertions.assertTrue;

import org.junit.jupiter.api.Test;

class MyFirstJUnitJupiterTests {

    @Test
    void addition() {
        assertTrue(true);
    }
}
Run mvn verify again and validate that your project compiles and that all tests are successful.
9.10. Specify the main class in the MANIFEST
Currently you have to specify the main class in the jar if you want to run your app. Test this by switching to the target folder and typing:
java -cp com.vogella.maven.first-1.0-SNAPSHOT.jar com.vogella.maven.first.AppWe would like to add the main application to the MANIFEST.MF.
For this, add the following to the pom.xml file.
    <build>
        <plugins>
            <!-- all the existing build entries-->
            <plugin>
                <groupId>org.apache.maven.plugins</groupId>
                <artifactId>maven-jar-plugin</artifactId>
                <version>3.2.0</version>
                <configuration>
                    <archive>
                        <manifest>
                            <mainClass>com.vogella.maven.first.App</mainClass>
                        </manifest>
                    </archive>
                </configuration>
            </plugin>
        </plugins>
    </build>
Run the Maven build again with mvn clean verify.
9.11. Verify
Afterwards, you can start your application directly.
java -jar com.vogella.maven.first-1.0-SNAPSHOT.jarThis should print "Hello World!" to the console.
A jar file is a zip file, open this zip file with your preferred tool and check that the /META-INF/MANIFEST.MF contains an entry for the main class.
10. Multi-module projects
Maven supports building multiple projects. A multi-module project (aggregator) is defined by a parent POM referencing one or more projects.
This aggregator can also contain the build configuration or include another parent POM to get this configuration.
<?xml version="1.0" encoding="UTF-8"?>

<project xmlns="http://maven.apache.org/POM/4.0.0" xmlns:xsi="http://www.w3.org/2001/XMLSchema-instance" xsi:schemaLocation="http://maven.apache.org/POM/4.0.0 http://maven.apache.org/xsd/maven-4.0.0.xsd">
  <modelVersion>4.0.0</modelVersion>

  <groupId>com.vogella</groupId>
  <artifactId>com.vogella.parent</artifactId>
  <version>1.0-SNAPSHOT</version>
  <packaging>pom</packaging>

  <name>com.vogella.parent</name>
  <!-- FIXME change it to the project's website -->
  <url>http://www.example.com</url>

  <properties>
    <project.build.sourceEncoding>UTF-8</project.build.sourceEncoding>
    <maven.compiler.source>11</maven.compiler.source>
    <maven.compiler.target>11</maven.compiler.target>
  </properties>

  <dependencies>
    <dependency>
      <groupId>junit</groupId>
      <artifactId>junit</artifactId>
      <version>4.11</version>
      <scope>test</scope>
    </dependency>
  </dependencies>


  <modules>
    <module>com.vogella.maven.api</module>
    <module>com.vogella.maven.consumer</module>
  </modules>
</project>
The packaging type of such a POM is pom, as such a project will not result in any build output.
The individual pom files can point to the parent pom to inherit its configuration.
<?xml version="1.0" encoding="UTF-8"?>
<project xmlns="http://maven.apache.org/POM/4.0.0" xmlns:xsi="http://www.w3.org/2001/XMLSchema-instance" xsi:schemaLocation="http://maven.apache.org/POM/4.0.0 http://maven.apache.org/xsd/maven-4.0.0.xsd">
  <modelVersion>4.0.0</modelVersion>

  <parent>
    <groupId>com.vogella</groupId>
    <artifactId>com.vogella.parent</artifactId>
    <version>1.0-SNAPSHOT</version>
  </parent>

  <groupId>com.vogella</groupId>
  <artifactId>com.vogella.maven.api</artifactId>
  <version>1.0-SNAPSHOT</version>

</project>
11. Exercise: Create a multi-project Maven project
In this exercise, you create two projects and build them in one multi project build.
11.1. Create two projects
Create two projects in the same directory:
mvn archetype:generate -DgroupId=com.vogella \
-DartifactId=com.vogella.maven.api   \
-DarchetypeArtifactId=maven-archetype-quickstart \
-DarchetypeVersion=1.4 \
-DinteractiveMode=false
mvn archetype:generate -DgroupId=com.vogella \
-DartifactId=com.vogella.maven.consumer \
-DarchetypeArtifactId=maven-archetype-quickstart \
-DarchetypeVersion=1.4 \
-DinteractiveMode=falseThis creates two sub-directories.
11.2. Create parent pom
Create the following pom in the main directory.
<?xml version="1.0" encoding="UTF-8"?>

<project xmlns="https://maven.apache.org/POM/4.0.0" xmlns:xsi="https://www.w3.org/2001/XMLSchema-instance" xsi:schemaLocation="https://maven.apache.org/POM/4.0.0 https://maven.apache.org/xsd/maven-4.0.0.xsd">
  <modelVersion>4.0.0</modelVersion>

  <groupId>com.vogella</groupId>
  <artifactId>com.vogella.parent</artifactId>
  <version>1.0-SNAPSHOT</version>
  <packaging>pom</packaging>

  <name>com.vogella.parent</name>
  <!-- FIXME change it to the project's website -->
  <url>https://www.example.com</url>

  <properties>
    <project.build.sourceEncoding>UTF-8</project.build.sourceEncoding>
    <maven.compiler.source>11</maven.compiler.source>
    <maven.compiler.target>11</maven.compiler.target>
  </properties>

  <modules>
    <module>com.vogella.maven.api</module>
    <module>com.vogella.maven.consumer</module>
  </modules>
</project>
11.3. Update individual poms
Define the parent relationship in the poms of the projects so that they can also inherit the configuration of the parent.
For com.vogella.maven.api
<?xml version="1.0" encoding="UTF-8"?>
<project xmlns="https://maven.apache.org/POM/4.0.0" xmlns:xsi="https://www.w3.org/2001/XMLSchema-instance" xsi:schemaLocation="https://maven.apache.org/POM/4.0.0 https://maven.apache.org/xsd/maven-4.0.0.xsd">
  <modelVersion>4.0.0</modelVersion>

  <parent>
    <groupId>com.vogella</groupId>
    <artifactId>com.vogella.parent</artifactId>
    <version>1.0-SNAPSHOT</version>
  </parent>

  <groupId>com.vogella</groupId>
  <artifactId>com.vogella.maven.api</artifactId>
  <version>1.0-SNAPSHOT</version>

</project>
For com.vogella.maven.consumer
<?xml version="1.0" encoding="UTF-8"?>
<project xmlns="https://maven.apache.org/POM/4.0.0" xmlns:xsi="https://www.w3.org/2001/XMLSchema-instance" xsi:schemaLocation="https://maven.apache.org/POM/4.0.0 https://maven.apache.org/xsd/maven-4.0.0.xsd">
  <modelVersion>4.0.0</modelVersion>

  <parent>
    <groupId>com.vogella</groupId>
    <artifactId>com.vogella.parent</artifactId>
    <version>1.0-SNAPSHOT</version>
  </parent>

  <groupId>com.vogella</groupId>
  <artifactId>com.vogella.maven.consumer</artifactId>
  <version>1.0-SNAPSHOT</version>

</project>
Also update the parent pom to contain the common configuration.
<?xml version="1.0" encoding="UTF-8"?>

<project xmlns="https://maven.apache.org/POM/4.0.0" xmlns:xsi="https://www.w3.org/2001/XMLSchema-instance" xsi:schemaLocation="https://maven.apache.org/POM/4.0.0 https://maven.apache.org/xsd/maven-4.0.0.xsd">
  <modelVersion>4.0.0</modelVersion>

  <groupId>com.vogella</groupId>
  <artifactId>com.vogella.parent</artifactId>
  <version>1.0-SNAPSHOT</version>
  <packaging>pom</packaging>

  <name>com.vogella.parent</name>
  <!-- FIXME change it to the project's website -->
  <url>https://www.example.com</url>

  <properties>
    <project.build.sourceEncoding>UTF-8</project.build.sourceEncoding>
    <maven.compiler.source>11</maven.compiler.source>
    <maven.compiler.target>11</maven.compiler.target>
  </properties>

  <dependencies>
    <dependency>
      <groupId>junit</groupId>
      <artifactId>junit</artifactId>
      <version>4.12</version>
      <scope>test</scope>
    </dependency>
  </dependencies>


  <modules>
    <module>com.vogella.maven.api</module>
    <module>com.vogella.maven.consumer</module>
  </modules>
</project>
11.4. Verify the build
Use mvn clean verify to run the build.
It should be successfully.
11.5. Update JUNit dependencies and code
Update your JUnit dependencies and your unit test to JUnit 5.
Solution example
  (1)
  <build>
    <plugins>
      <plugin>
        <artifactId>maven-surefire-plugin</artifactId>
        <version>2.22.2</version>
      </plugin>
      <plugin>
        <artifactId>maven-failsafe-plugin</artifactId>
        <version>2.22.2</version>
      </plugin>
    </plugins>
  </build>

  (2)
  <dependencies>
    <dependency>
      <groupId>org.junit.jupiter</groupId>
      <artifactId>junit-jupiter-api</artifactId>
      <version>5.7.2</version>
      <scope>test</scope>
    </dependency>
    <dependency>
      <groupId>org.junit.jupiter</groupId>
      <artifactId>junit-jupiter-engine</artifactId>
      <version>5.7.2</version>
      <scope>test</scope>
    </dependency>
  </dependencies>
The following listings contain the adjusted tests.
package com.vogella.maven.api;

import static org.junit.jupiter.api.Assertions.assertTrue;

import org.junit.jupiter.api.Test;

/**
 * Unit test for simple App.
 */
public class AppTest
{
    @Test
    public void shouldAnIswerWithTrue()
    {
        App app = new App();
        assertTrue( true );
    }
}
package com.vogella.maven.consumer;
import static org.junit.jupiter.api.Assertions.assertTrue;
import org.junit.jupiter.api.Test;
/**
* Unit test for simple App.
*/
public class AppTest
{
/**
* Rigorous Test :-)
*/
@Test
public void shouldAnswerWithTrue()
{
System.out.println("THIS IS A TEST");
assertTrue( true );
}
}12. Define project dependencies
12.1. Define API
In your api project, define the following class:
package com.vogella.maven.api;

public interface TaskService {

}
12.2. Define usage
Defining project dependencies is the same as defining library dependencies.
Add a dependency to the api project in the pom of the consumer project.
 <dependencies>
    <dependency>
        <groupId>com.vogella</groupId>
        <artifactId>com.vogella.maven.api</artifactId>
        <version>1.0-SNAPSHOT</version>
    </dependency>
  </dependencies>
Now you can modify the App in your consumer project to use this API.
package com.vogella.maven.consumer;

import com.vogella.maven.api.TaskService;

public class App
{
    public static void main( String[] args )
    {
        System.out.println( "Hello World!" );
        TaskService taskService;
    }
}12.4. Install Maven modules into local Maven repository
Now try to build the com.vogella.maven.consumer alone by switching into the directory the mvn clean verify command.
This fails, as the com.vogella.maven.api project is not available in your local .m2 repo and not part of the build (Maven reactor).
Switch back to the parent directory and use mvn clean install to build and install the modules into your local repo.
Now you can also build com.vogella.maven.consumer, the com.vogella.maven.api module is source from your local Maven repository.
12.5. Create one executable JAR
Maven provides multiple options to create one big JAR.
Lets use the maven-assembly-plugin.
Add the following to the pom file of your com.vogella.maven.consumer
<build>
        <plugins>
            <plugin>
                <groupId>org.apache.maven.plugins</groupId>
                <artifactId>maven-assembly-plugin</artifactId>
                <executions>
                    <execution>
                        <phase>package</phase>
                        <goals>
                            <goal>single</goal>
                        </goals>
                        <configuration>
                            <archive>
                                <manifest>
                                    <mainClass>
                                        com.vogella.maven.consumer.App
                                    </mainClass>
                                </manifest>
                            </archive>
                            <descriptorRefs>
                                <descriptorRef>jar-with-dependencies</descriptorRef>
                            </descriptorRefs>
                        </configuration>
                    </execution>
                </executions>
                </plugin>
        </plugins>
    </build>
13. Optional: Adding an unrelated project to the build
The com.vogella.maven.first project you created earlier does not depend on anything from the other two projects.
You can keep its independent build configuration but maybe you want to build if for convenience with the same build.
To do this, add it as child module to your build and re-run the build.
Ensure it is also build.
Maintaining the build configuration can become a maintenance burden, so you may want to add the parent relationship to reuse a common build configuration.
14. Exercise: Add Maven wrapper to your project
14.1. Create the wrapper
For your multi project, create a Maven wrapper.
mvn -N io.takari:maven:wrapper14.2. Verify the wrapper
Use mvnw (Linux / Mac) or mvnw.cmd (Windows) depending on your platform to run the clean verify command.
Now everyone can run your build, without installing Maven.
15. Using profiles and properties in Maven
15.1. Using profiles
Maven supports the usage of profiles to define different configurations.
If you start Maven, you can instruct it to use a certain profile.
For this you specify the -P parameter followed directly (without whitespace) by the profile, e.g., -PyourProfile.
<profiles>
 <profile>
  <id>dev</id>
   <activation>
           <activeByDefault>true</activeByDefault>
        </activation>
  <properties>
    <db.location>URL_to_dev_system</db.location>
    <logo.image>companylogo.png</logo.image>
  </properties>
 </profile>
  <profile>
    <id>production</id>
        <properties>
            <db.location>URL_to_prod_system</db.location>
            <logo.image>companylogo2.png</logo.image>
        </properties>
    </profile>
 </profiles>
15.2. Using properties
You can specify properties in your build files.
You can override them via the command line with the -D parameter followed directly (without whitespace) by its value.
See the next chapter for an example.
15.3. Example of properties: Skipping the tests in a Maven build
You can specify via a property that your tests should be skipped during the build. This property (among with several others for demo purposes) is defined in the following snippet.
<properties>
    <skipTests>true</skipTests>
    <maven.build.timestamp.format>yyyyMMdd-HHmm</maven.build.timestamp.format>
    <buildTimestamp>${maven.build.timestamp}</buildTimestamp>
    <buildId>${buildType}${buildTimestamp}</buildId>
</properties>
How to override these parameters via the command line is demonstrated by the following listing.
mvn clean install -DskipTests=false15.4. Useful properties
| Property | Description |
|---|---|
skipTests |
true or false, specifies if tests should be executed or not |
showWarnings |
true or false, defines if the Maven build shows the compiler warnings |
16. Maven settings
Maven allows defining settings on a global, user and project level. The common case is to define on a user level, settings like a proxy server or passwords to upload build artifacts to a server.
You can view the file locations in the Eclipse IDE via .
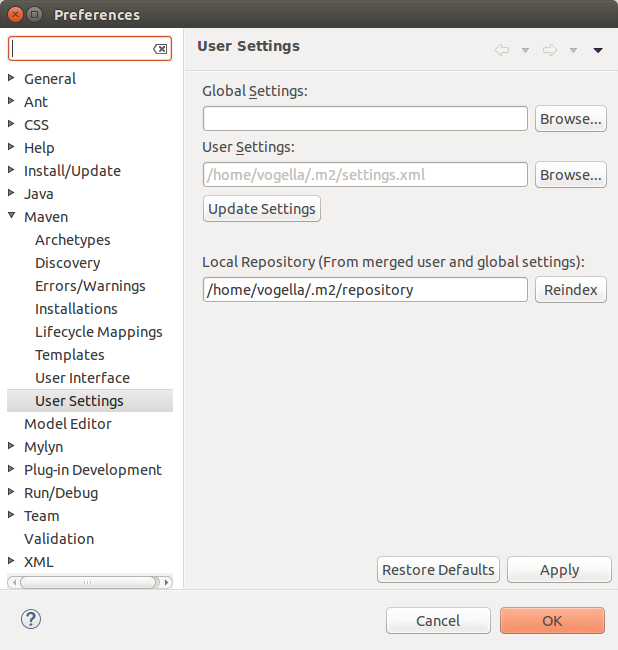
The user settings file is located in the .m2 folder of the users home.
The following settings.xml file defines a proxy server. If this snippet is located in the .m2 folder of the users home, Maven uses this proxy.
<settings>
 <proxies>
  <proxy>
   <active>true</active>
   <protocol>http</protocol>
   <host>proxy</host>
   <port>8080</port>
   <username>your_user</username>
   <password>your_password</password>
   <nonProxyHosts>www.google.com|*.test.com</nonProxyHosts>
  </proxy>
 </proxies>
</settings>
17. Useful Maven parameters
The following table lists useful Maven parameters.
| Parameter | Description |
|---|---|
--log-file log.txt |
Maven build output is written to the specified file |
--debug |
Outputs more information during the build process |
18. Exercise: Excluding certain tests
18.1. Run Maven build without tests
Sometimes your tests run too long or are flaky so you want to build your software without running the tests.
Use the -DskipTests=true on the command line to skip tests.
Check in the log output that the tests are skipped.
[INFO] Tests are skipped.For testing, add skipTests as parameter to your build.
    <properties>
        <!-- more properties..-->
        <skipTests>true</skipTests>
    </properties>
Run your tests without the skipTests parameter and ensure that they still not executed.
Test again with -DskipTests=false and check that you can override the default configuration via the command line.
After this test, remove the property again from your pom file.
18.2. Use profiles
To practise the usage of profiles, define a profile which skips tests
    <profiles>
        <profile>
            <id>dev</id>
            <activation>
                <activeByDefault>true</activeByDefault>
            </activation>
            <properties>
                <!-- potential properties here-->
            </properties>
        </profile>
        <profile>
            <id>notests</id>
            <properties>
                <skipTests>true</skipTests>
            </properties>
        </profile>
    </profiles>
Run your Maven build with mvn clean verify -Pnotests and validate that no tests are executed.
18.3. Tag a few tests
Tag a few tests with JUnit 5 as slow.
package com.vogella;

import static org.junit.jupiter.api.Assertions.assertTrue;

import org.junit.jupiter.api.Tag;
import org.junit.jupiter.api.Test;

/**
 * Unit test for simple App.
 */
public class AppTest
{
    @Test
    @Tag("slow")
    public void shouldAnswerWithTrue()
    {
        System.out.println("THIS IS A TEST");
        assertTrue( true );
    }
}
18.4. Exclude tagged tests
<plugin>
    <artifactId>maven-surefire-plugin</artifactId>
    <version>2.22.2</version>
    <configuration>
        <includes>
            <include>**/Test*.java</include>
            <include>**/*Test.java</include>
            <include>**/*Tests.java</include>
            <include>**/*TestCase.java</include>
        </includes>
        <!-- use groups to define included tags, use comma to separate -->
        <excludedGroups>slow</excludedGroups>
    </configuration>
</plugin>
Run the build and ensure the tagged test is not executed.
|
If you configure this for the multi project build ensure you modify the correct test.
In the exercises it was optional to align the build configuration for the first project you created, so in case you have not updated the pom of |
18.5. Exclude on the command line
mvn clean verify -DexcludedGroups="slow"18.6. Define a profile
Add a profile named fast to run all tests.
|
Define a new property named You can refer to a property named |
19. Creating a unit test report with Maven
Maven can generate HTML test reports for unit test. This allows to review the test results after the build and to identify easily the test failures.
The Maven unit test reports are generated by the Maven Surefire plugin. To generate them, you can execute the following command:
mvn surefire-report:reportThe generated unit test report is located in the target/site directory of the project.
To generate an aggregated test report for a multi-project Maven build, use the following:
mvn surefire-report:report -Daggregate=true20. Exercise: Generate an HTML test report
20.1. Create a test report for your single Maven project
In your com.vogella.maven.first project run the following command.
mvn surefire-report:report20.2. Validate generated report
Open the generated com.vogella.maven.first/target/site/surefire-report.html and review the file.
It looks a bit boring as it is not styled. This is because the report goal only creates the test reports and not default reports.
20.3. Trying running the site phase.
Try running the mvn site command.
The site target may fail with an error, as some plugins have errors in their latest version. In this case fix the plugins used for creating the reports in your pom file.
<plugin>
  <groupId>org.apache.maven.plugins</groupId>
  <artifactId>maven-site-plugin</artifactId>
  <version>3.7.1</version>
</plugin>
<plugin>
  <groupId>org.apache.maven.plugins</groupId>
  <artifactId>maven-project-info-reports-plugin</artifactId>
  <version>3.0.0</version>
</plugin>
Re-run the build and validate that the site is generated.
Open the index.xml and check the content.
Go back to your project pom and add a description.
<description>This is a description</description>Re-run the site generation and check that the generated HTML contains the new description.
Have a short look at the additional customization you can for your description: https://maven.apache.org/plugins/maven-site-plugin/examples/sitedescriptor.html
20.4. Bind the test generation to the test goal
Currently the test reports are only generated if you execute the site goal.
You can also bind goals to other phases and goals.
Add the following to your build configuration.
Now, if you run mvn clean test the test reports are generated also.
The report-only goal only generates the test reports without re-running tests (that are already running due to the test phase).
            <plugin>
                <groupId>org.apache.maven.plugins</groupId>
                <artifactId>maven-surefire-report-plugin</artifactId>
                <version>2.6</version>
                <executions>
                    <execution>
                        <phase>test</phase>
                        <goals>
                            <goal>report-only</goal>
                        </goals>
                    </execution>
                </executions>
            </plugin>
20.5. Optional: Learn more about the site plug-in
Review https://maven.apache.org/guides/mini/guide-site.html to learn how you can customize the site output.
21. Exercise: Setting up a Git repository and GitHub build actions
In this exercise, you create a new GitHub repository for your Maven build. Afterwards, you configure GitHub actions to validate every commit and every pull request automatically on GitHub.
21.1. Create new GitHub repository
Create a new public GitHub repository. Clone it to your local machine with your preferred method.
21.2. Add your projects to your GitHub repo
If you are using the Git command line, move your projects into the Git repository. If you are using the Eclipse IDE, you can add these projects with the menu entry.
21.3. Create a .gitignore file
Create a new .gitignore file in the top level directory of your repository.
Ignore at least all /target folders in this file.
The following .gitignore ignores all target folder and some potential Eclipse metadata.
target/
**.class
.metadata
release.properties
Ensure that target is not listed with the git status command.
21.4. Commit and push
Add and commit all files.
git stage . # older git versions: git add .
git commit -m "Initial commit"
git push --set-upstream origin master
21.5. Setup build validation
To verify each commit and pull request on GitHub create the following file maven.yaml in the .github/workflows directory.
name: Maven build for Java 11 and Java 15 on Ubuntu/ macOS and Windows

on:
  push:
  pull_request:

jobs:
  build:
    name: "Build (JDK-${{ matrix.java }}, ${{ matrix.os }})"
    strategy:
      fail-fast: false
      matrix:
        os: [ ubuntu-latest, macOS-latest, windows-latest ]
        java: [11, 15 ]
    runs-on: ${{ matrix.os }}
    steps:
      - name: 'Checkout'
        uses: actions/checkout@v2

      - name: 'Set up JDK'
        uses: actions/setup-java@v1
        with:
          java-version: ${{ matrix.java }}

      - name: Cache Maven Dependencies
        uses: actions/cache@v2
        with:
          path: ~/.m2/repository
          key: ${{ runner.os }}-maven-${{ hashFiles('**/pom.xml') }}
          restore-keys: |
            ${{ runner.os }}-maven-
      - name: Build and test with Maven using xvfb
        uses: GabrielBB/xvfb-action@v1
        with:
          run: |
            mvn clean verify
Stage, commit and push this file.
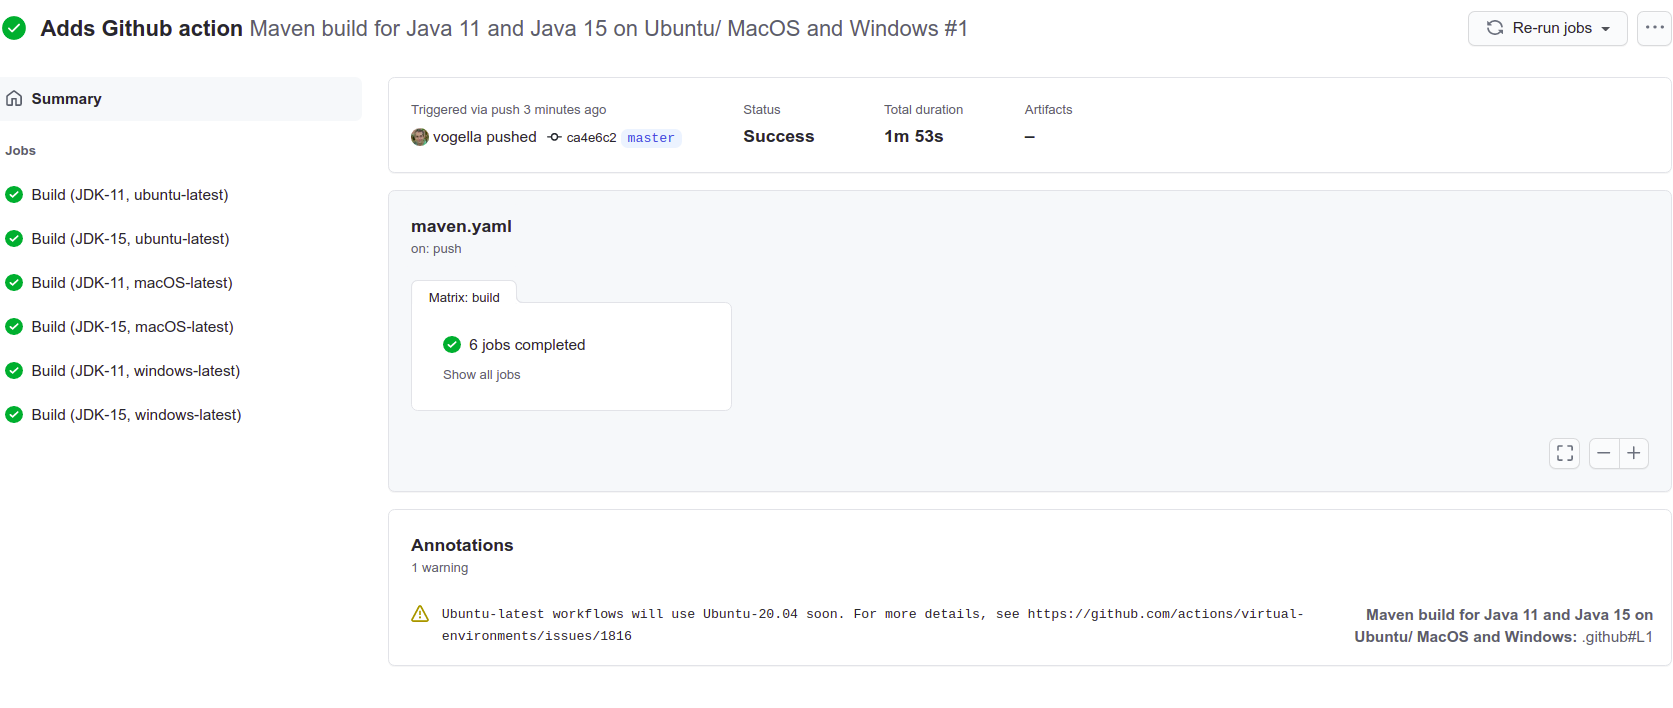
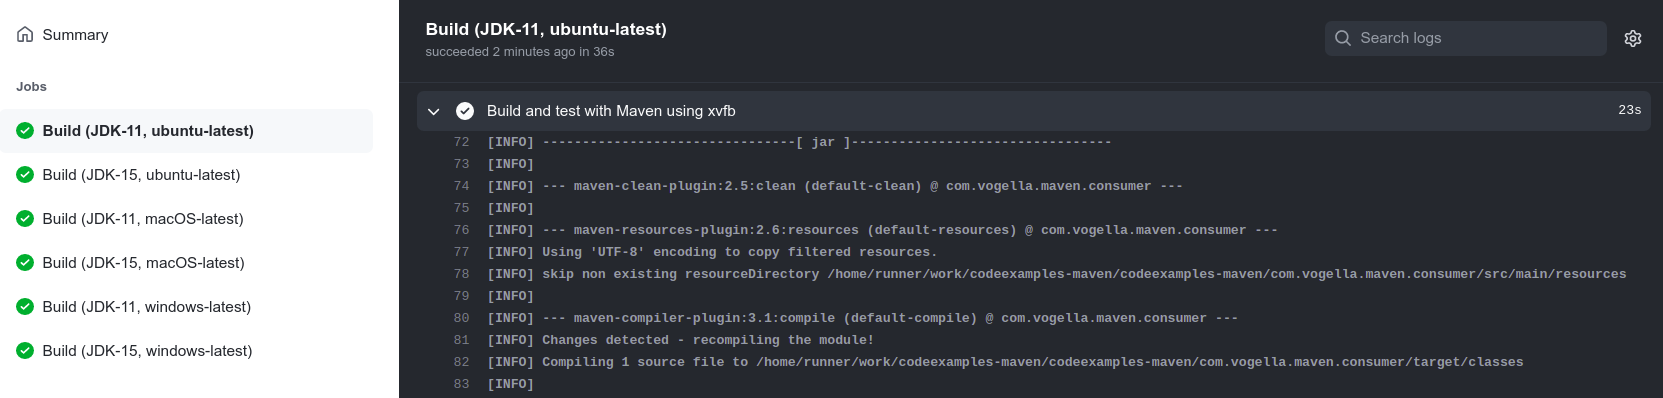
21.6. Check that your workflow works
Switch to GitHub and select Actions on your repository. You should see that your verification has been triggered or already completed.
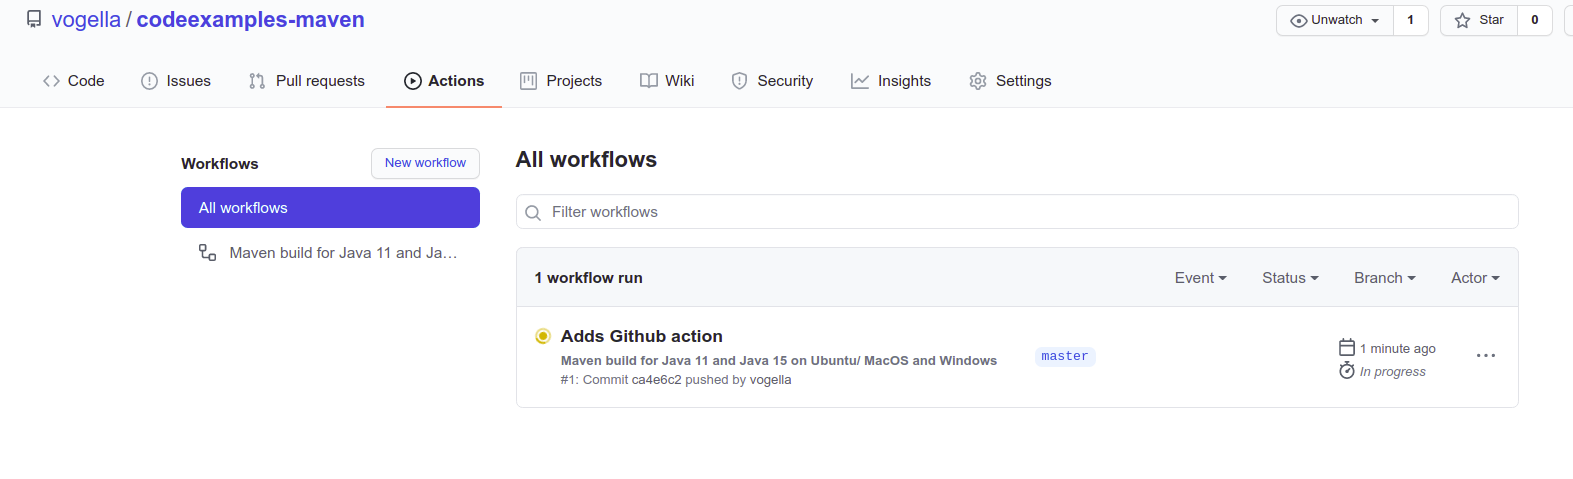
Wait until the build verification has completed and review some of the details.
22. Useful Maven tips and plug-ins
22.1. Checking and updating versions
Maven can check dependencies for newer version and update your pom files to use these new versions:
-
mvn versions:display-dependency-updates - show if updates for library are available
-
mvn versions:use-releases - Update snapshot version to use the current release
-
mvn versions:use-next-releases - Update snapshot version to use next release
-
mvn versions:use-latest-releases - Update pom to use latest versions
22.2. Capturing all folder as modules
Maven requires an entry in the top-level project. You can use a Linux command line and awk to generate such entries.
ls -l| grep '^d' | awk '{ print "<module>"$9"</module>" }'22.3. Show the dependency tree
Maven provides a plugin that can be used to visualize a dependency tree to either the console or an output file.
# Show dependencies inside the console
mvn dependency:tree -Dverbose
# Write dependency to a file
mvn dependency:tree -Dverbose -DoutputFile=/home/simon/maven-dependencies
<project xmlns="http://maven.apache.org/POM/4.0.0" xmlns:xsi="http://www.w3.org/2001/XMLSchema-instance"
xsi:schemaLocation="http://maven.apache.org/POM/4.0.0 http://maven.apache.org/xsd/maven-4.0.0.xsd">
<modelVersion>4.0.0</modelVersion>
<groupId>com.vogella</groupId>
<artifactId>com.vogella.maven.dependencies</artifactId>
<version>0.0.1-SNAPSHOT</version>
<packaging>pom</packaging>
<dependencies>
<dependency>
<groupId>org.slf4j</groupId>
<artifactId>slf4j-log4j12</artifactId>
<version>1.7.10</version>
</dependency>
</dependencies>
</project>The output of the mvn dependency:tree command can for example look like the following.

22.4. Show all goals of a certain plug-in
You can see all goals of a certain plug-in. The standard Maven plug-ins are listed on the Maven Plugin Site.
For example, the following shows all goals of the site plug-in.
mvn help:describe -e -Dplugin=site22.5. Versions plugin
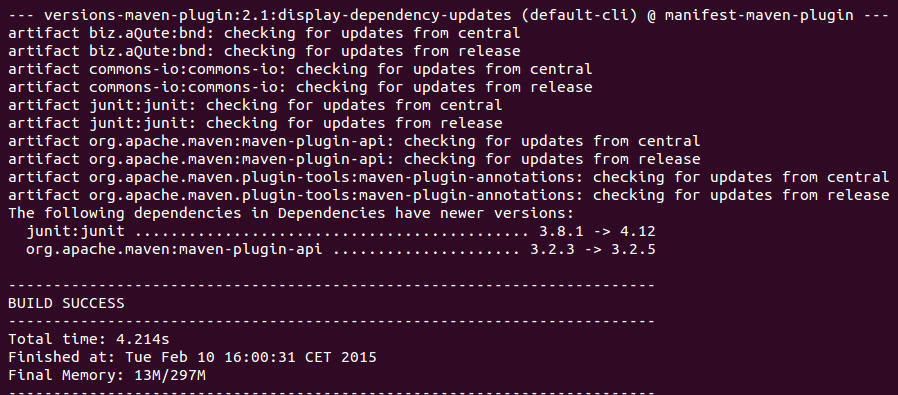
The display-dependency-updates goal of the Versions Maven Plugin can be used to determine if there are newer versions of a dependency available.
For example, running mvn versions:display-dependency-updates for a project might result in the following output.
22.6. Execute a Java program with Maven
If you want to execute a program you can use the exec-maven-plugin.
This is demonstrated in the following pom.xml file.
To trigger this use the exec:java target in maven.
<project>
    <modelVersion>4.0.0</modelVersion>
    <groupId>com.vogella.build.maven.intro</groupId>
    <artifactId>com.vogella.build.maven.intro</artifactId>
    <version>0.0.1-SNAPSHOT</version>
    <name>mavenintroduction</name>
    <build>
        <sourceDirectory>src</sourceDirectory>
        <plugins>
            <plugin>
                <artifactId>maven-compiler-plugin</artifactId>
                <version>3.3</version>
                <configuration>
                    <source>1.8</source>
                    <target>1.8</target>
                </configuration>
            </plugin>
            <plugin>
                <groupId>org.codehaus.mojo</groupId>
                <artifactId>exec-maven-plugin</artifactId>
                <version>1.2.1</version>
                <configuration>
                    <mainClass>com.vogella.build.maven.intro.Main</mainClass>
                </configuration>
            </plugin>
        </plugins>

    </build>
</project>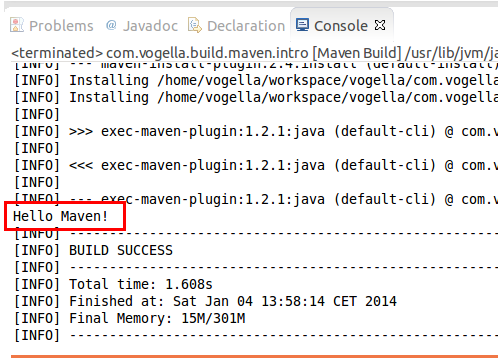
23. Maven vs. other build tools
23.1. Maven vs. Ant
Ant uses an imperative style of declaring the actions the Ant build should do. You specify the commands Ant should perform and the sequence in which they should happen. Ant has no dependency management tools per default, you have to use other tools like Ivy or handle the download of the dependencies manually.
Ant projects also do not follow a standard project layout.
Maven uses a declarative style which defines what to build not how to build. It uses a default layout for projects and provides built-in support for dependency management.
Ant build files tend to be unique for the project while Maven build files tend to follow a similar structure, and therefore maintenance of Maven build files is typically easier.
23.2. Maven vs. Gradle
Gradle provides the same functionality as Maven but uses a concise syntax. Gradle also supports a declarative and imperative style in addition to Maven’s declarative approach.
The Maven build tool is older and maintained by a group of volunteers, while the Gradle build is driven by a venture-capital-funded company.
24. Common Maven tasks
24.1. Setting the Java Version in Maven
To configure Maven to compile for a certain Java release you can use properties in your pom file.
    <properties>
        <maven.compiler.target>11</maven.compiler.target>
        <maven.compiler.source>11</maven.compiler.source>
    </properties>
In a full build file this would look like the following:
<project xmlns="https://maven.apache.org/POM/4.0.0"
    xmlns:xsi="https://www.w3.org/2001/XMLSchema-instance"
    xsi:schemaLocation="https://maven.apache.org/POM/4.0.0 https://maven.apache.org/xsd/maven-4.0.0.xsd">
    <modelVersion>4.0.0</modelVersion>
    <groupId>com.vogella</groupId>
    <artifactId>com.vogella.xml.jaxb.maven</artifactId>
    <version>0.0.1-SNAPSHOT</version>

    <properties>
        <maven.compiler.target>11</maven.compiler.target>
        <maven.compiler.source>11</maven.compiler.source>
    </properties>

    <dependencies>
        <dependency>
            <groupId>com.sun.xml.bind</groupId>
            <artifactId>jaxb-impl</artifactId>
            <version>2.3.3</version>
        </dependency>
    </dependencies>
</project>
25. Apache Maven resources
25.1. vogella Java example code
If you need more assistance we offer Online Training and Onsite training as well as consulting