Simon Scholz (c) 2017 - 2025 vogella GmbH :revnumber: 0.2 :revdate: 13.02.2019
This tutorial contains information on how to implement single page applications (SPA) with Dojo IO.
1. Dojo IO
Dojo is a progressive framework for modern web applications built with TypeScript.
Dojo has a virtual DOM, many custom widgets and is pretty much self contained. It does not lack any features the other big JS/TS frameworks offer, but its main strength compared to the others is that its designed to support i18n and accessibility.
2. Tooling for Dojo
Any editor can be used for writing TypeScript code. For example:
Once the right editor has been chosen Node JS, NPM and the Dojo CLI should be installed.
For Node JS a version manager called nvm can be used:
curl -o- https://raw.githubusercontent.com/creationix/nvm/v0.33.11/install.sh | bash
nvm install node
Now Node JS and NPM should be installed and the dojo CLI can be installed globally like this:
npm install -g @dojo/cli3. First Dojo Project
To be able to generate a single page application @dojo/cli-create-app has to be installed:
npm install -g @dojo/cli-create-appTo create the actual project run:
dojo create app --name user-app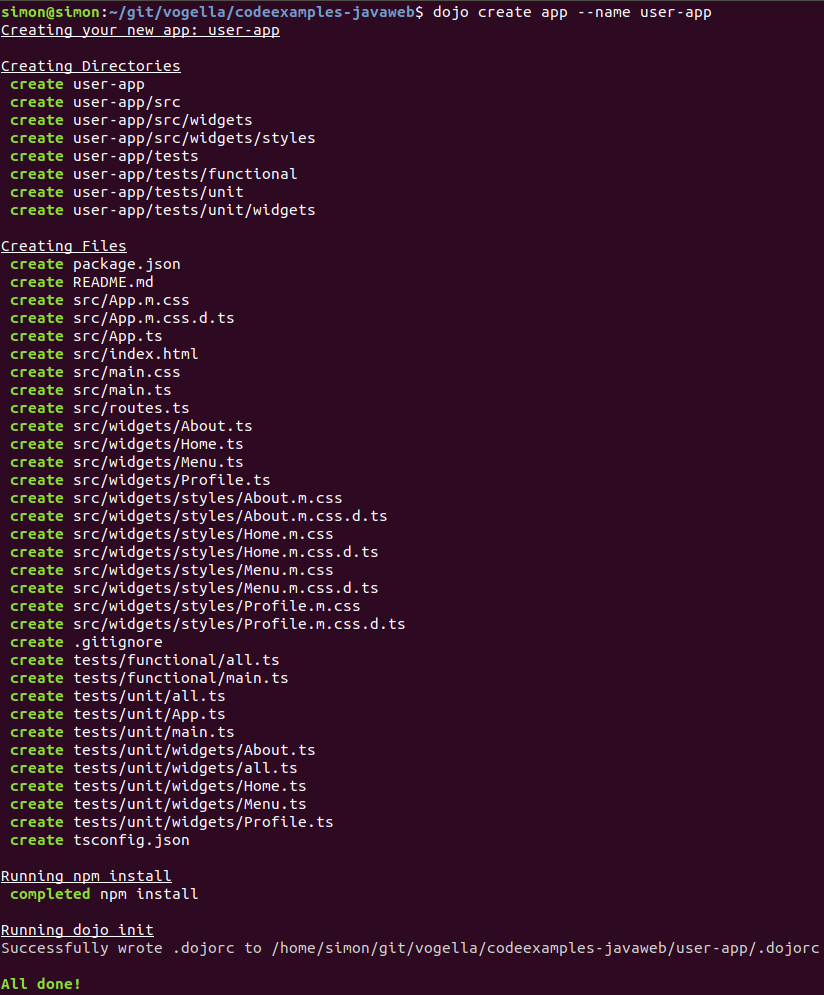
| This is based on Dojo 5 and may look different in future versions. |
The app can be built by running:
dojo build --mode dev --watch --serve (1)

// or ...

dojo build (2)
| 1 | Starts a local server (https://localhost:9999/), which tracks file changes and rebuilds automatically. |
| 2 | Builds a distribution of the app in the user-app/output/dist folder that can be deployed on a real server or be run without server. |

In the following chapters the source code of the user-app single page web application will be explained.
4. Routes in dojo
When you click on the PROFILE link the URL changes to https://localhost:9999/#profile, which means that the # anchor is used to route between different pages of the SPA.
The routes themselves are specified in the routes.ts file, which looks like this:
export default [
    {
        path: 'home', (1)
        outlet: 'home', (2)
        defaultRoute: true (3)
    },
    {
        path: 'about',
        outlet: 'about'
    },
    {
        path: 'profile',
        outlet: 'profile'
    }
];| 1 | The path, which is used after the # |
| 2 | An outlet is a container, which is rendered on demand. By demand the #{path} route is meant. |
| 3 | Specify a default route when navigating to the index.html. |
These routes are applied in the main.ts file, which itself is the main entry point of the SPA.
import renderer from '@dojo/framework/widget-core/vdom';
import Registry from '@dojo/framework/widget-core/Registry';
import { w } from '@dojo/framework/widget-core/d';
import { registerRouterInjector } from '@dojo/framework/routing/RouterInjector';
import { registerThemeInjector } from '@dojo/framework/widget-core/mixins/Themed';
import dojo from '@dojo/themes/dojo';
import '@dojo/themes/dojo/index.css';

import routes from './routes'; (1)
import App from './App'; (2)

const registry = new Registry(); (3)
registerRouterInjector(routes, registry); (4)
registerThemeInjector(dojo, registry); (5)

const r = renderer(() => w(App, {})); (6)
r.mount({ registry });| 1 | Import the routes |
| 2 | Import the application widget to mount it with a renderer |
| 3 | Create the Registry, which manages application state and objects |
| 4 | Register the routes for the SPA |
| 5 | Enable themes for the widgets |
| 6 | Render the App widget and mount it |
Now that a router has been created and is known by the registry (4) let us have a look at the App widget, which is rendered.
import WidgetBase from '@dojo/framework/widget-core/WidgetBase';
import { v, w } from '@dojo/framework/widget-core/d';
import Outlet from '@dojo/framework/routing/Outlet';

import Menu from './widgets/Menu';
import Home from './widgets/Home';
import About from './widgets/About';
import Profile from './widgets/Profile';

import * as css from './App.m.css';

export default class App extends WidgetBase { (1)
    protected render() {
        return v('div', { classes: [css.root] }, [ (2)
            w(Menu, {}), (3)
            v('div', [
                w(Outlet, { key: 'home', id: 'home', renderer: () => w(Home, {}) }), (4)
                w(Outlet, { key: 'about', id: 'about', renderer: () => w(About, {}) }),
                w(Outlet, { key: 'profile', id: 'profile', renderer: () => w(Profile, { username: 'Dojo User' }) })
            ])
        ]);
    }
}| 1 | Dojo widgets are usually derived from WidgetBase, where the render method should be overridden |
| 2 | The imported v method is used to render usual HTML nodes, e.g., <div> elements |
| 3 | The imported w method is used to render widgets |
| 4 | Outlets are also widgets, which will be rendered on route changes |
The Menu widget (3), which is defined in ./widgets/Menu.ts, contains Link widgets.
The Link widgets have a to property that points to a certain route to render a specific outlet.
import WidgetBase from '@dojo/framework/widget-core/WidgetBase';
import { w } from '@dojo/framework/widget-core/d';
import Link from '@dojo/framework/routing/ActiveLink';
import Toolbar from '@dojo/widgets/toolbar';

import * as css from './styles/Menu.m.css';

export default class Menu extends WidgetBase {
    protected render() {
        return w(Toolbar, { heading: 'My Dojo App!', collapseWidth: 600 }, [
            w(
                Link,
                {
                    to: 'home',
                    classes: [css.link],
                    activeClasses: [css.selected]
                },
                ['Home']
            ),
            w(
                Link,
                {
                    to: 'about',
                    classes: [css.link],
                    activeClasses: [css.selected]
                },
                ['About']
            ),
            w(
                Link,
                {
                    to: 'profile',
                    classes: [css.link],
                    activeClasses: [css.selected]
                },
                ['Profile']
            )
        ]);
    }
}
5. Exercise - Adding a Login Outlet
Create a Login.ts file inside the widgets folder of the project.
import WidgetBase from '@dojo/framework/widget-core/WidgetBase';
import { v, w } from '@dojo/framework/widget-core/d';
import Button from '@dojo/widgets/button';
import TextInput from '@dojo/widgets/text-input';

export default class Login extends WidgetBase {

    private _onSubmit(event: Event) { (1)
        event.preventDefault();
        // ... to be continued
    }

    private _onEmailInput(email:  string) {
        // ... to be continued
    }

    private _onPasswordInput(password: string) {
        // ... to be continued
    }

    protected render() {
        return v('div', { }, [
                v('form', {
                    onsubmit: this._onSubmit (2)
                }, [
                    v('fieldset', { }, [
                        w(TextInput, {
                            key: 'email',
                            label: 'Email',
                            placeholder: 'Email',
                            type: 'email',
                            required: true,
                            onInput: this._onEmailInput (3)
                        }),
                        w(TextInput, {
                            key: 'password',
                            label: 'Password',
                            placeholder: 'Password',
                            type: 'password',
                            required: true,
                            onInput: this._onPasswordInput (4)
                        }),
                        w(Button, { }, [ 'Login' ]) (5)
                    ]),
                ])
        ]);
    }
}| 1 | Specify action listener for the form and its widgets |
| 2 | Register _onSubmit listener for the form submit event |
| 3 | Update _onEmailInput when modifying the text in the TextInput widget |
| 4 | Update _onPasswordInput when modifying the text in the TextInput widget |
| 5 | The Button widget has no action listener applied, but is part of the form and therefore trigger the submit of the form on click |
Now a login route can be added to the routes.ts file:
export default [
    {
        path: 'home',
        outlet: 'home',
        defaultRoute: true
    },
    {
        path: 'about',
        outlet: 'about'
    },
    {
        path: 'profile',
        outlet: 'profile'
    },
    {
        path: 'login', (1)
        outlet: 'login'
    }
];| 1 | New login route |
Now that the login route is known by the router an Outlet in the App.ts file can be added.
import WidgetBase from '@dojo/framework/widget-core/WidgetBase';
import { v, w } from '@dojo/framework/widget-core/d';
import Outlet from '@dojo/framework/routing/Outlet';

import Menu from './widgets/Menu';
import Home from './widgets/Home';
import About from './widgets/About';
import Profile from './widgets/Profile';

import * as css from './App.m.css';
import Login from './widgets/Login'; (1)

export default class App extends WidgetBase {
    protected render() {
        return v('div', { classes: [css.root] }, [
            w(Menu, {}),
            v('div', [
                w(Outlet, { key: 'home', id: 'home', renderer: () => w(Home, {}) }),
                w(Outlet, { key: 'about', id: 'about', renderer: () => w(About, {}) }),
                w(Outlet, { key: 'profile', id: 'profile', renderer: () => w(Profile, { username: 'Dojo User' }) }),
                w(Outlet, { key: 'login', id: 'login', renderer: () => w(Login, { }) }) (2)
            ])
        ]);
    }
}| 1 | The Login class has to be imported for usage in the App class |
| 2 | Add an Outlet, which renders the Login widget |
Now the only thing, which is left to do is to add a Link in the Menu widget, so navigating to the login page is easy.
import WidgetBase from '@dojo/framework/widget-core/WidgetBase';
import { w } from '@dojo/framework/widget-core/d';
import Link from '@dojo/framework/routing/ActiveLink';
import Toolbar from '@dojo/widgets/toolbar';

import * as css from './styles/Menu.m.css';

export default class Menu extends WidgetBase {
    protected render() {
        return w(Toolbar, { heading: 'My Dojo App!', collapseWidth: 600 }, [
            w(
                Link,
                {
                    to: 'home',
                    classes: [css.link],
                    activeClasses: [css.selected]
                },
                ['Home']
            ),
            w(
                Link,
                {
                    to: 'about',
                    classes: [css.link],
                    activeClasses: [css.selected]
                },
                ['About']
            ),
            w(
                Link,
                {
                    to: 'profile',
                    classes: [css.link],
                    activeClasses: [css.selected]
                },
                ['Profile']
            ),
            w(
                Link,
                {
                    to: 'login', (1)
                    classes: [css.link],
                    activeClasses: [css.selected]
                },
                ['login']
            )
        ]);
    }
}| 1 | Point to the login route |
Now the dojo application can be built by using dojo build --mode dev --watch --serve.
When navigating to https://localhost:9999/#login the following result should be shown:
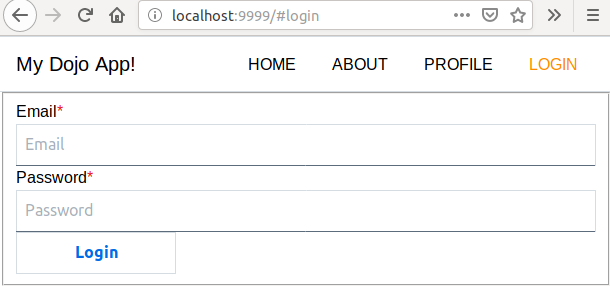
Don’t be confused that the TextInput will have the value undefinded when it loses the focus, we will cover that later.
|
6. Exercise - Styling the Login widget
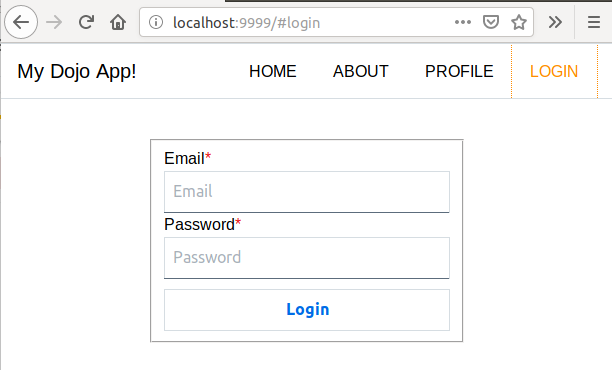
Right now the Login widgets has 100% width, which does not look that well.
That’s the point where CSS styling will help.
As you can see in the src/widgets/styles folder every generated widget has a *.m.css and a corresponding *.m.css.d.ts file.
For the Login widget this has not been done yet.
So let us create a Login.m.css file with the following contents:
.root {
    margin-top: 40px;
    text-align: center;
    border: 0px;
}

.root fieldset,
.root label {
    display: inline-block;
    text-align: left;
}

.root button {
    margin-top: 10px;
    display: inline-block;
    width: 100%;
}
Now the CSS has to be imported and applied as CSS class for the root div in the Login widget.
import WidgetBase from '@dojo/framework/widget-core/WidgetBase';
import { v, w } from '@dojo/framework/widget-core/d';
import Button from '@dojo/widgets/button';
import TextInput from '@dojo/widgets/text-input';

import * as css from './styles/Login.m.css'; (1)

export default class Login extends WidgetBase {

    private _onSubmit(event: Event) {
        event.preventDefault();
    }

    private _onEmailInput(email:  string) {
    }

    private _onPasswordInput(password: string) {
    }

    protected render() {
        return v('div', { classes: css.root }, [ (2)
                v('form', {
                    onsubmit: this._onSubmit
                }, [
                    v('fieldset', { }, [
                        w(TextInput, {
                            key: 'email',
                            label: 'Email',
                            placeholder: 'Email',
                            type: 'email',
                            required: true,
                            onInput: this._onEmailInput
                        }),
                        w(TextInput, {
                            key: 'password',
                            label: 'Password',
                            placeholder: 'Password',
                            type: 'password',
                            required: true,
                            onInput: this._onPasswordInput
                        }),
                        w(Button, { }, [ 'Login' ])
                    ]),
                ])
        ]);
    }
}| 1 | Import the ./styles/Login.m.css CSS so that it can be applied |
| 2 | Apply the CSS by using the classes: property |
Until now the TypeScript compiler will show some errors that the CSS cannot be imported. That happens because the Login.m.css.d.ts is not generated yet.
By running dojo build on the command line will generate the Login.m.css.d.ts,
but the build unfortunately fails the first time and a second build is necessary to make the build run successfully.
The result should now look like this:
| Further details about styling and theming can be found in the Dojo Theming tutorial. |
7. Exercise - Translations (i18n) for the Login widget
One of Dojo’s strengths is that it comes with i18n support out of the box.
Tet us translate the Login widget into German.
For i18n create a nls folder inside the src/widgets folder. Inside the nls folder create a de (German) folder.
Now create the follwing files:
-
/src/widgets/nls/de/login.ts
-
/src/widgets/nls/login.ts
const messages = {
    email: 'E-Mail',
    password: 'Passwort',
    login : 'Anmelden'
};
export default messages;import de from './de/login';
export default {
locales: {
de: () => de
},
messages: {
email: 'Email',
password: 'Password',
login : 'Login'
}
};To make use of the messages values the Login widget has to be modified to extend I18nMixin, which decorates WidgetBase.
import WidgetBase from '@dojo/framework/widget-core/WidgetBase';
import { v, w } from '@dojo/framework/widget-core/d';
import Button from '@dojo/widgets/button';
import TextInput from '@dojo/widgets/text-input';
import I18nMixin from '@dojo/framework/widget-core/mixins/I18n'; (1)
import messageBundle from './nls/login'; (2)


import * as css from './styles/Login.m.css';

export default class Login extends I18nMixin(WidgetBase) { (3)

    private _onSubmit(event: Event) {
        event.preventDefault();
    }

    private _onEmailInput(email:  string) {
    }

    private _onPasswordInput(password: string) {
    }

    protected render() {
        const { messages } = this.localizeBundle(messageBundle); (4)

        return v('div', { classes: css.root }, [
                v('form', {
                    onsubmit: this._onSubmit
                }, [
                    v('fieldset', { }, [
                        w(TextInput, {
                            key: 'email',
                            label: messages.email, (5)
                            placeholder: 'Email',
                            type: 'email',
                            required: true,
                            onInput: this._onEmailInput
                        }),
                        w(TextInput, {
                            key: 'password',
                            label: messages.password, (6)
                            placeholder: 'Password',
                            type: 'password',
                            required: true,
                            onInput: this._onPasswordInput
                        }),
                        w(Button, { }, [ messages.login ]) (7)
                    ]),
                ])
        ]);
    }
}| 1 | Import the I18nMixin class |
| 2 | Get the messageBundle from the nls folder |
| 3 | Extend I18nMixin, which wraps/decorates WidgetBase |
| 4 | The I18nMixin class comes with a localizeBundle method, which is capable of loading our messageBundle. |
| 5 | Make use of the messages of the messageBundle (messages.email) |
| 6 | Make use of the messages of the messageBundle (messages.password) |
| 7 | Make use of the messages of the messageBundle (messages.login) |
Dojo now automatically determines your locale and makes use of the correct messages.
Some web pages also provide buttons to switch the locale at runtime.
This can also be done by using the switchLocale method from @dojo/framework/i18n/i18n.
8. Exercise - Switching the locale at runtime
The locale can be switched by using the switchLocale method from @dojo/framework/i18n/i18n.
To archive this we will add another Button, which will call this method onClick.
import WidgetBase from '@dojo/framework/widget-core/WidgetBase';
import { v, w } from '@dojo/framework/widget-core/d';
import Button from '@dojo/widgets/button';
import TextInput from '@dojo/widgets/text-input';
import I18nMixin from '@dojo/framework/widget-core/mixins/I18n';
import i18n, { switchLocale, systemLocale } from '@dojo/framework/i18n/i18n'; (1)
import messageBundle from './nls/login';

import * as css from './styles/Login.m.css';

export default class Login extends I18nMixin(WidgetBase) {

    private _onSubmit(event: Event) {
        event.preventDefault();
    }

    private _onEmailInput(email:  string) {
    }

    private _onPasswordInput(password: string) {
    }

    private _switchLocale() {
        if(i18n.locale !== 'de') { (2)
            switchLocale('de'); (3)
        } else {
            switchLocale(systemLocale); (4)
        }
        this.invalidate(); (5)
    }

    protected render() {
        const { messages } = this.localizeBundle(messageBundle);

        return v('div', { classes: css.root }, [
                v('form', {
                    onsubmit: this._onSubmit
                }, [
                    v('fieldset', { }, [
                        w(TextInput, {
                            key: 'email',
                            label: messages.email,
                            placeholder: 'Email',
                            type: 'email',
                            required: true,
                            onInput: this._onEmailInput
                        }),
                        w(TextInput, {
                            key: 'password',
                            label: messages.password,
                            placeholder: 'Password',
                            type: 'password',
                            required: true,
                            onInput: this._onPasswordInput
                        }),
                        w(Button, { }, [ messages.login ])
                    ]),
                ]),
                w(Button, {
                    onClick: this._switchLocale (6)
                }, ['Switch locale'])
        ]);
    }
}| 1 | Import necessary objects and methods |
| 2 | i18n.locale will return the currently set locale |
| 3 | Switch to de locale if it is not the current i18n.locale |
| 4 | Switch to the default system locale else wise |
| 5 | Redraw the widget to update the locale messages |
| 6 | Button, which calls the _switchLocale method. |
|
If your default system locale is already de the |
The expected output is shown in the screenshot below.
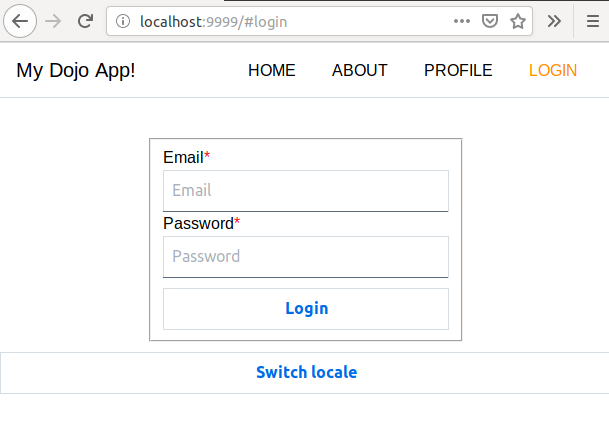
and like this after pressing the Switch locale button:
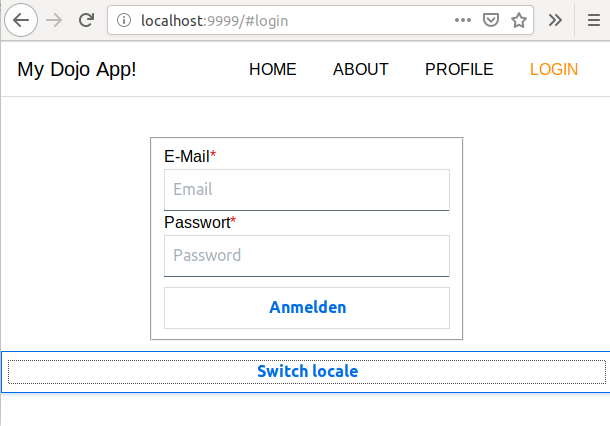
The task to add the Switch locale Button label to the messages class to translate the Button as well
and also properly styling it with CSS is left for the reader.
9. Widget Properties
Dojo widgets can specify properties as generic type for WidgetBase and its decorators.
An example can be seen in the existing Profile widget:
import WidgetBase from '@dojo/framework/widget-core/WidgetBase';
import { v } from '@dojo/framework/widget-core/d';

import * as css from './styles/Profile.m.css';

export interface ProfileProperties { (1)
    username: string;
}

export default class Profile extends WidgetBase<ProfileProperties> { (2)
    protected render() {
        const { username } = this.properties; (3)
        return v('h1', { classes: [css.root] }, [`Welcome ${username}!`]); (4)
    }
}| 1 | Interface for properties of the widget to configure the widget |
| 2 | Specify the interface as generic type for WidgetBase, so that users of the widget are forced to pass the necessary property object |
| 3 | Get certain values from the property interface, e.g., username. |
| 4 | Render the property value, e.g., username. |
You can change the App.ts file to manipulate the username property, which is passed to the Profile widget.
    // original code
    w(Outlet, { key: 'profile', id: 'profile', renderer: () => w(Profile, { username: 'Dojo User' }) }),

    // changed username to 'Simon Scholz'
    w(Outlet, { key: 'profile', id: 'profile', renderer: () => w(Profile, { username: 'Simon Scholz' }) }),
When rebuilding the app the Profile widget will show the following:

10. Exercise - Define LoginProperties
Now we want to come back to the issue that the TextInput widgets will have an undefined value when losing the focus.
The Login widget is not supposed to do the login process itself, but it should delegate it to another component.
Therefore a LoginProperties interface is created, which specifies the needs of the Login widget.
Pretty much like the Profile widget does.
export interface LoginProperties {
    email: string; (1)
    password: string; (2)
    inProgress?: boolean; (3)
    onEmailInput: (email: string) => void; (4)
    onPasswordInput: (password: string) => void; (5)
    onLogin: (login: object) => void; (6)
}| 1 | Get the email string for the email TextInput widget. |
| 2 | Get the password string for the password TextInput widget. |
| 3 | Progress boolean to disable the login Button once the login is in progress |
| 4 | Method to be called on email input |
| 5 | Method to be called on password input |
| 6 | Method to be called when the login form is submitted |
Now the private methods of the Login widget can do something by using the LoginProperties.
import WidgetBase from '@dojo/framework/widget-core/WidgetBase';
import { v, w } from '@dojo/framework/widget-core/d';
import Button from '@dojo/widgets/button';
import TextInput from '@dojo/widgets/text-input';
import I18nMixin from '@dojo/framework/widget-core/mixins/I18n';
import i18n, { switchLocale, systemLocale } from '@dojo/framework/i18n/i18n';
import messageBundle from './nls/login';

import * as css from './styles/Login.m.css';

export interface LoginProperties {
    email: string;
    password: string;
    inProgress?: boolean;
    onEmailInput: (email: string) => void;
    onPasswordInput: (password: string) => void;
    onLogin: (login: object) => void;
}

export default class Login extends I18nMixin(WidgetBase)<LoginProperties> { (1)

    private _onSubmit(event: Event) {
        event.preventDefault();
        this.properties.onLogin({}); (2)
    }

    private _onEmailInput(email: string) {
        this.properties.onEmailInput(email); (3)
    }

    private _onPasswordInput(password: string) {
        this.properties.onPasswordInput(password); (4)
    }

    private _switchLocale() {
        if(i18n.locale !== 'de') {
            switchLocale('de');
        } else {
            switchLocale(systemLocale);
        }
        this.invalidate();
    }

    protected render() {
        const { messages } = this.localizeBundle(messageBundle);
        const { email, password, inProgress = false } = this.properties;

        return v('div', { classes: css.root }, [
                v('form', {
                    onsubmit: this._onSubmit
                }, [
                    v('fieldset', { }, [
                        w(TextInput, {
                            key: 'email',
                            label: messages.email,
                            placeholder: 'Email',
                            type: 'email',
                            required: true,
                            value: email, (5)
                            onInput: this._onEmailInput
                        }),
                        w(TextInput, {
                            key: 'password',
                            label: messages.password,
                            placeholder: 'Password',
                            type: 'password',
                            required: true,
                            value: password, (6)
                            onInput: this._onPasswordInput
                        }),
                        w(Button, {
                            disabled: inProgress (7)
                        }, [ messages.login ])
                    ]),
                ]),
                w(Button, {
                    onClick: this._switchLocale
                }, ['Switch locale'])
        ]);
    }
}| 1 | Add LoginProperties as generic type for the Login widget |
| 2 | Call the onLogin method when the form is submitted |
| 3 | Call the onEmailInput method when the email input changes |
| 4 | Call the onPasswordInput method when the password input changes |
| 5 | Get the email value from the properties |
| 6 | Get the password value from the properties |
| 7 | Disable the login button when the login process is running |
Now that the LoginProperties are defined as generic type of the Login widget,
the App class will complain that all these properties have to be passed to the Login widget.
Just like it is done for the Profile widget.
For now we will create all these properties in the App class, but later we are going to externalize this.
import WidgetBase from '@dojo/framework/widget-core/WidgetBase';
import { v, w } from '@dojo/framework/widget-core/d';
import Outlet from '@dojo/framework/routing/Outlet';
import I18nMixin from '@dojo/framework/widget-core/mixins/I18n';

import Menu from './widgets/Menu';
import Home from './widgets/Home';
import About from './widgets/About';
import Profile from './widgets/Profile';

import * as css from './App.m.css';
import { LoginProperties } from './widgets/Login';
import Login from './widgets/Login';

export default class App extends I18nMixin(WidgetBase) {

    private getLoginProperties() : LoginProperties {
        let _email = "simon.scholz@vogella.com" (1)
        let _password = "super secret"
        let _inProgress = false;
        return {
            email: _email, (2)
            password: _password,
            inProgress: _inProgress,
            onEmailInput: (email: string) => {_email = email}, (3)
            onPasswordInput: (password: string) => {_password = password}, (4)
            onLogin: (login: object) => { (5)
                _inProgress = true;
                console.log("Do login");
            }
        };
    }

    protected render() {
        return v('div', { classes: [css.root] }, [
            w(Menu, {}),
            v('div', [
                w(Outlet, { key: 'home', id: 'home', renderer: () => w(Home, {}) }),
                w(Outlet, { key: 'about', id: 'about', renderer: () => w(About, {}) }),
                w(Outlet, { key: 'profile', id: 'profile', renderer: () => w(Profile, { username: 'Simon Scholz' }) }),
                w(Outlet, { key: 'login', id: 'login', renderer: () => w(Login, this.getLoginProperties()) })
            ])
        ]);
    }
}| 1 | Set default values for email, password and inProgress |
| 2 | Apply email, password and inProgress for the actual LoginProperties |
| 3 | Save the email value in the _email variable |
| 4 | Save the password value in the _password variable |
| 5 | Run the login operation, which currently only logs Do login to the console and the inProgress to true |
Now the TextInput widgets of the Login widget should not have undefined as a value any more and
when the login button is clicked the console of the browser should output Do login.
11. Exercise - Using the Dojo Store
To avoid that the App class is polluted with its child widget’s states and methods Dojo provides a concept of Containers,
that are in charge to manage all that for a certain widget.
In this tutorial we skip the easy state management approaches for small applications and directly dive into Dojo Stores.
| State management for smaller applications is covered by the official Dojo tutorials. https://dojo.io/tutorials/1010_containers_and_injecting_state/ |
14. Dojo resources
14.1. vogella Java example code
If you need more assistance we offer Online Training and Onsite training as well as consulting

