Lars Vogel, (©) 2009 - 2026 vogella GmbH :revnumber: 1.5 :revdate: 30.09.2025
This tutorial describes how to create a custom text editor for the Eclipse IDE, with code completion, syntax highlighting, hover and code mining support.
1. Eclipse Editors
A text editor allows you to modify data, typically text and applies the changes to the underlying model whenever the save action is triggered.
To provide editor functionality for a certain file extension or content type, you can:
-
Extent the generic editor
-
Implement your own editor
Extending the generic editor is the preferred choice for new files as this accelerates and simplifies the implementation.
Add support a new content type in the generic editor you need to:
-
add a content type
-
register a
PresentationReconsilerto it via theorg.eclipse.ui.genericeditor.presentationReconcilersextension point
1.1. JFace text framework
In JFace text a text document is modeled as an IDocument.
To view or edit an IDocument document you use an ITextViewer as controller that uses a StyledText widget for its presentation.
The IDocument interface stores text and provide support for:
-
line information
-
text manipulation
-
document change listeners
-
customizable position management
-
search
-
customizable partition management
-
document partition change listeners
A document can be partitioned into different partitions via a document partitioner. These partitions can be manipulated according to their type, e.g., they can have different foreground colors.
1.2. Introduction to presentation reconciler
Every time the user changes the document, the presentation reconciler determines which region of the visual presentation should be invalidated and how to repair it.
The highlighting of source code can be achieved by using an presentation reconciler.
Such a presentation reconciler can be defined via an org.eclipse.ui.genericeditor.presentationReconcilers extension.
It requires the specification of a contentType and a class that implements the IPresentationReconciler interface.
When using an IPresentationReconciler certain IRules can be applied for a specified content type.
An IRule defines a rule used in the scanning of text for document partitioning or text styling.
The partition is a semantic view onto the document:
-
each partition has a content type
-
each character of a document belongs to a partition
-
documents support multiple partitions
-
partitioning is always up-to-date
1.3. API for working with editors
You can open an Editor via the current active page. For this you need the EditorInput object and the ID for the editor which is defined in the "org.eclipse.ui.editors" extension point.
page.openEditor(new YourEditorInput(), ID_OF_THE_EDITOR);To get the page you can use:
// If you are in a view
getViewSite().getPage();
// If you are in an command
HandlerUtil.getActiveWorkbenchWindow(event).getActivePage();
// Somewhere else
PlatformUI.getWorkbench().getActiveWorkbenchWindow().getActivePage();1.5. Using TextMate Grammars for syntax highlighting
TextMate grammars are JSON or YAML-based syntax definitions that describe how to tokenize and style text in an editor, commonly used for syntax highlighting. They follow a hierarchical, pattern-matching approach and are widely supported in editors like Visual Studio Code and Eclipse (via plugins or extensions).
TM4E brings Java API to tokenize textual documents according to TextMate grammars with an Eclipse IDE client that can do syntax highlighting according to this tokenization; and Eclipse IDE client for VSCode Language Configuration to support matching bracket, auto close, on enter support.
2. Adding a hyperlink detector to an editor
2.1. Hyperlinks in a source editor
If you hold down the Ctrl and click on an element in the Java editor you can navigate to it.
This functionality is provided via extensions for the org.eclipse.ui.workbench.texteditor.hyperlinkDetectors extension point.
The specified name is visible in the preferences under .
The targetId points to the type of editor you want to support.
If you want to use in all text editors use org.eclipse.ui.DefaultTextEditor.
To target the generic editor use the org.eclipse.ui.genericeditor.GenericEditor target id.
An IHyperlinkDetector is supposed to return an array of IHyperlink objects.
The IHyperlink implementation performs the hyperlink action.
2.2. Adding colors and fonts preferences
Eclipse provides a page for the customizations of colors and fonts by the user under .
To define an entry for this page, you need to define an extension for the org.eclipse.ui.themes extension point.
For example, you can provide a category, font and color with the following entry in the plugin.xml file or your plug-in.
 <extension point="org.eclipse.ui.themes">
    <themeElementCategory
        id="com.vogella.eclipse.preferences.mythemeElementCategory"
        label="vogella category">
        <description>
            An example theme category
        </description>
    </themeElementCategory>
    <colorDefinition
        categoryId="com.vogella.eclipse.preferences.mythemeElementCategory"
        id="com.vogella.eclipse.preferences.myFirstColorDefinition"
        label="vogella color"
        value="COLOR_DARK_BLUE">
        <description>
            Your description for the color
        </description>
    </colorDefinition>
    <fontDefinition
        categoryId="com.vogella.eclipse.preferences.mythemeElementCategory"
        id="com.vogella.eclipse.preferences.myFirstFontDefinition"
        label="vogella Font"
        value="Lucida Sans-italic-18">
        <description>
            Your description for the font
        </description>
    </fontDefinition>
</extension>
The value for the color can be a COLOR_* constants defined in the SWT class.
You can specify RGB values like 255,0,0.
The value for the font is defined via the following pattern:`fontname-style-height`
The preference can now be changed via the user or via the CSS engine.
To get the current value you can use the IThemeManager.
// Eclipse 4 API
@Inject IThemeManager themeManager;

// Eclipse 3 API
IThemeManager themeManager = PlatformUI.getWorkbench().getThemeManager();

ITheme currentTheme = themeManager.getCurrentTheme();

ColorRegistry colorRegistry = currentTheme.getColorRegistry();
Color color = colorRegistry.get("com.vogella.eclipse.preferences.myFirstColorDefinition");

FontRegistry fontRegistry = currentTheme.getFontRegistry();
Font font = fontRegistry.get("com.vogella.eclipse.preferences.myFirstFontDefinition");
2.3. Custom spelling engine
The org.eclipse.ui.workbench.texteditor plug-in provides the option to register a custom spelling engine via the
org.eclipse.ui.workbench.texteditor.spellingEngine extension point.
3. Exercise : Use generic editor for a custom file type
Eclipse provides the generic editor as basis for creating a text based editor.
In this exercise, you associate files with the tasks extension with a text editor.
Other the following exercises, you will provide more and more functionality for this editor.
test:Hello
Helper:stuff
3.1. Create a new plug-in
Create a new simple plug-in project named com.vogella.ide.editor.tasks.
3.2. Add Manifest dependencies
Open the editor for the MANIFEST.MF file and add the following dependencies via the Dependencies tab using the Add button.
-
org.eclipse.text
-
org.eclipse.ui
-
org.eclipse.ui.editors
-
org.eclipse.ui.genericeditor
-
org.eclipse.ui.workbench.texteditor
-
org.eclipse.jface.text
-
org.eclipse.core.runtime
-
org.eclipse.core.resources
It should look similar to the following (version numbers have been removed as they change frequently).
Manifest-Version: 1.0
Bundle-ManifestVersion: 2
Bundle-Name: Tasks
Bundle-SymbolicName: com.vogella.ide.editor.tasks
Bundle-Version: 1.0.0.qualifier
Bundle-Vendor: VOGELLA
Automatic-Module-Name: com.vogella.ide.editor.tasks
Bundle-RequiredExecutionEnvironment: JavaSE-21
Require-Bundle: org.eclipse.text,
 org.eclipse.ui,
 org.eclipse.ui.editors,
 org.eclipse.ui.genericeditor,
 org.eclipse.ui.workbench.texteditor,
 org.eclipse.jface.text,
 org.eclipse.core.runtime,
 org.eclipse.core.resources
3.3. Define content type
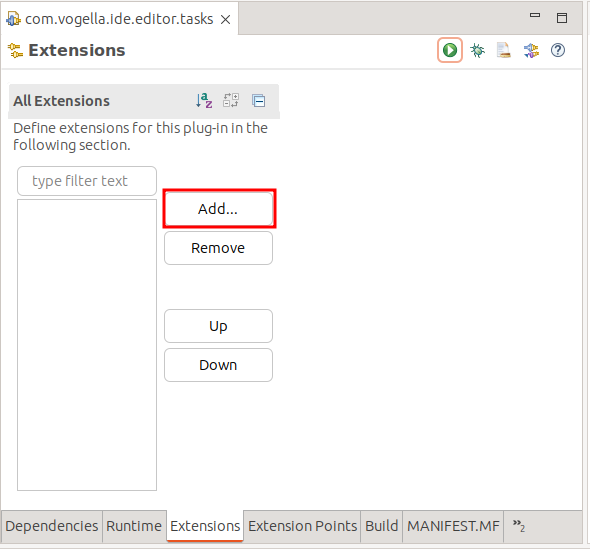
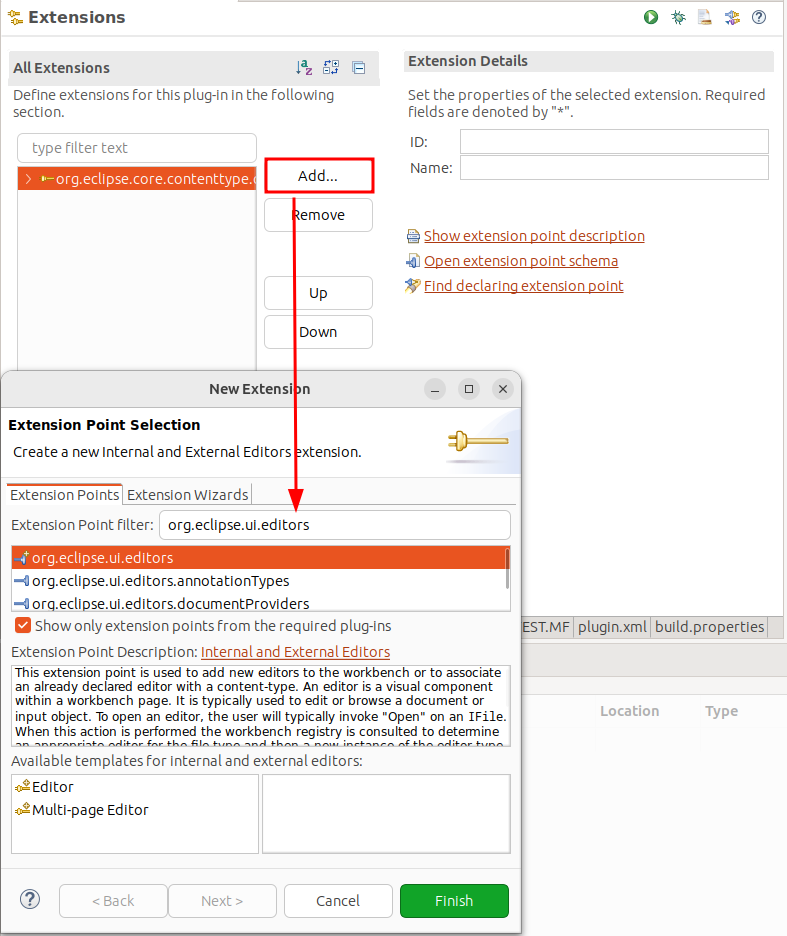
Using the MANIFEST.MF editor, open the Extensions tab and press the Add… button.
Select the org.eclipse.core.contenttype.contentTypes extension point.
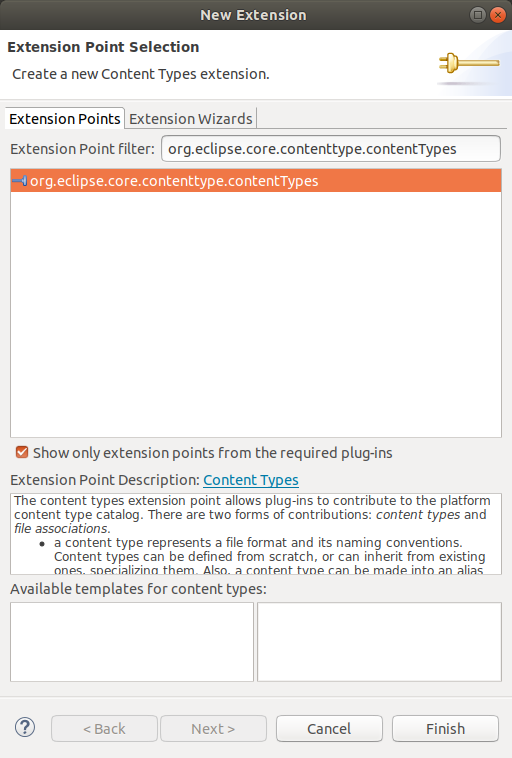
Press Finish to close the dialog and add the extension.
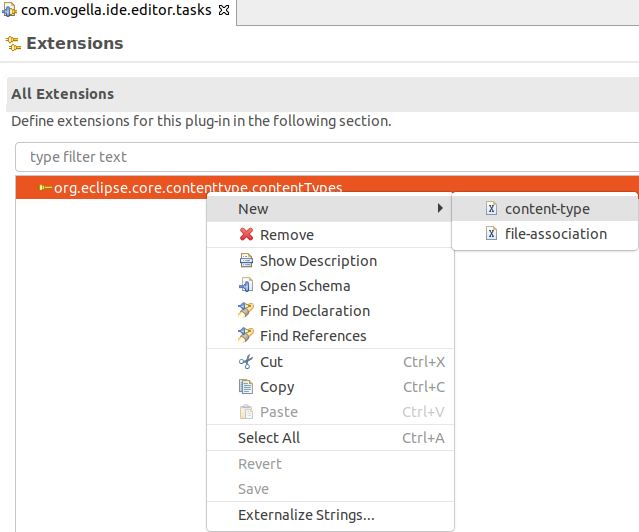
Right-click on your new entry and select .
Specify a content type for files with the .tasks extension similar to the following screenshot.
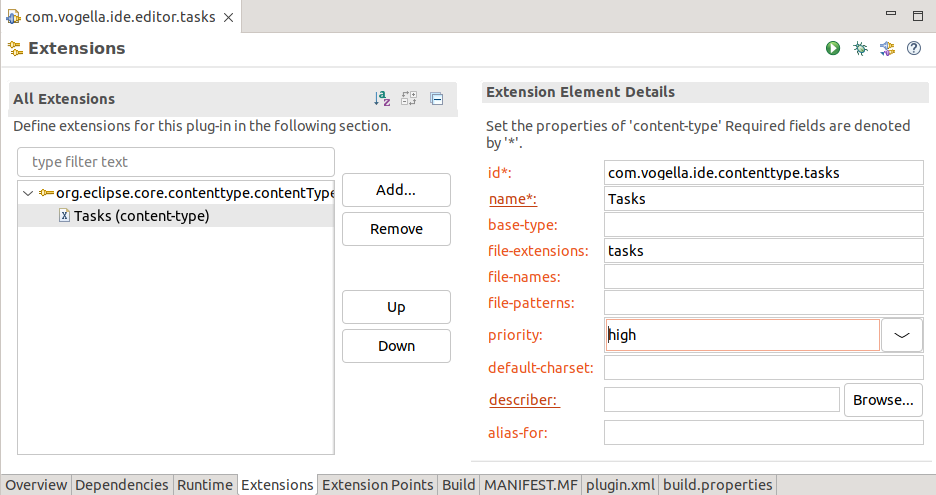
This creates an entry in the plugin.xml file.
Your plugin.xml file should look similar to the following listing. You can see this by clicking the plugin.xml tab of the manifest editor.
<?xml version="1.0" encoding="UTF-8"?>
<?eclipse version="3.4"?>
<plugin>
   <extension
         point="org.eclipse.core.contenttype.contentTypes">
      <content-type
            file-extensions="tasks"
            id="com.vogella.ide.contenttype.tasks"
            name="Tasks"
            priority="high">
      </content-type>
   </extension>

</plugin>
3.4. Associate content type with editor
This content type can be associated with a certain editor.
The org.eclipse.ui.editors extension point can be used for this.
Add the org.eclipse.ui.editors extension via the Add button on the Extensions tab.
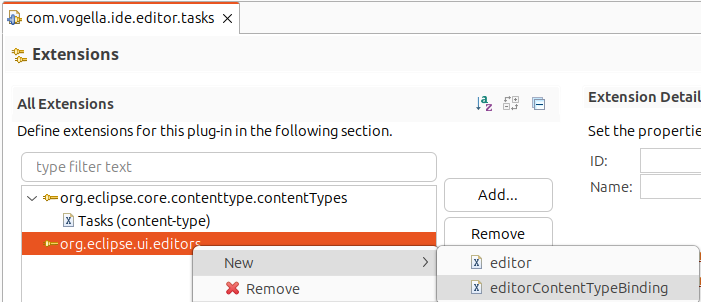
Right-click on your org.eclipse.ui.editors, and select to define this.
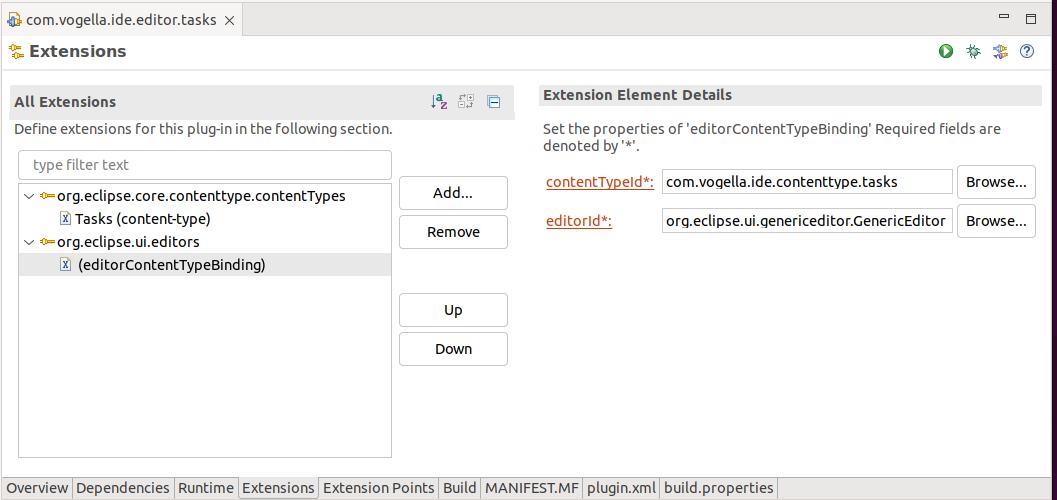
The resulting plugin.xml should now looks similar to the following.
<?xml version="1.0" encoding="UTF-8"?>
<?eclipse version="3.4"?>
<plugin>
   <extension
         point="org.eclipse.core.contenttype.contentTypes">
      <content-type
            file-extensions="tasks"
            id="com.vogella.ide.contenttype.tasks"
            name="Tasks"
            priority="high">
      </content-type>
   </extension>
   <extension
         point="org.eclipse.ui.editors">
      <editorContentTypeBinding
            contentTypeId="com.vogella.ide.contenttype.tasks"
            editorId="org.eclipse.ui.genericeditor.GenericEditor">
      </editorContentTypeBinding>
   </extension>

</plugin>
3.5. Add your plug-in to your product via the feature
Add your new plug-in to your IDE feature or product.
If you are not using features or products, skip this step
3.6. Test your development
Start a new runtime Eclipse via the your product, if you are using a product configuration file.
|
Starting via the product updates the associated launch configuration. If you start the runtime Eclipse directly via an unmodified launch configuration, your updated product / feature content is not considered. |
If you are not using features and a product, update the launch configuration directly to ensure you new plug-in is included in the start.
In your runtime Eclipse, ensure that you content type is visible in .
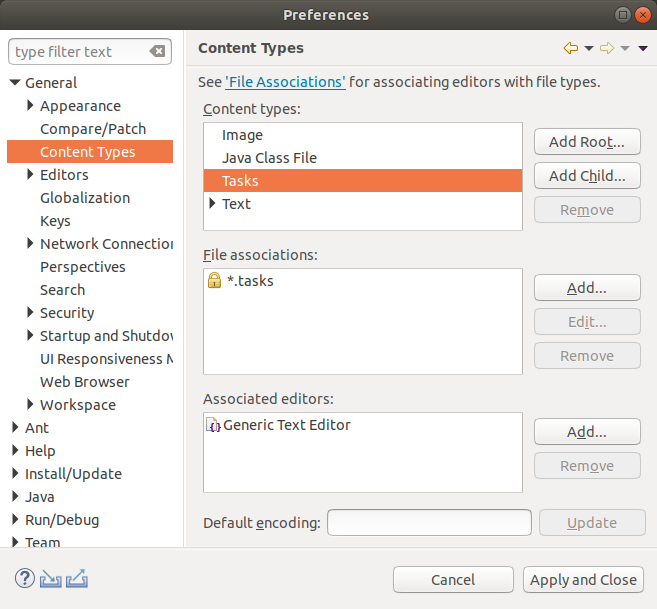
Create a new project (either General or Java project).
In this new project create a new file with the .tasks extension.
If you open the file, it should open in the generic text editor.

The icon should be the icon of the generic editor.
3.7. Optional: Define icon for your content type
Download icons with size 16×16x (and with 32×32px) from the Internet or use the Plug-in Image Browser view to copy an existing icon into your project.
If you are reading this text online, you can download the following icons via right-mouse click in your browser.


Create a folder icons and copy your icons into this folder.
Add the extension point org.eclipse.ui.genericeditor.icons to your plugin.xml file and configure that the generic editor use your icon for your content type.
The new entry should look similar to the following:
   <extension
         point="org.eclipse.ui.genericeditor.icons">
      <icon
            contentType="com.vogella.ide.contenttype.tasks"
            icon="icons/file_type_taskfile.png">
      </icon>
   </extension>
Ensure that the icons folder is include in the export as defined via the build.properites file.
source.. = src/
output.. = bin/
bin.includes = META-INF/,\
               .,\
               plugin.xml,\
               icons/
4. Exercise: Implementing syntax highlighting
In this exercise, you implement syntax highlighting for your tasks file editor.
You continue to work on the com.vogella.ide.editor.tasks plug-in.
4.1. Implement syntax highlighting
Implement the following class to define a IRule.
package com.vogella.ide.editor.tasks;

import org.eclipse.jface.text.rules.ICharacterScanner;
import org.eclipse.jface.text.rules.IRule;
import org.eclipse.jface.text.rules.IToken;
import org.eclipse.jface.text.rules.Token;

public class PropertyNameRule implements IRule {

    private final Token token;

    public PropertyNameRule(Token token) {
        this.token = token;
    }

    @Override
    public IToken evaluate(ICharacterScanner scanner) {
        int c = scanner.read();
        int count = 1;

        while (c != ICharacterScanner.EOF) {

            if (c == ':') {
                return token;
            }

            if ('\n' == c || '\r' == c) {
                break;
            }

            count++;
            c = scanner.read();
        }

        // put the scanner back to the original position if no match
        for (int i = 0; i < count; i++) {
            scanner.unread();
        }

        return Token.UNDEFINED;
    }
}
Implement the following class which will be used as the reconciler for your editor.
package com.vogella.ide.editor.tasks;

import org.eclipse.jface.text.IDocument;
import org.eclipse.jface.text.TextAttribute;
import org.eclipse.jface.text.presentation.PresentationReconciler;
import org.eclipse.jface.text.rules.DefaultDamagerRepairer;
import org.eclipse.jface.text.rules.IRule;
import org.eclipse.jface.text.rules.RuleBasedScanner;
import org.eclipse.jface.text.rules.Token;
import org.eclipse.swt.SWT;
import org.eclipse.swt.widgets.Display;

public class PropertiesReconciler extends PresentationReconciler {

    private final TextAttribute tagAttribute = new TextAttribute(
            Display.getCurrent().getSystemColor(SWT.COLOR_DARK_GREEN));

    public PropertiesReconciler() {
        RuleBasedScanner scanner = new RuleBasedScanner();
        IRule rule = new PropertyNameRule(new Token(tagAttribute));
        scanner.setRules(rule);
        DefaultDamagerRepairer dr = new DefaultDamagerRepairer(scanner);
        this.setDamager(dr, IDocument.DEFAULT_CONTENT_TYPE);
        this.setRepairer(dr, IDocument.DEFAULT_CONTENT_TYPE);
    }
}
Add the an extension to the org.eclipse.ui.genericeditor.presentationReconcilers extension point to the plugin.xml file of the com.vogella.ide.editor.tasks plug-in.
<extension
      point="org.eclipse.ui.genericeditor.presentationReconcilers">
    <presentationReconciler
         class="com.vogella.ide.editor.tasks.PropertiesReconciler"
         contentType="com.vogella.ide.contenttype.tasks">
   </presentationReconciler>
</extension>
4.2. Test your implementation
Restart your runtime Eclipse.
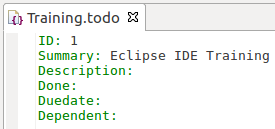
Open a .tasks file and enter a few property values into the file, as for example:
ID: 1
Summary: Eclipse IDE Training
Description:
Done:
Duedate:
Dependent:
The expected output is shown in the screenshot below.
5. Exercise: Implementing syntax highlighting using text mate
In this exercise, you implement syntax highlighting for shell files using an TextMate extension.
| This following exercise is based on Eclipse community newletter June 2018. |
5.1. Add TM4E to target file
Open your target file and add the following to it.
<location includeAllPlatforms="false" includeConfigurePhase="true" includeMode="planner" includeSource="true" type="InstallableUnit">
    <repository location="https://download.eclipse.org/tm4e/releases/latest/"/>
    <unit id="org.eclipse.tm4e.feature.feature.group"/>
</location>
5.2. Add TM4E feature to product
To ensure that the TME4 plug-ins are present at runtime, you must add them to your runtime. Also add the org.eclipse.tm4e.feature.feature.group to your product and start it via the product.
5.3. Implement plug-in
Create a new simple plug-in project called com.vogella.ide.editor.shell.
Open the editor for the MANIFEST.MF file and add the following dependencies via the Dependencies tab using the Add button.
-
org.eclipse.text
-
org.eclipse.ui
-
org.eclipse.ui.editors
-
org.eclipse.ui.genericeditor
-
org.eclipse.ui.workbench.texteditor
-
org.eclipse.jface.text
-
org.eclipse.core.runtime
-
org.eclipse.core.resources
-
org.eclipse.tm4e.registry
5.4. Create syntax description
Create a new folder called syntaxes and create a file named Shell-Unix-Bash.json with the following content.
{
  "scopeName": "source.shell",
  "name": "Shell Script",
  "fileTypes": ["sh", "bash"],
  "patterns": [
    {
      "name": "comment.line.number-sign.shell",
      "match": "#.*$"
    },
    {
      "name": "string.quoted.double.shell",
      "begin": "\"",
      "end": "\"",
      "patterns": [
        {
          "name": "variable.other.shell",
          "match": "\\$[a-zA-Z_][a-zA-Z0-9_]*"
        }
      ]
    },
    {
      "name": "string.quoted.single.shell",
      "begin": "'",
      "end": "'"
    },
    {
      "name": "variable.other.shell",
      "match": "\\$[a-zA-Z_][a-zA-Z0-9_]*"
    },
    {
      "name": "keyword.control.shell",
      "match": "\\b(if|then|else|fi|for|while|do|done|case|esac)\\b"
    },
    {
      "name": "keyword.operator.shell",
      "match": "\\b(and|or|not)\\b"
    },
    {
      "name": "support.function.builtin.shell",
      "match": "\\b(echo|cd|exit|pwd|read)\\b"
    }
  ],
  "repository": {},
  "uuid": "eae8d676-1b23-11e0-ac64-0800200c9a66"
}
5.5. Create plugin.xml file
Your plug-in has no plugin.xml file yet.
Select the Overview tab in the manifest editor.
Press Extensions and the add button to create it.
5.6. Create content type and associate it with the generic editor
Create the following extensions to configure a new content type and register it with the tm4e framework.
<?xml version="1.0" encoding="UTF-8"?>
<?eclipse version="3.4"?>
<plugin>
   <extension
         point="org.eclipse.core.contenttype.contentTypes">
      <content-type
            base-type="org.eclipse.core.runtime.text"
            file-extensions="shell"
            id="com.vogella.ide.editor.shell.content-type"
            name="Shell"
            priority="normal">
      </content-type>
   </extension>
   <extension
         point="org.eclipse.ui.editors">
      <editorContentTypeBinding
            contentTypeId="com.vogella.ide.editor.shell.content-type"
            editorId="org.eclipse.ui.genericeditor.GenericEditor">
      </editorContentTypeBinding>
   </extension>

</plugin>
5.7. Register your grammar and content type with TM4E
Now register your content and your syntax highlighting with TM4E.
| This is added in addition to the other plugin.xml entries. |
<extension
         point="org.eclipse.tm4e.registry.grammars">
      <grammar
            path="syntaxes/Shell-Unix-Bash.json"
            scopeName="source.shell">
      </grammar>
      <scopeNameContentTypeBinding
            contentTypeId="com.vogella.ide.editor.shell.content-type"
            scopeName="source.shell">
      </scopeNameContentTypeBinding>
   </extension>
5.8. Test
Include your new plug-in into your launch configuration, e.g., via your feature and start via your product.
Create now a new project of type general and in it an example.shell file with the following content.
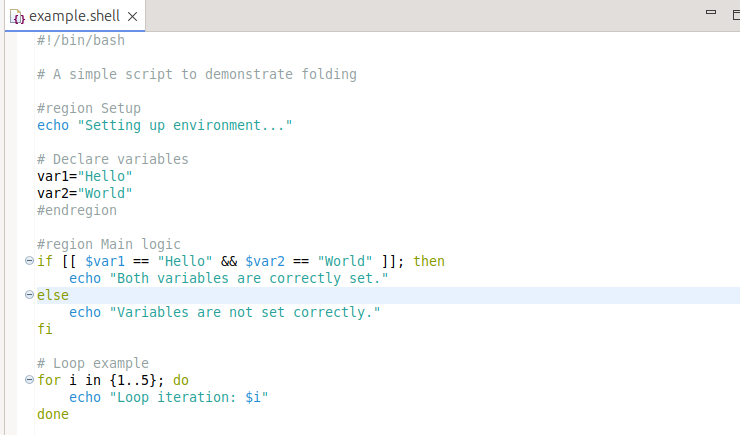
This file should contain syntax highlighting.
#!/bin/bash

# A simple script to demonstrate folding

#region Setup
echo "Setting up environment..."

# Declare variables
var1="Hello"
var2="World"
#endregion

#region Main logic
if [[ $var1 == "Hello" && $var2 == "World" ]]; then
    echo "Both variables are correctly set."
else
    echo "Variables are not set correctly."
fi

# Loop example
for i in {1..5}; do
    echo "Loop iteration: $i"
done

#region Cleanup
echo "Cleaning up..."
#endregion
The expected output is shown in the screenshot below.
5.9. Adding more language configuration
VSCode Language configuration gives the capability to configure matching bracket character pair, etc for a language. TM4E is able to consume this language configuration to bind it with a content type.
Create a folder named language-configurations in your plug-in. Create a file named json.language-configuration.json in this folder with the following content.
{
  "comments": {
    "lineComment": "//"
  },
  "brackets": [["{", "}"]],
  "folding": {
    "markers": {
      "start": "^\\s*//\\s*#region\\b",
      "end": "^\\s*//\\s*#endregion\\b"
    }
  },
  "foldingRanges": {
    "foldingRules": [
      {
        "start": "^(={1,5})\\s+.*$",
        "end": "^(={1,5})\\s+.*$"
      },
      {
        "start": "^\\[source,\\s*\\w+\\]\\s*\\n^----$",
        "end": "^----$"
      }
    ]
  }
}
Add the configuration to use this language configuration.
<extension
      point="org.eclipse.tm4e.languageconfiguration.languageConfigurations">
   <languageConfiguration
         contentTypeId="com.vogella.ide.editor.shell.content-type"
         path="language-configurations/json.language-configuration.json">
   </languageConfiguration>
</extension>
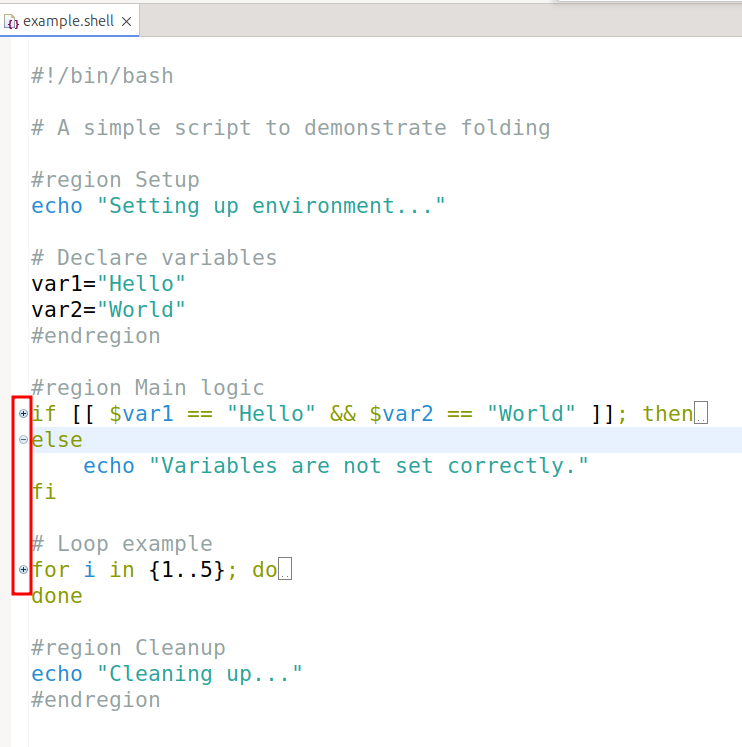
Restart you runtime IDE and open you file, you should see folding icons for the blocks.
In the following screenshot the folding options are highlighted
5.10. Checking the dark theme
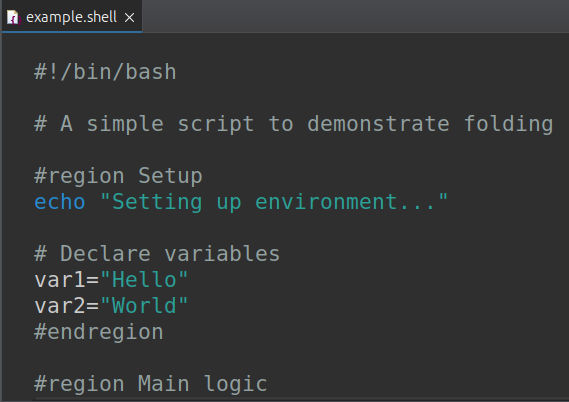
TM4E has theme support, for the standard Eclipse light or dark theme. Switch your IDE to either the light or the dark theme via preference page] and restart the IDE.
Your editor should automatically use the selected theme.
5.11. Optional: Switch theme at runtime
TM4E provides multiple themes, click in the editor ruler and switch to another one.

5.12. Optional: Add syntax highlighting for an additional language
Now that you know the process of adding syntax highlighting for additional language, add syntax highlighting for *.ini files. This grammar can be used for this purpose: https://github.com/textmate/ini.tmbundle/blob/master/Syntaxes/Ini.plist The file which you copy this content to must end with .tmLanguage.
6. Exercise: Allow user to customize the colors
In the precious exercises you implement syntax highlighting for a tasks file editor using a hard-code color. This is not optimal, as it prevent the user from customizing this color.
In this exercise, you extend the com.vogella.ide.editor.tasks plug-in to allow the user to customize this color.
6.1. Define colors
Use the Extensions tab on the manifest editor to add an extension for the org.eclipse.ui.themes extension point.
Right-click on the generated entry and select themeElementCategory and use:
-
id: com.vogella.ide.editor.tasks.settings
-
label: Tasks settings
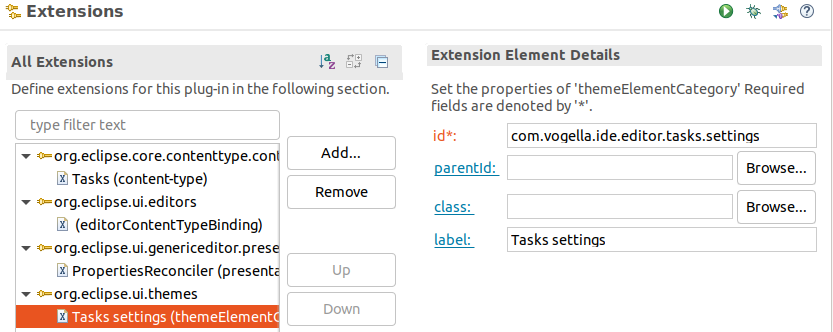
Right-click on the org.eclipse.ui.themes entry and select colorDefinition.
Use:
-
id: com.vogella.ide.editor.tasks.key
-
label: Task key color
-
value: 255,0,0
-
categoryId: com.vogella.ide.editor.tasks.settings
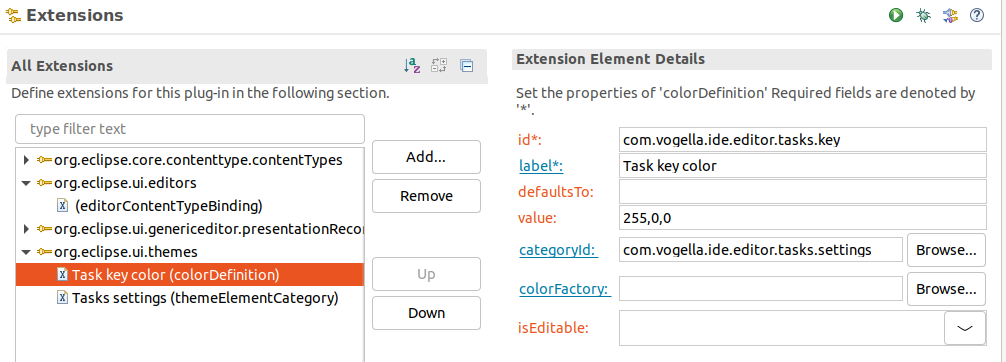
The plugin.xml content should look similar to the following:
<?xml version="1.0" encoding="UTF-8"?>
<?eclipse version="3.4"?>
<plugin>
   <extension
         point="org.eclipse.core.contenttype.contentTypes">
      <content-type
            file-extensions="tasks"
            id="com.vogella.ide.contenttype.tasks"
            name="Tasks"
            priority="high">
      </content-type>
   </extension>
   <extension
         point="org.eclipse.ui.editors">
      <editorContentTypeBinding
            contentTypeId="com.vogella.ide.contenttype.tasks"
            editorId="org.eclipse.ui.genericeditor.GenericEditor">
      </editorContentTypeBinding>
   </extension>
   <extension
         point="org.eclipse.ui.genericeditor.presentationReconcilers">
      <presentationReconciler
            class="com.vogella.ide.editor.tasks.PropertiesReconciler"
            contentType="com.vogella.ide.contenttype.tasks">
      </presentationReconciler>
   </extension>
   <extension
         point="org.eclipse.ui.themes">
      <colorDefinition
            categoryId="com.vogella.ide.editor.tasks.settings"
            id="com.vogella.ide.editor.tasks.key"
            label="Task key color"
            value="255,0,0">
      </colorDefinition>
      <themeElementCategory
            id="com.vogella.ide.editor.tasks.settings"
            label="Tasks settings">
      </themeElementCategory>
   </extension>

</plugin>
6.2. Validate
If you start your runtime Eclipse, you should be able to see your category and color in the setting.
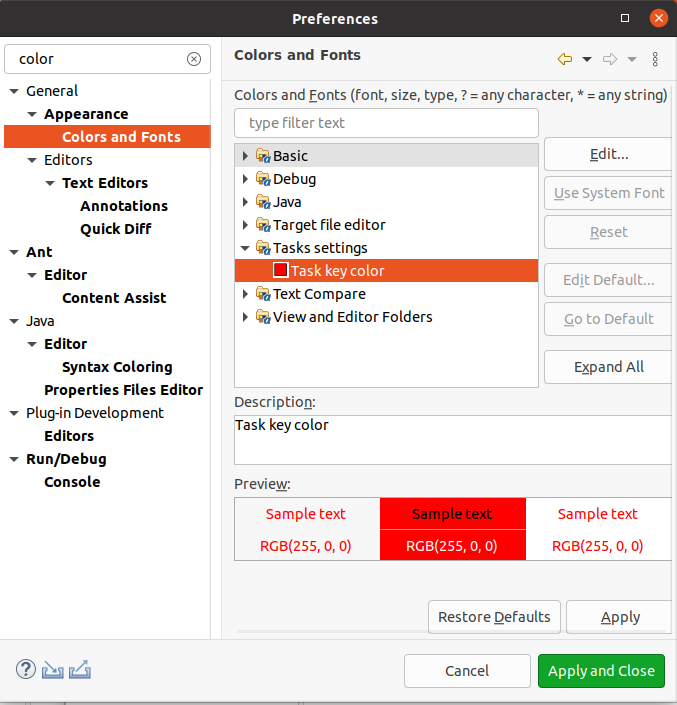
6.3. Use colors for your syntax highlighting
Access the color registry and use it in your editor. The following code snippet should help you.
IThemeManager themeManager = PlatformUI.getWorkbench().getThemeManager();
ITheme currentTheme = themeManager.getCurrentTheme();
ColorRegistry colorRegistry = currentTheme.getColorRegistry();
Color color = colorRegistry.get("com.vogella.ide.editor.tasks.key");
package com.vogella.ide.editor.tasks;
import org.eclipse.jface.resource.ColorRegistry;
import org.eclipse.jface.text.IDocument;
import org.eclipse.jface.text.TextAttribute;
import org.eclipse.jface.text.presentation.PresentationReconciler;
import org.eclipse.jface.text.rules.DefaultDamagerRepairer;
import org.eclipse.jface.text.rules.IRule;
import org.eclipse.jface.text.rules.RuleBasedScanner;
import org.eclipse.jface.text.rules.Token;
import org.eclipse.swt.graphics.Color;
import org.eclipse.ui.PlatformUI;
import org.eclipse.ui.themes.ITheme;
import org.eclipse.ui.themes.IThemeManager;
public class PropertiesReconciler extends PresentationReconciler {
public PropertiesReconciler() {
IThemeManager themeManager = PlatformUI.getWorkbench().getThemeManager();
ITheme currentTheme = themeManager.getCurrentTheme();
ColorRegistry colorRegistry = currentTheme.getColorRegistry();
Color color = colorRegistry.get("com.vogella.ide.editor.tasks.key");
TextAttribute tagAttribute = new TextAttribute(color);
RuleBasedScanner scanner = new RuleBasedScanner();
IRule rule = new PropertyNameRule(new Token(tagAttribute));
scanner.setRules(rule);
DefaultDamagerRepairer dr = new DefaultDamagerRepairer(scanner);
this.setDamager(dr, IDocument.DEFAULT_CONTENT_TYPE);
this.setRepairer(dr, IDocument.DEFAULT_CONTENT_TYPE);
}
}6.4. Test your changes
Open . Search for your colors and change them.
Close your editor and reopen it. Validate that your new colors are used.
6.5. Use a preference listener to update the color
Preferences are persisted user settings. It is possible to register changes in a node via a preference listener.
In your PropertiesReconciler override the install method and listen to changes in the org.eclipse.ui.workbench node used to persist the color.
public void install(ITextViewer viewer) {
        super.install(viewer);

        IEclipsePreferences node = InstanceScope.INSTANCE.getNode("org.eclipse.ui.workbench");

        node.addPreferenceChangeListener(event -> {
            // TODO UPDATE YOUR RULES WITH AN UPDATED RULE WITH THE NEW COLOR
            viewer.invalidateTextPresentation();
        });
    }
Solve the TODO and check that the color is updated.
|
To find the preference node for a preference. you can use the preference spy. Open the view via . Toogle the trace for preferences. Afterwards, change a color and see its data.  |
package com.vogella.ide.editor.tasks;

import org.eclipse.core.runtime.preferences.IEclipsePreferences;
import org.eclipse.core.runtime.preferences.InstanceScope;
import org.eclipse.jface.resource.ColorRegistry;
import org.eclipse.jface.text.IDocument;
import org.eclipse.jface.text.ITextViewer;
import org.eclipse.jface.text.TextAttribute;
import org.eclipse.jface.text.presentation.PresentationReconciler;
import org.eclipse.jface.text.rules.DefaultDamagerRepairer;
import org.eclipse.jface.text.rules.IRule;
import org.eclipse.jface.text.rules.RuleBasedScanner;
import org.eclipse.jface.text.rules.Token;
import org.eclipse.swt.graphics.Color;
import org.eclipse.ui.PlatformUI;
import org.eclipse.ui.themes.ITheme;
import org.eclipse.ui.themes.IThemeManager;

public class PropertiesReconciler extends PresentationReconciler {

    private ColorRegistry colorRegistry;
    private RuleBasedScanner scanner;
    private IRule rule;

    @Override
    public void install(ITextViewer viewer) {
        super.install(viewer);

        IEclipsePreferences node = InstanceScope.INSTANCE.getNode("org.eclipse.ui.workbench");

        node.addPreferenceChangeListener(event -> {
            updateRule();
            viewer.invalidateTextPresentation();
        });
    }

    private void updateRule() {
        Color color = colorRegistry.get("com.vogella.ide.editor.tasks.key");
        TextAttribute tagAttribute = new TextAttribute(color);
        rule = new PropertyNameRule(new Token(tagAttribute));
        scanner.setRules(rule);

    }

    public PropertiesReconciler() {

        IThemeManager themeManager = PlatformUI.getWorkbench().getThemeManager();
        ITheme currentTheme = themeManager.getCurrentTheme();
        colorRegistry = currentTheme.getColorRegistry();

        scanner = new RuleBasedScanner();
        updateRule();

        DefaultDamagerRepairer dr = new DefaultDamagerRepairer(scanner);
        this.setDamager(dr, IDocument.DEFAULT_CONTENT_TYPE);
        this.setRepairer(dr, IDocument.DEFAULT_CONTENT_TYPE);
    }
}
7. Exercise: Implementing content assist for todo properties
In this exercise, you implement content assist (code completion) for your .tasks files.
As discussed earlier, these files should contain key-value pairs, separated by a column.
Properties will be proposed in case the cursor is located at the beginning of a line.
7.1. Add the content assists extension
Add an extension for the org.eclipse.ui.genericeditor.contentAssistProcessors extension point in the manifest file of your com.vogella.ide.editor.tasks plug-in.
<extension
      point="org.eclipse.ui.genericeditor.contentAssistProcessors">
   <contentAssistProcessor
         class="com.vogella.ide.editor.tasks.TodoPropertiesContentAssistProcessor"
         contentType="com.vogella.ide.contenttype.tasks">
   </contentAssistProcessor>
</extension>
The implementation of the TodoPropertiesContentAssistProcessor should look similar to the following code.
package com.vogella.ide.editor.tasks;

import java.util.Arrays;
import java.util.List;

import org.eclipse.jface.text.BadLocationException;
import org.eclipse.jface.text.IDocument;
import org.eclipse.jface.text.ITextViewer;
import org.eclipse.jface.text.contentassist.CompletionProposal;
import org.eclipse.jface.text.contentassist.ICompletionProposal;
import org.eclipse.jface.text.contentassist.IContentAssistProcessor;
import org.eclipse.jface.text.contentassist.IContextInformation;
import org.eclipse.jface.text.contentassist.IContextInformationValidator;

public class TodoPropertiesContentAssistProcessor implements IContentAssistProcessor {

    // public as used later by other code
    public static final List<String> PROPOSALS = Arrays.asList( "ID:", "Summary:", "Description:", "Done:", "Duedate:", "Dependent:");

    @Override
    public ICompletionProposal[] computeCompletionProposals(ITextViewer viewer, int offset) {

        IDocument document = viewer.getDocument();

        try {
            int lineOfOffset = document.getLineOfOffset(offset);
            int lineOffset = document.getLineOffset(lineOfOffset);

            // do not show any content assist in case the offset is not at the
            // beginning of a line
            if (offset != lineOffset) {
                return new ICompletionProposal[0];
            }
        } catch (BadLocationException e) {
            // ignore here and just continue
        }

        return PROPOSALS.stream().filter(proposal -> !viewer.getDocument().get().contains(proposal))
                .map(proposal -> new CompletionProposal(proposal, offset, 0, proposal.length()))
                .toArray(ICompletionProposal[]::new);
    }

    @Override
    public IContextInformation[] computeContextInformation(ITextViewer viewer, int offset) {
        return null;
    }

    @Override
    public char[] getCompletionProposalAutoActivationCharacters() {
        return null;
    }

    @Override
    public char[] getContextInformationAutoActivationCharacters() {
        return null;
    }

    @Override
    public String getErrorMessage() {
        return null;
    }

    @Override
    public IContextInformationValidator getContextInformationValidator() {
        return null;
    }

}
7.2. Test your implementation
Start the IDE and open a .tasks file and then press Ctrl+Space to activate content assist.
This should result in the following:
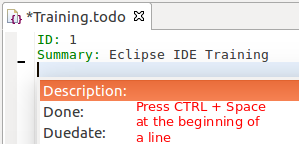
7.3. Optional exercise - Implement a slow content assists processor
The generic editor uses asynchronous code completion by default, e.g., the user interface does not block even if one of your proposal computers is slow.
Test this by adding a delay to your completion processor. Ensure the editor remains usable, even if you trigger content assists.
Afterwards, remove the delay again.
8. Improved code completion
8.1. Optional exercise - Add prefix completion
The IDocument class offers a lot of utilities to parse and modify its contents.
Extend your TodoPropertiesContentAssistProcessor#computeCompletionProposals method, so that you can match on prefixes.
For example, if you type "D" you should see all proposal matching D.
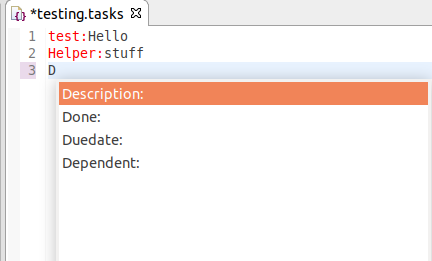
Solution example
public ICompletionProposal[] computeCompletionProposals(ITextViewer viewer, int offset) {

    IDocument document = viewer.getDocument();

    try {
        int lineOfOffset = document.getLineOfOffset(offset);
        int lineOffset = document.getLineOffset(lineOfOffset);

        int lineTextLenght = offset - lineOffset;
        String lineStartToOffsetValue = document.get(lineOffset, lineTextLenght).toLowerCase();

        return PROPOSALS.stream()
                .filter(proposal -> !viewer.getDocument().get().contains(proposal)
                        && proposal.toLowerCase().startsWith(lineStartToOffsetValue))
                .map(proposal -> new CompletionProposal(proposal, lineOffset, lineTextLenght, proposal.length()))
                .toArray(ICompletionProposal[]::new);
    } catch (BadLocationException e) {
        e.printStackTrace();
    }
    return new ICompletionProposal[0];
}
8.2. Optional exercise - Enable auto-activation of your content assists
Currently, your content assists only shows its proposals if the user presses Ctrl+Space. This might not be obvious for the user.
IContentAssistProcessor allows to modify this behavior via its getCompletionProposalAutoActivationCharacters method.
Pressing Ctrl+Space may not be obvious for your user. Implement that any letter activate the content assists.
Solution example
@Override
public char[] getCompletionProposalAutoActivationCharacters() {
    String str = "abcdefghijklmnopqrstuvwxyzABCDEFGHIJKLMNOPQRSTUVWXYZ";
    return str.toCharArray();
}
9. Exercise : Implementing another content assist using other information
It is possible to register multiple content assist processors for the same content type.
In this exercise, you add another content assists to your editor. This processor will allow to set values for the _ property. This allows to model that a task is dependent on another task.
9.1. Implement and register a new content assists processor
Create the DependentTodoContentAssistProcessor class implementing the IContentAssistProcessor interface.
Register this class via the plugin.xml file as extension to the org.eclipse.ui.genericeditor.contentAssistProcessors extension point.
Solution example
 <extension
       point="org.eclipse.ui.genericeditor.contentAssistProcessors">
    <contentAssistProcessor
          class="com.vogella.ide.editor.tasks.TodoPropertiesContentAssistProcessor"
          contentType="com.vogella.ide.contenttype.tasks">
    </contentAssistProcessor>
 </extension>
 <extension
       point="org.eclipse.ui.genericeditor.contentAssistProcessors">
    <contentAssistProcessor
          class="com.vogella.ide.editor.tasks.DependentTodoContentProcessor"
          contentType="com.vogella.ide.contenttype.tasks">
    </contentAssistProcessor>
 </extension>
For accessing the active editor, create the following Util class.
package com.vogella.ide.editor.tasks;

import org.eclipse.ui.IEditorPart;
import org.eclipse.ui.IWorkbench;
import org.eclipse.ui.IWorkbenchPage;
import org.eclipse.ui.IWorkbenchWindow;
import org.eclipse.ui.PlatformUI;

public class Util {

    private Util() {
        // only helper
    }

    public static IEditorPart getActiveEditor() {
        IWorkbench workbench = PlatformUI.getWorkbench();
        IWorkbenchWindow activeWorkbenchWindow = workbench.getActiveWorkbenchWindow();
        if (null == activeWorkbenchWindow) {
            activeWorkbenchWindow = workbench.getWorkbenchWindows()[0];
        }
        IWorkbenchPage activePage = activeWorkbenchWindow.getActivePage();
        if (activePage == null) {
            return null;
        }
        return activePage.getActiveEditor();
    }
}
The implementation of the DependentTodoContentAssistProcessor should look similar to this:
package com.vogella.ide.editor.tasks;
import static com.vogella.ide.editor.tasks.Util.getActiveEditor;

import java.util.Arrays;

import org.eclipse.core.resources.IContainer;
import org.eclipse.core.resources.IResource;
import org.eclipse.core.runtime.CoreException;
import org.eclipse.jface.text.BadLocationException;
import org.eclipse.jface.text.IDocument;
import org.eclipse.jface.text.ITextViewer;
import org.eclipse.jface.text.contentassist.CompletionProposal;
import org.eclipse.jface.text.contentassist.ICompletionProposal;
import org.eclipse.jface.text.contentassist.IContentAssistProcessor;
import org.eclipse.jface.text.contentassist.IContextInformation;
import org.eclipse.jface.text.contentassist.IContextInformationValidator;
import org.eclipse.ui.IEditorInput;
import org.eclipse.ui.IEditorPart;

public class DependentTodoContentAssistProcessor implements IContentAssistProcessor {

    @Override
    public ICompletionProposal[] computeCompletionProposals(ITextViewer viewer, int offset) {
        IDocument document = viewer.getDocument();
        IEditorPart activeEditor = getActiveEditor();

        if (activeEditor != null) {
            IEditorInput editorInput = activeEditor.getEditorInput();
            IResource adapter = editorInput.getAdapter(IResource.class);
            IContainer parent = adapter.getParent();
            try {
                int lineOfOffset = document.getLineOfOffset(offset);
                int lineOffset = document.getLineOffset(lineOfOffset);

                String lineProperty = document.get(lineOffset, offset - lineOffset);
                // Content assist should only be used in the dependent line
                if (lineProperty.startWith("Dependent:")) {
                    IResource[] members = parent.members();

                    // Only take resources, which have the "tasks" file extension and skip the current resource itself
                    return Arrays.asList(members).stream().filter(
                            res -> !adapter.getName().equals(res.getName()) && "tasks".equals(res.getFileExtension()))
                            .map(res -> new CompletionProposal(res.getName(), offset, 0, res.getName().length()))
                            .toArray(ICompletionProposal[]::new);
                }
            } catch (CoreException | BadLocationException e) {
                // ignore here and just continue
            }
        }
        return new ICompletionProposal[0];
    }

    @Override
    public IContextInformation[] computeContextInformation(ITextViewer viewer, int offset) {
        return null;
    }

    @Override
    public char[] getCompletionProposalAutoActivationCharacters() {
        return null;
    }

    @Override
    public char[] getContextInformationAutoActivationCharacters() {
        return null;
    }

    @Override
    public String getErrorMessage() {
        return null;
    }

    @Override
    public IContextInformationValidator getContextInformationValidator() {
        return null;
    }

}
9.2. Validate
Start the IDE and ensure that at least 2 .tasks files are available and open one of these files.
Then press Ctrl+Space right after the Dependent: property to activate content assist.
10. Exercise: Reacting to document changes
A IDocumentSetupParticipant allows to be notified during setup and changes of a document to trigger functionality.
You can register an implementation via the org.eclipse.core.filebuffers.documentSetup extension point for a content type
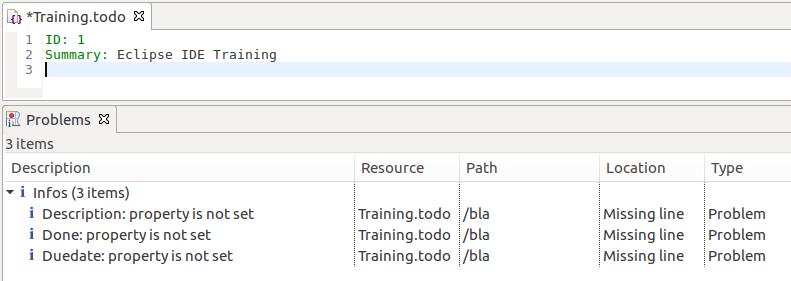
In our example we use this to add markers to the Problems view for missing keys in the .tasks file.
10.1. Implement and register your IDocumentSetupParticipant
The TodoMarkerDocumentSetup registers an IDocumentListener, which applies markers for the IResource, which is currently changed.
package com.vogella.ide.editor.tasks;
import static com.vogella.ide.editor.tasks.Util.getActiveEditor;

import java.util.Arrays;
import java.util.List;
import java.util.Optional;

import org.eclipse.core.filebuffers.IDocumentSetupParticipant;
import org.eclipse.core.resources.IMarker;
import org.eclipse.core.resources.IResource;
import org.eclipse.core.runtime.CoreException;
import org.eclipse.core.runtime.ICoreRunnable;
import org.eclipse.core.runtime.jobs.Job;
import org.eclipse.jface.text.DocumentEvent;
import org.eclipse.jface.text.IDocument;
import org.eclipse.jface.text.IDocumentListener;
import org.eclipse.ui.IEditorInput;
import org.eclipse.ui.IEditorPart;
import org.eclipse.ui.PlatformUI;

public class TodoMarkerDocumentSetup implements IDocumentSetupParticipant {

    private static final String TODO_PROPERTY = "todoProperty";

    @Override
    public void setup(IDocument document) {
        document.addDocumentListener(new IDocumentListener() {

            private Job markerJob;

            @Override
            public void documentChanged(DocumentEvent event) {
                IEditorPart activeEditor = getActiveEditor();

                if (activeEditor != null) {
                    IEditorInput editorInput = activeEditor.getEditorInput();
                    IResource adapter = editorInput.getAdapter(IResource.class);
                    if (markerJob != null) {
                        markerJob.cancel();
                    }
                    markerJob = Job.create("Adding Marker", (ICoreRunnable) monitor -> createMarker(event, adapter)); (1)
                    markerJob.setUser(false);
                    markerJob.setPriority(Job.DECORATE);
                    // set a delay before reacting to user action to handle continuous typing
                    markerJob.schedule(500); (2)
                }
            }


            @Override
            public void documentAboutToBeChanged(DocumentEvent event) {
                // not needed
            }
        });
    }

    private void createMarker(DocumentEvent event, IResource adapter) throws CoreException {
        String docText = event.getDocument().get();

        for (String todoProperty : TodoPropertiesContentAssistProcessor.PROPOSALS) {
            List<IMarker> markers = Arrays
                    .asList(adapter.findMarkers(IMarker.PROBLEM, true, IResource.DEPTH_INFINITE));
            Optional<IMarker> findAny = markers.stream()
                    .filter(m -> todoProperty.equals(m.getAttribute(TODO_PROPERTY, ""))).findAny();
            if (docText.contains(todoProperty) && findAny.isPresent()) {
                findAny.get().delete();
            } else if (!docText.contains(todoProperty) && !findAny.isPresent()) {
                IMarker marker = adapter.createMarker(IMarker.PROBLEM);
                marker.setAttribute(IMarker.MESSAGE, todoProperty + " property is not set");
                marker.setAttribute(IMarker.SEVERITY, IMarker.SEVERITY_INFO);
                marker.setAttribute(IMarker.LOCATION, "Missing line");
                marker.setAttribute(TODO_PROPERTY, todoProperty);
            }
        }
    }

}| 1 | The implementation uses a Job implementation, so that the UI thread is not blocked during this process. |
| 2 | Since the job is started on document change, it starts with a delay so that it can be canceled on another document change so that unnecessary marker creations can be omitted. |
Add the following extension to your plugin.xml.
<extension
       point="org.eclipse.core.filebuffers.documentSetup">
    <participant
          class="com.vogella.ide.editor.tasks.TodoMarkerDocumentSetup"
          contentTypeId="com.vogella.ide.contenttype.tasks">
    </participant>
 </extension>
10.2. Implement and register your IDocumentSetupParticipant
The expected output is shown in the screenshot below.
11. Exercise : Implement hyperlinking for your tasks
In Eclipse support navigation between references to other files. Source editors typically support Ctrl + left mouse click on the reference to open files.
The *.tasks files can point via the Dependent: property to another *.task file inside the same project. In this exercise our editor should allow the user to navigate between dependent task files.

11.1. Add manifest dependencies
Add org.eclipse.ui.ide as a plug-in dependency to com.vogella.ide.editor.tasks.
11.2. Implement hyperlinking for dependent task files
Create the following IHyperlink implementation.
import org.eclipse.core.resources.IFile;
import org.eclipse.jface.text.IRegion;
import org.eclipse.jface.text.hyperlink.IHyperlink;
import org.eclipse.ui.IWorkbenchPage;
import org.eclipse.ui.PartInitException;
import org.eclipse.ui.PlatformUI;
import org.eclipse.ui.ide.IDE;

public class ResourceHyperlink implements IHyperlink {

    private IRegion region;
    private String hyperlinkText;
    private IFile resource;

    public ResourceHyperlink(IRegion region, String hyperlinkText, IFile resource) {
        this.region = region;
        this.hyperlinkText = hyperlinkText;
        this.resource = resource;
    }

    @Override
    public IRegion getHyperlinkRegion() {
        return region;
    }

    @Override
    public String getTypeLabel() {
        return null;
    }

    @Override
    public String getHyperlinkText() {
        return hyperlinkText;
    }

    @Override
    public void open() {
        IWorkbenchPage activePage = PlatformUI.getWorkbench().getActiveWorkbenchWindow().getActivePage();
        try {
            IDE.openEditor(activePage, resource);
        } catch (PartInitException e) {
            e.printStackTrace();
        }
    }
}
Create the following IHyperlinkDetector implementation.
import java.util.Arrays;

import org.eclipse.core.resources.IContainer;
import org.eclipse.core.resources.IFile;
import org.eclipse.core.resources.IResource;
import org.eclipse.core.runtime.CoreException;
import org.eclipse.jface.text.BadLocationException;
import org.eclipse.jface.text.IDocument;
import org.eclipse.jface.text.IRegion;
import org.eclipse.jface.text.ITextViewer;
import org.eclipse.jface.text.Region;
import org.eclipse.jface.text.hyperlink.AbstractHyperlinkDetector;
import org.eclipse.jface.text.hyperlink.IHyperlink;
import org.eclipse.ui.IEditorInput;
import org.eclipse.ui.IEditorPart;
import org.eclipse.ui.IWorkbench;
import org.eclipse.ui.IWorkbenchPage;
import org.eclipse.ui.IWorkbenchWindow;
import org.eclipse.ui.PlatformUI;

public class DependentTodoHyperlinkDetector extends AbstractHyperlinkDetector {

    private static final String DEPENDENT_PROPERTY = "Dependent:";

    @Override
    public IHyperlink[] detectHyperlinks(ITextViewer textViewer, IRegion region, boolean canShowMultipleHyperlinks) {
        IDocument document = textViewer.getDocument();

        IWorkbench workbench = PlatformUI.getWorkbench();
        IWorkbenchWindow activeWorkbenchWindow = workbench.getActiveWorkbenchWindow();
        if (null == activeWorkbenchWindow) {
            activeWorkbenchWindow = workbench.getWorkbenchWindows()[0];
        }
        IWorkbenchPage activePage = activeWorkbenchWindow.getActivePage();

        IEditorPart activeEditor = activePage.getActiveEditor();
        if (activeEditor != null) {
            IEditorInput editorInput = activeEditor.getEditorInput();
            IResource adapter = editorInput.getAdapter(IResource.class);
            IContainer parent = adapter.getParent();
            try {
                int offset = region.getOffset();

                IRegion lineInformationOfOffset = document.getLineInformationOfOffset(offset);
                String lineContent = document.get(lineInformationOfOffset.getOffset(),
                        lineInformationOfOffset.getLength());

                // Content assist should only be used in the dependent line
                if (lineContent.startsWith(DEPENDENT_PROPERTY)) {
                    String dependentResourceName = lineContent.substring(DEPENDENT_PROPERTY.length()).trim();

                    Region targetRegion = new Region(lineInformationOfOffset.getOffset() + DEPENDENT_PROPERTY.length(),
                            lineInformationOfOffset.getLength() - DEPENDENT_PROPERTY.length());

                    IResource[] members = parent.members();

                    // Only take resources, which have the "todo" file extension and skip the
                    // current resource itself
                    return Arrays.asList(members).stream()
                            .filter(res -> res instanceof IFile && dependentResourceName.equals(res.getName()))
                            .map(res -> new ResourceHyperlink(targetRegion, res.getName(), (IFile) res))
                            .toArray(IHyperlink[]::new);
                }
            } catch (CoreException | BadLocationException e) {
                e.printStackTrace();
            }
        }
        // do not return new IHyperlink[0] because the array may only be null or not
        // empty
        return null;
    }

}
The DependentTodoHyperlinkDetector class can be registered in the plugin.xml like this:
 <extension
       point="org.eclipse.ui.workbench.texteditor.hyperlinkDetectors">
    <hyperlinkDetector
          activate="true"
          class="com.vogella.ide.editor.tasks.DependentTodoHyperlinkDetector"
          id="com.vogella.ide.editor.tasks.hyperlinkDetector"
          name="Hyperlink to other tasks files"
          targetId="org.eclipse.ui.genericeditor.GenericEditor">
    </hyperlinkDetector>
 </extension>
11.3. Validate
To validate this create at least two *.tasks files and use the dependent attribute to point to one of them. Validate that you can use Ctrl + left mouse click to navigate to the linked file.
Dependent:Training2.tasks
12. Example: Implement a hyperlink detector for your company name
In this exercise, you create a hyperlink detector for the vogella keyword in the generic editor.
12.1. Create project and add dependencies
Create a new plug-in project called com.vogella.ide.editor.companylink.
Add the following entries as plug-in dependencies:
-
org.eclipse.ui
-
org.eclipse.jface
-
org.eclipse.ui.workbench.texteditor
12.2. Add hyperlink detector
Add the org.eclipse.ui.workbench.texteditor.hyperlinkDetectors extension with a unique id and a descriptive name.
Create the following two classes to determine the hyperlink and to react to it.
package com.vogella.ide.editor.companylink;

import org.eclipse.jface.text.IRegion;
import org.eclipse.jface.text.hyperlink.IHyperlink;
import org.eclipse.swt.program.Program;

public class VogellaHyperlink implements IHyperlink {

    private final IRegion fUrlRegion;

    public VogellaHyperlink(IRegion urlRegion) {
        fUrlRegion = urlRegion;
    }

    @Override
    public IRegion getHyperlinkRegion() {
        return fUrlRegion;
    }

    @Override
    public String getTypeLabel() {
        return null;
    }

    @Override
    public String getHyperlinkText() {
        return "Open vogella website";
    }

    @Override
    public void open() {
        Program.launch("https://www.vogella.com/");
    }
}
package com.vogella.ide.editor.companylink;
import org.eclipse.jface.text.BadLocationException;
import org.eclipse.jface.text.IDocument;
import org.eclipse.jface.text.IRegion;
import org.eclipse.jface.text.ITextViewer;
import org.eclipse.jface.text.Region;
import org.eclipse.jface.text.hyperlink.AbstractHyperlinkDetector;
import org.eclipse.jface.text.hyperlink.IHyperlink;
public class VogellaHyperlinkDetector extends AbstractHyperlinkDetector {
public VogellaHyperlinkDetector() {
}
@Override
public IHyperlink[] detectHyperlinks(ITextViewer textViewer, IRegion region, boolean canShowMultipleHyperlinks) {
IDocument document = textViewer.getDocument();
int offset = region.getOffset();
// extract relevant characters
IRegion lineRegion;
String candidate;
try {
lineRegion = document.getLineInformationOfOffset(offset);
candidate = document.get(lineRegion.getOffset(), lineRegion.getLength());
} catch (BadLocationException ex) {
return null;
}
// look for keyword
int index = candidate.indexOf("vogella");
if (index != -1) {
// detect region containing keyword
IRegion targetRegion = new Region(lineRegion.getOffset() + index, "vogella".length());
if ((targetRegion.getOffset() <= offset)
&& ((targetRegion.getOffset() + targetRegion.getLength()) > offset))
// create link
return new IHyperlink[] { new VogellaHyperlink(targetRegion) };
}
return null;
}
}12.3. Validate
Start your plug-in and add vogella to one of the text editor, for example the Java editor. Press Ctrl and click on vogella. This should open the https://www.vogella.com/ website in an external browser.
13. Exercise : Add code mining information to your task files
Eclipse support showing additional information into the text editor to enhance it. This information is not saved in the file but helps the user to better understand the content. You can register actions on these minings, so that the user can perform actions directory out of the text editor.
In this exercise we will implement code minings for our task editor to show additional information and to allow the user to perform certain actions via the minings.
13.1. Implement and register code mining
Implement the following class which creates line header annotations.
package com.vogella.ide.editor.tasks;

import java.util.concurrent.CompletableFuture;

import org.eclipse.core.runtime.IProgressMonitor;
import org.eclipse.jface.text.BadLocationException;
import org.eclipse.jface.text.IDocument;
import org.eclipse.jface.text.ITextViewer;
import org.eclipse.jface.text.codemining.ICodeMiningProvider;
import org.eclipse.jface.text.codemining.LineHeaderCodeMining;

public class TaskCodeMining extends LineHeaderCodeMining {


    public TaskCodeMining(int beforeLineNumber, IDocument document, ICodeMiningProvider provider)
            throws BadLocationException {
        super(beforeLineNumber, document, provider);
    }

    @Override
    protected CompletableFuture<Void> doResolve(ITextViewer viewer, IProgressMonitor monitor) {
        return CompletableFuture.runAsync(() -> {
            super.setLabel("This is additional information about the tasks");
        });
    }
}
Create the following implementation of a ICodeMiningProvider.
package com.vogella.ide.editor.tasks;

import java.util.ArrayList;
import java.util.List;
import java.util.concurrent.CompletableFuture;

import org.eclipse.core.runtime.IProgressMonitor;
import org.eclipse.jface.text.BadLocationException;
import org.eclipse.jface.text.IDocument;
import org.eclipse.jface.text.ITextViewer;
import org.eclipse.jface.text.codemining.ICodeMining;
import org.eclipse.jface.text.codemining.ICodeMiningProvider;

public class TaskCodeMiningProvider implements ICodeMiningProvider {

    public TaskCodeMiningProvider() {
    }

    @Override
    public CompletableFuture<List<? extends ICodeMining>> provideCodeMinings(ITextViewer viewer,
            IProgressMonitor monitor) {
        return CompletableFuture.supplyAsync(() -> {
            List<ICodeMining> minings = new ArrayList<>();
            IDocument document = viewer.getDocument();
            try {
                minings.add(new TaskCodeMining(0, document, this));
            } catch (BadLocationException e) {
                e.printStackTrace();
            }
            return minings;
        });
    }

    @Override
    public void dispose() {
    }
}
Register the default CodeMiningReconciler for your content type via the org.eclipse.ui.genericeditor.reconcilers extension.
<extension
       point="org.eclipse.ui.genericeditor.reconcilers">
    <reconciler
          class="org.eclipse.jface.text.codemining.CodeMiningReconciler"
          contentType="com.vogella.ide.contenttype.tasks">
    </reconciler>
 </extension>
Now add the following extension to your plugin.xml.
<extension
       point="org.eclipse.ui.workbench.texteditor.codeMiningProviders">
    <codeMiningProvider
          class="com.vogella.ide.editor.tasks.TaskCodeMiningProvider"
          id="com.vogella.ide.editor.tasks.codeMiningProvider"
          label="Show additional task info">
       <enabledWhen>
          <with
               variable="editorInput">
                <adapt type="org.eclipse.core.resources.IFile">
                   <test property="org.eclipse.core.resources.contentTypeId" value="com.vogella.ide.contenttype.tasks" />
                </adapt>
          </with></enabledWhen>
    </codeMiningProvider>
</extension>14. Optional exercise - Add action to code mining
Override getAction in TaskCodeMining to allow the user to trigger some actions.
package com.vogella.ide.editor.tasks;

import java.util.concurrent.CompletableFuture;
import java.util.function.Consumer;

import org.eclipse.core.runtime.IProgressMonitor;
import org.eclipse.jface.dialogs.MessageDialog;
import org.eclipse.jface.text.BadLocationException;
import org.eclipse.jface.text.IDocument;
import org.eclipse.jface.text.ITextViewer;
import org.eclipse.jface.text.codemining.ICodeMiningProvider;
import org.eclipse.jface.text.codemining.LineHeaderCodeMining;
import org.eclipse.swt.events.MouseEvent;

public class TaskCodeMining extends LineHeaderCodeMining {


    private ITextViewer viewer;

    public TaskCodeMining(int beforeLineNumber, IDocument document, ICodeMiningProvider provider, boolean isValid)
            throws BadLocationException {
        super(beforeLineNumber, document, provider);
    }

    @Override
    protected CompletableFuture<Void> doResolve(ITextViewer viewer, IProgressMonitor monitor) {
        this.viewer = viewer;
        return CompletableFuture.runAsync(() -> {
            super.setLabel("This is additional information about the tasks");
        });
    }

    @Override
    public Consumer<MouseEvent> getAction() {
        return r->showMessageDialog();
    }

    private void showMessageDialog() {
        MessageDialog.openInformation(viewer.getTextWidget().getShell(), "Clicked", "You clicked on the code mining annotation");
    }
}
15. Optional exercise - Extend your code mining
Clone the Git repository located at https://github.com/angelozerr/EclipseConFrance2018. Import the included project and test them.
Use the information to extend your code mining, e.g., add code minings to each line in your editor.
16. Optional exercise - Review JDT coding mining
Clone the Git repository located at https://github.com/angelozerr/jdt-codemining
Clone the code and import the projects. Include them in your runtime Eclipse. Review the code.
17. Excurse: Implementing your custom editor
While it is recommended to reuse the generic editor instead defining a new one, this is still supported. This chapter gives an explanation how this can be done.
17.1. IEditorPart and EditorPart
To define a new editor for the Eclipse IDE, you typically:
* Create an IEditorInput class
* Define an extension for the org.eclipse.ui.editors extension point
* Implement a class extending IEditorPart
IEditorInput serves as the model for the editor.
Eclipse will buffer IEditorInput objects therefore this object should be relatively small.
It is supposed to be a light-weight representation of the model.
For example, the Eclipse IDE uses IEditorInput objects to identify files without handling with the complete file.
The equals() of IEditorInput define the identity of the editor, e.g., it will be used to determine if an editor is already open or not.
The editor receives the IEditorSite and the IEditorInput in the init() method.
It must set the input via the setInput() method and the side via the setSite() method.
init() is called before createPartControl() (which creates the user interface).
Therefore, you can use the input during your UI creation.
If you define your own perspective, you can enable the editor area via the following code in your perspective implementation.
import org.eclipse.ui.IPageLayout;

public class Perspective implements IPerspectiveFactory {

    public void createInitialLayout(IPageLayout layout) {
        //layout.setEditorAreaVisible(false);
        layout.setFixed(true);
    }

}
17.2. Setting the editor title and tooltip
By default, the editor will use the tooltip and title from the IEditorInput.
Therefore, you may want to change the title and tooltip in your Editor.
Use setPartName() to set the title of the Editor and getTitleToolTip() for setting the tooltip.
See Bug https://bugs.eclipse.org/bugs/show_bug.cgi?id=107772 for details on the tooltip.
17.3. Saving the editor content
The method isDirty() determines if the editor contains modified data.
For inform the workbench about changes in the dirty state you fired an event.
firePropertyChange(IEditorPart.PROP.DIRTY);18. Links and Literature
18.1. vogella Java example code
If you need more assistance we offer Online Training and Onsite training as well as consulting


