This tutorial describes the usage of the Maven Tycho plug-in to build plug-ins, bundles and Eclipse applications. It uses Tycho version 5.0.4.
It starts with a general overview and gives a detailed example for building Eclipse components.

1. Using Maven Tycho to build Eclipse components
The process of generating an executable application from your source code is called building your application. A headless build builds your application using the command line or a build server, typically without user interaction. The outcome, packaged as a zip file, can then be delivered to end users.
Tycho is a collection of Maven plugins dedicated to building Eclipse plug-ins, features, products, and OSGi bundles. A Tycho build is configured via one or multiple pom.xml files.
At a minimum, one pom file is necessary to configure the Tycho build process.
When building multiple Eclipse components, you typically define an extension named extensions.xml in the .mvn folder, so that standard Eclipse components do not need their own pom.xml file.
If the individual modules require special build instructions, you can define separate pom.xml files for each module.
Or you can set properties via the build.properties file, see https://github.com/eclipse-tycho/tycho/wiki/Tycho-Pomless#define-properties.
Example: The following entries in a build.properties file
pom.model.property.my-property = a-value
pom.model.property.another.flag = true
is equivalent to the following properties-section in the polyglot-pom within the same directory:
<properties>
  <my-property>a-value</my-property>
  <another.flag>true</another.flag>
</properties>
Optionally, each module can define its own pom file or utilize Tycho’s functionality to derive this information from existing metadata.
2. Exercise: Setting up a Maven build for an Eclipse application
You learn how to configure a command line build using Maven Tycho for your Eclipse components. The description assumes that all artifacts are placed in the same top-level directory.
2.1. Enable the Tycho build extension
Create a configuration file in the main directory in which all your Eclipse artifacts are stored.
To do this, create a new directory named .mvn in the main directory.
top-level-directory/
├── .mvn/
├── com.vogella.tasks.feature/
├── com.vogella.tasks.model/
├── more....
└── ...
To ensure consistent usage of the Tycho version in your build configuration files, create a file named maven.config in the .mvn directory with the following content.
-Dtycho.version=5.0.4This defines the tycho.version property for your build.
You can use this property in the .mvn/extensions.xml file and in your pom.xml file.
In the .mvn folder, create a new file named extensions.xml with the following content:
<extensions>
  <extension>
    <groupId>org.eclipse.tycho</groupId>
    <artifactId>tycho-build</artifactId>
    <version>${tycho.version}</version>
  </extension>
</extensions>|
This is difficult to do from the Eclipse IDE, as the top-level-folder is not inside a project. Use your file explorer and a regular text editor to create this file (this editor must allow saving the content as regular text). |
2.2. Create a top-level pom file
Create the following pom.xml file in the top-level directory in which your Eclipse artifacts are stored.
|
This is difficult to do from the Eclipse IDE, as the top-level-folder is not inside a project. Use your file explorer and a regular text editor to create this file (this editor must allow saving the content as regular text). |
For example, the directory structure could look like this:
top-level-directory/
├── .mvn/
├── pom.xml
├── com.vogella.tasks.feature/
├── com.vogella.tasks.model/
├── com.vogella.tasks.services/
├── com.vogella.tasks.events/
├── com.vogella.contribute.parts/
├── com.vogella.tasks.ui.contribute/
├── com.vogella.eclipse.css/
├── com.vogella.tasks.product/
├── com.vogella.swt.widgets/
└── ...
The pom file should look like this:
<project>
 <modelVersion>4.0.0</modelVersion>
 <groupId>com.vogella.tycho</groupId>
 <artifactId>releng</artifactId>
 <version>1.0.0-SNAPSHOT</version>
 <packaging>pom</packaging>

 <properties>
  <project.build.sourceEncoding>UTF-8</project.build.sourceEncoding>
 </properties>

 <build>
   <pluginManagement>
     <plugins>
       <plugin>
         <groupId>org.eclipse.tycho</groupId>
         <artifactId>tycho-p2-director-plugin</artifactId>
         <version>${tycho.version}</version>
       </plugin>
     </plugins>
   </pluginManagement>

  <plugins>
   <plugin>
    <groupId>org.eclipse.tycho</groupId>
    <artifactId>tycho-maven-plugin</artifactId>
    <version>${tycho.version}</version>
    <extensions>true</extensions>
   </plugin>
    <plugin>
    <groupId>org.eclipse.tycho</groupId>
    <artifactId>target-platform-configuration</artifactId>
    <version>${tycho.version}</version>
    <configuration>
     <!-- Optionally, set the Java version you are using-->
      <!--   <executionEnvironment>JavaSE-25</executionEnvironment>-->
     <environments>
      <environment>
       <os>linux</os>
       <ws>gtk</ws>
       <arch>x86_64</arch>
      </environment>
      <environment>
       <os>win32</os>
       <ws>win32</ws>
       <arch>x86_64</arch>
      </environment>
      <environment>
       <os>macosx</os>
       <ws>cocoa</ws>
       <arch>x86_64</arch>
      </environment>
      <environment>
       <os>macosx</os>
       <ws>cocoa</ws>
       <arch>aarch64</arch>
      </environment>
     </environments>
    </configuration>
   </plugin>
  </plugins>
 </build>
  <modules>
   <!-- Fill later-->
 </modules>
</project>
The modules with your Eclipse artifacts will be added in the next exercise.
tycho.version is provided by the maven.config file, you could also set it as property: <tycho.version>5.0.4</tycho.version>
|
2.3. Validate build setup
Run the build via mvn clean verify.
This build should complete successfully.
No build artifact is created.
The output should be similar to the following:
[INFO] Scanning for projects...
[INFO]
[INFO] ----------------------< com.vogella.tycho:releng >----------------------
[INFO] Building releng 1.0.0-SNAPSHOT
[INFO] --------------------------------[ pom ]---------------------------------
[INFO]
[INFO] --- clean:3.2.0:clean (default-clean) @ releng ---
[INFO] ------------------------------------------------------------------------
[INFO] BUILD SUCCESS
[INFO] ------------------------------------------------------------------------
[INFO] Total time:  0.984 s
[INFO] Finished at: 2026-08-31T09:36:03+02:00
[INFO] ------------------------------------------------------------------------
3. Exercise: Use a target platform for the build
The Eclipse target platform defines which libraries your application is built against. A target definition file allows you to add libraries and to define the version of the Eclipse libraries which is used.
Without an active target definition, the Eclipse IDE compiles against its own installation. A Tycho build has no such default, it only knows the libraries from the target definition or from the p2 repositories listed in the POM.
You can add the target definition to the build:
-
By pointing directly to the target file
-
Or by defining a Maven project for the target project
We use the first approach in this exercise, as it is easier.
|
See below for a full listing of the top-level pom file. |
Adjust the target-platform-configuration to use your target file. This code assumes that you have one project named target-platform with your target definition file named target-platform.target.
<!-- this part already exists......-->
<plugin>
    <groupId>org.eclipse.tycho</groupId>
    <artifactId>target-platform-configuration</artifactId>
    <version>${tycho.version}</version>
    <configuration>
<!-- THIS PART IS NEW-->
     <target>
      <file>../target-platform/target-platform.target</file>
    </target>
Here is the complete top-level pom file.
<project>
 <modelVersion>4.0.0</modelVersion>
 <groupId>com.vogella.tycho</groupId>
 <artifactId>releng</artifactId>
 <version>1.0.0-SNAPSHOT</version>
 <packaging>pom</packaging>

 <properties>
  <project.build.sourceEncoding>UTF-8</project.build.sourceEncoding>
 </properties>

 <build>
  <pluginManagement>
     <plugins>
       <plugin>
         <groupId>org.eclipse.tycho</groupId>
         <artifactId>tycho-p2-director-plugin</artifactId>
         <version>${tycho.version}</version>
       </plugin>
     </plugins>
   </pluginManagement>
  <plugins>
   <plugin>
    <groupId>org.eclipse.tycho</groupId>
    <artifactId>tycho-maven-plugin</artifactId>
    <version>${tycho.version}</version>
    <extensions>true</extensions>
   </plugin>
    <plugin>
    <groupId>org.eclipse.tycho</groupId>
    <artifactId>target-platform-configuration</artifactId>
    <version>${tycho.version}</version>
    <configuration>
     <!-- Optionally, set the Java version you are using-->
    <!--<executionEnvironment>JavaSE-25</executionEnvironment>-->
     <target>
      <file>../target-platform/target-platform.target</file>
    </target>
     <environments>
      <environment>
       <os>linux</os>
       <ws>gtk</ws>
       <arch>x86_64</arch>
      </environment>
      <environment>
       <os>win32</os>
       <ws>win32</ws>
       <arch>x86_64</arch>
      </environment>
      <environment>
       <os>macosx</os>
       <ws>cocoa</ws>
       <arch>x86_64</arch>
      </environment>
      <environment>
       <os>macosx</os>
       <ws>cocoa</ws>
       <arch>aarch64</arch>
      </environment>
     </environments>
    </configuration>
   </plugin>
  </plugins>
 </build>

 <modules>
     <!--<module>your modules will be defined here</module>-->

 </modules>
</project>
In the <artifactId>target-platform-configuration</artifactId> block you added a reference to the target definition file.
3.1. Validate the build
Re-run your build and ensure that it still runs successfully.
3.2. Potential error resolution with the Java version being used
If your build has mixed Java requirements, you may have to specify the Java version to build against.
In the above build file, the following line is used for that purpose.
<executionEnvironment>JavaSE-25</executionEnvironment>4. Exercise: Configure the modules
To add your Eclipse components to the build, you must add them as modules to the top-level pom.xml file.
A minimal setup contains only one plug-in that has no dependencies on any other module.
In general, all your plug-ins, features and products should be part of the build. All libraries will be provided by the target platform.
|
You may have created more plug-ins than listed below during the optional exercises; ensure that they are part of your build. |
4.1. Adding the modules
The module names must match the directory names of your projects. For the example projects used in this tutorial the module list looks like the following, adjust it to your projects.
<project>

<!-- CONTENT AS BEFORE -->

 <modules>
  <module>com.vogella.tasks.model</module>
  <module>com.vogella.tasks.services</module>
  <module>com.vogella.tasks.events</module>
  <module>com.vogella.tasks.ui</module>
  <module>com.vogella.tasks.feature</module>
  <module>com.vogella.tasks.product</module>
  <module>target-platform</module>
 </modules>
</project>
5. Exercise: Validate the build
5.1. Run the build
Run the build from the main directory via the following command:
mvn clean verifyThis should result in a success message, such as the one below.
[INFO] Reactor Summary:
[INFO]
[INFO] releng 1.0.0-SNAPSHOT .............................. SUCCESS [  0.114 s]
[INFO] [bundle] First 1.0.0-SNAPSHOT ...................... SUCCESS [  0.803 s]
[INFO] [feature] Feature 1.0.0-SNAPSHOT ................... SUCCESS [  0.283 s]
[INFO] [product] Custom IDE 1.0.0 ......................... SUCCESS [  4.311 s]
[INFO] ------------------------------------------------------------------------
[INFO] BUILD SUCCESS
[INFO] ------------------------------------------------------------------------
[INFO] Total time:  17.499 s
[INFO] Finished at: 2026-08-31T16:16:15+02:00
[INFO] ------------------------------------------------------------------------
Press F5 in the Eclipse IDE on your feature project to refresh it.
You should find a new target folder in your project that contains the JAR file for your feature.
This JAR file also has the SNAPSHOT suffix.
This suffix is replaced with the build timestamp once you build a product or an update site with the eclipse-repository packaging type.
5.2. Error resolution
If Tycho cannot find a required plug-in or feature, it gives an error message. The following is an example for a feature that requires a bundle but this bundle is not part of the build.
[ERROR] Missing requirement:
 com.vogella.tycho.feature.feature.group 1.0.0.qualifier
 requires 'com.vogella.tycho.plugin1 0.0.0' but it could not be found
If an independent build of the feature is required, you need to make the plug-in available via a repository.
This can, for example, be done by building and installing the plug-in into the local Maven repository with the mvn clean install command.
In this case, you need to either add the required module to the build or, if you are using it in binary form, add it to the target platform.
6. Exercise: Tycho build for update sites
This exercise demonstrates how to create Eclipse p2 update sites using Maven Tycho.
The Tycho build generates similar content for the product in the target/repository folder.
The distinction between an update site created from a category file and the target/repository folder generated for a product build primarily lies in their intended use cases and content organization.
-
An update site created with Tycho based on a category file is specifically designed for distributing Eclipse plug-ins, features, and other components to Eclipse users. The category file (
category.xml) serves as a manifest that defines how components are organized into categories, making it easier for users to discover and install them through the Eclipse Update Manager. -
The
target/repositoryfolder generated during a product build with Tycho is part of the build output that contains the assembled product, including all required plug-ins, features, and configuration files. While it can serve as an update site for the product, its primary purpose is to package the product build. It includes similar metadata files that describe the product’s contents, allowing it to be used to update or install the product.
6.1. Create a new project
Create a new project named updatesite in a project of type general.
6.2. Creating a category definition file
Right-click the project, navigate to New > Other… > Plug-in Development > Category Definition, and name the file category.xml. Create a new category by clicking the New Category button with:
-
com.vogella.tasks.updateID -
Task management update sitename.

Click Add Feature… to add your feature project to the category.

6.3. Updating the root POM
Include the new module in your root pom file.
 <modules>
    <!-- all modules as before -->
  <module>updatesite</module> (1)
</modules>| 1 | Adds the updatesite project to the aggregator build |
6.4. Running the aggregator build and validating the update site
Execute the build from the main directory, ensuring it successfully completes and builds all components, including the update site.
Refresh your update site project in Eclipse IDE by pressing F5. A new target folder containing a repository folder, which holds the update site, should appear.

Ensure that the SNAPSHOT suffix in the repository directory’s JAR files is replaced with the build qualifier.
6.5. Creating a self-contained p2 repository
Most Tycho components have options that can be configured. The following configuration will instruct Tycho to not build a zip file of the update site and to include all dependencies of the JAR files that are packed in the update site.
<plugin>
 <groupId>org.eclipse.tycho</groupId>
 <artifactId>tycho-p2-repository-plugin</artifactId>
 <version>${tycho.version}</version>
  <configuration>
    <skipArchive>true</skipArchive>
    <includeAllDependencies>true</includeAllDependencies>
  </configuration>
</plugin>
Run the build again and verify that all required libraries are part of the /target/repository/plugins folder.
7. Executing plug-in unit tests with Tycho
For the development of Eclipse components, it is common practice to have a separate test plug-in or fragment project for your tests.
Tycho supports pomless builds for plug-ins that contain tests.
A regular eclipse-plugin project can also contain tests in the src/test/java folder.
These are executed by the plugin-test goal of the Tycho Surefire plug-in, which you bind to the integration-test phase in the POM of the bundle.
Test execution is performed via the Tycho Surefire plug-in, which is aware of plug-in dependencies.
|
The runtime behavior of the Maven Tycho Surefire plug-in is slightly different from the Maven Surefire plug-in. Tycho Surefire tests run in the integration-test phase while regular Maven Surefire tests run in the test phase. The integration-test phase occurs between the package and install phases. |
If you need to configure the tests, e.g., exclude some tests or specify parameters you can still provide your pom file for the test plug-in.
The Tycho Surefire plug-in supports the execution of non-UI-based and UI-based tests.
If you want to run UI tests, you have to enable that explicitly via the useUIHarness parameter, as demonstrated by the following listing.
<project>
    <modelVersion>4.0.0</modelVersion>

    <!--parent pom... -->

    <artifactId>com.vogella.tycho.rcp.tests</artifactId>
    <version>1.0.0-SNAPSHOT</version>
    <packaging>eclipse-test-plugin</packaging>

    <build>
        <plugins>
         <plugin>
            <groupId>org.eclipse.tycho</groupId>
            <artifactId>tycho-surefire-plugin</artifactId>
            <version>${tycho.version}</version>
            <configuration>
                <useUIHarness>true</useUIHarness>
            </configuration>
         </plugin>
        </plugins>
    </build>
</project>
The tests are executed in a test runtime (based on OSGi), using the dependencies defined in the MANIFEST.MF file of the test plug-in.
You can include more dependencies in features ("eclipse-feature"), plug-ins or fragments ("eclipse-plugin") or installable units ("p2-installable-unit").
If you define a dependency, you need to include its transitive dependencies in the test runtime, too.
<project>
 <modelVersion>4.0.0</modelVersion>

 <!--parent pom... -->

 <artifactId>com.vogella.tycho.rcp.tests</artifactId>
 <version>1.0.0-SNAPSHOT</version>
 <packaging>eclipse-test-plugin</packaging>

 <build>
  <plugins>
   <plugin>
    <groupId>org.eclipse.tycho</groupId>
    <artifactId>tycho-surefire-plugin</artifactId>
    <version>${tycho.version}</version>
    <configuration>
     <useUIHarness>true</useUIHarness>
     <dependencies>
      <dependency>
       <type>eclipse-feature</type>
       <artifactId>com.vogella.feature1</artifactId>
       <!-- This is the minimum required version -->
       <version>1.0.0</version>
      </dependency>
     </dependencies>
    </configuration>
   </plugin>
  </plugins>
 </build>

</project>
7.1. Selection of tests
Similar to the Maven Surefire plug-in, Tycho Surefire executes, by default, all test classes matching the following pattern:
-
**/Test*.java -
**/*Test.java -
**/*TestCase.java -
**/*Tests.java
These included tests can be configured via the includes parameter.
<project>
    <modelVersion>4.0.0</modelVersion>

    <!--parent pom... -->

    <artifactId>com.vogella.tycho.rcp.tests</artifactId>
    <version>1.0.0-SNAPSHOT</version>
    <packaging>eclipse-test-plugin</packaging>

    <!-- Define to include all classes in the test run -->
    <build>
     <plugins>
      <plugin>
        <groupId>org.eclipse.tycho</groupId>
        <artifactId>tycho-surefire-plugin</artifactId>
        <version>${tycho.version}</version>
         <configuration>
          <includes>
            <include>**/*.class</include>
          </includes>
         </configuration>
       </plugin>
     </plugins>
    </build>
</project>
You can exclude tests from the run.
<project>
    <modelVersion>4.0.0</modelVersion>

    <!--parent pom...  -->

    <artifactId>com.vogella.tycho.rcp.tests</artifactId>
    <version>1.0.0-SNAPSHOT</version>
    <packaging>eclipse-test-plugin</packaging>

    <build>
        <plugins>

        <plugin>
         <groupId>org.eclipse.tycho</groupId>
         <artifactId>tycho-surefire-plugin</artifactId>
         <version>${tycho.version}</version>
            <configuration>
                <excludes>
                    <!-- Tests currently fail in the command line build -->
                    <exclude>ThisShouldNotRunViaTychoTests</exclude>
                </excludes>
            </configuration>
        </plugin>
        </plugins>
    </build>
</project>
You can run a single test class or a test suite class via the testClass parameter.
<build>
 <plugins>
  <plugin>
   <groupId>org.eclipse.tycho</groupId>
   <artifactId>tycho-surefire-plugin</artifactId>
   <version>${tycho.version}</version>
   <configuration>
    <testClass>com.vogella.tasks.ui.tests.AllTests</testClass>
   </configuration>
  </plugin>
 </plugins>
</build>
On the command line, the test property selects test classes by name, the value is used as **/${test}.java pattern.
mvn clean verify -Dtest=TaskServiceTest7.2. Using the correct JRE for the test execution
The JDT compiler uses the source and target level from the Bundle-RequiredExecutionEnvironment header of the MANIFEST.MF file.
It is therefore possible to compile a Java 21 bundle correctly, even if the build runs on a Java 25 JVM.
By default, the tests run on the JVM which runs the build.
If the tests must run on the JRE from the Bundle-RequiredExecutionEnvironment header, set the useJDK parameter of the Tycho Surefire plug-in to BREE and describe the installed JDKs in the ~/.m2/toolchains.xml file of Maven.
<plugin>
 <groupId>org.eclipse.tycho</groupId>
 <artifactId>tycho-surefire-plugin</artifactId>
 <version>${tycho.version}</version>
 <configuration>
  <useJDK>BREE</useJDK>
 </configuration>
</plugin>
7.3. Filtering unit tests by JUnit tag
Projects that use JUnit 5 tags can expose them as a configurable property in the tycho-surefire-plugin configuration.
A typical setup defines a property, for example unit.test.groups, and forwards it to the <groups> element of the plug-in.
<plugin>
    <groupId>org.eclipse.tycho</groupId>
    <artifactId>tycho-surefire-plugin</artifactId>
    <version>${tycho.version}</version>
    <configuration>
        <groups>${unit.test.groups}</groups>
    </configuration>
</plugin>
With such a configuration in place, you can select the tests to execute from the command line.
mvn -Dunit.test.groups=com.example.tags.MR clean installOnly test methods or classes annotated with @Tag("com.example.tags.MR") are executed.
The parameter description of Tycho still talks about JUnit 4 categories, with the JUnit 5 provider the value is passed to the JUnit platform as tag filter.
The exact property name is defined by the project and is not a built-in Tycho property.
|
If |
8. Exercise: Tycho build for test plug-ins
The following exercise demonstrates how to run unit tests with Tycho.
| Testing libraries are evolving at a high speed, therefore the required libraries may have changed if you read this. The exercise uses JUnit 5, JUnit 6 is supported as well. |
8.1. Adding the test dependencies
For testing, JUnit is usually used, and you can add additional libraries like Hamcrest and Mockito. Therefore, add the Maven dependencies to Mockito to your target platform.
<!-- Add this to an existing Maven in the target file or create a new one -->
<dependency>
    <groupId>org.mockito</groupId>
    <artifactId>mockito-core</artifactId>
    <version>5.23.0</version>
</dependency>
For test purposes the new target entry could look like this:
<location includeDependencyDepth="infinite" includeDependencyScopes="compile" includeSource="true" missingManifest="generate" type="Maven">
    <dependencies>
        <dependency>
            <groupId>org.junit.jupiter</groupId>
            <artifactId>junit-jupiter-engine</artifactId>
            <version>5.14.4</version>
            <type>jar</type>
        </dependency>
        <!-- https://mvnrepository.com/artifact/org.junit.platform/junit-platform-suite-api -->
        <dependency>
            <groupId>org.junit.platform</groupId>
            <artifactId>junit-platform-suite-api</artifactId>
            <version>1.14.4</version>
        </dependency>
        <!-- https://mvnrepository.com/artifact/org.junit.platform/junit-platform-suite-engine -->
        <dependency>
            <groupId>org.junit.platform</groupId>
            <artifactId>junit-platform-suite-engine</artifactId>
            <version>1.14.4</version>
        </dependency>
        <!-- https://mvnrepository.com/artifact/org.junit.platform/junit-platform-launcher -->
        <dependency>
            <groupId>org.junit.platform</groupId>
            <artifactId>junit-platform-launcher</artifactId>
            <version>1.14.4</version>
        </dependency>
        <!-- https://mvnrepository.com/artifact/org.junit.platform/junit-platform-suite-commons -->
        <dependency>
            <groupId>org.junit.platform</groupId>
            <artifactId>junit-platform-suite-commons</artifactId>
            <version>1.14.4</version>
        </dependency>
        <dependency>
            <groupId>org.mockito</groupId>
            <artifactId>mockito-core</artifactId>
            <version>5.23.0</version>
            <type>jar</type>
        </dependency>
    </dependencies>
</location>|
For more information about excluding transitive dependencies in the target platform, see the following issue: Exclusion of Maven dependencies in the target platform issue. |
8.2. Create a new plug-in for the tests
The tests of the implementation belong into a separate plug-in or fragment project called com.vogella.tasks.ui.tests.
Create a new plug-in fragment project named com.vogella.tasks.ui.tests.
Define a package dependency on org.junit.jupiter.api in its MANIFEST.MF file.
Manifest-Version: 1.0
Bundle-ManifestVersion: 2
Bundle-Name: Tests
Bundle-SymbolicName: com.vogella.tasks.ui.tests
Bundle-Version: 1.0.0.qualifier
Bundle-Vendor: VOGELLA
Fragment-Host: com.vogella.tasks.ui;bundle-version="1.0.0"
Import-Package: org.junit.jupiter.api;version="5.14.4"
Automatic-Module-Name: com.vogella.tasks.ui.tests
Bundle-RequiredExecutionEnvironment: JavaSE-25
The defaults are sufficient for this test plug-in, hence we do not need a separate pom for the test plug-in.
8.3. Create a unit test
Create the following unit test, as an example. This test does not test anything meaningful. It is only used to demonstrate how Tycho runs the tests.
package com.vogella.tasks.ui.tests;

import static org.junit.jupiter.api.Assertions.assertTrue;

import org.junit.jupiter.api.Test;

public class ExampleTest {

    @Test
    public void test() {
        // just an example
        assertTrue(true);
    }
}
8.4. Run the build with the tests
Run the build from the main directory. This should work fine.
If you want to skip the test execution use mvn clean verify -DskipTests=true
8.5. Create test report
Run the following command to create test reports:
mvn clean verify surefire-report:reportYou find the report in {basedir}/target/site/surefire-report.html.
8.6. To debug Maven Tycho tests via Eclipse
To debug Maven Tycho tests, add the -DdebugPort=8000 parameter to your Maven build command.
Maven will then pause during execution and you can create a Remote Java Application debug configuration to connect to the test.
9. Exercise: Adding a JRE to the application
|
The JRE is constantly updated, so this exercise might not work exactly as described here. The Java and Eclipse ecosystems are evolving rapidly. |
To bundle a JRE with your product, select the This product includes a JRE flag.
If you target platform uses the planner mode and finds a JustJ JRE in one of your update sites, Tycho adds a fitting JRE to your product.
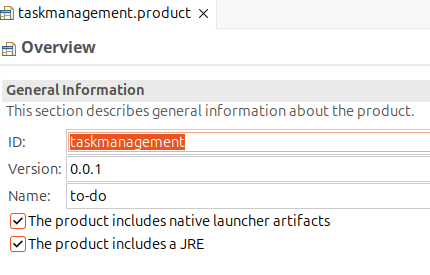
You can find this JRE in your plugins folder of your product and also a reference to it in your .ini file.
For example, your .ini file would have a -vm argument similar to the following.
-startup plugins/org.eclipse.equinox.launcher_1.7.0.v20250519-0528.jar --launcher.library plugins/org.eclipse.equinox.launcher.gtk.linux.x86_64_1.2.1500.v20250801-0854 -clearPersistedState -nl de -vm plugins/org.eclipse.justj.openjdk.hotspot.jre.full.linux.x86_64_25.0.1.v20251108-1451/jre/bin/java
|
The JRE is taken from the target platform. If your build picks up the wrong JRE version, use the version-specific JustJ update site in your target definition instead of the generic one. Adjust the version segment in the URL (for example |
10. Exercise: Tycho build for SWTBot tests
The following exercise demonstrates how to run SWTBot tests with Tycho. It assumes that you already created some SWTBot tests in a plug-in named com.vogella.tycho.rcp.it.tests.
10.1. Pom file for SWTBot tests
For SWTBot tests the Tycho Surefire plug-in has to be configured, so that the SWTBot test can run properly.
<?xml version="1.0" encoding="UTF-8"?>
<project
    xsi:schemaLocation="http://maven.apache.org/POM/4.0.0 http://maven.apache.org/xsd/maven-4.0.0.xsd"
    xmlns="http://maven.apache.org/POM/4.0.0" xmlns:xsi="http://www.w3.org/2001/XMLSchema-instance">
    <modelVersion>4.0.0</modelVersion>
    <parent>
        <groupId>com.vogella.tycho</groupId>
        <artifactId>com.vogella.tycho.tests</artifactId>
        <version>1.0.0-SNAPSHOT</version>
    </parent>

    <artifactId>com.vogella.tycho.rcp.it.tests</artifactId>
    <version>1.0.0-SNAPSHOT</version>
    <packaging>eclipse-test-plugin</packaging>

    <build>
        <plugins>
            <plugin>
                <groupId>org.eclipse.tycho</groupId>
                <artifactId>tycho-surefire-plugin</artifactId>
                <version>${tycho.version}</version>
                <configuration>
                    <useUIHarness>true</useUIHarness>
                    <useUIThread>false</useUIThread>
                    <product>com.vogella.tycho.rcp.product</product>
                    <application>org.eclipse.e4.ui.workbench.swt.E4Application</application>
                </configuration>
            </plugin>
        </plugins>
    </build>

</project>
10.2. Adding org.eclipse.equinox.event as extra requirement
In typical cases the org.eclipse.equinox.event plug-in is used in an Eclipse RCP application.
Unfortunately, it sometimes is not loaded properly for an integration test, even though it is part of the target platform of the product and mentioned in the start level configuration.
Due to this it needs to be specified in the configuration of the target-platform-configuration plugin.
<project>

    <build>
        <plugins>
        <plugin>
            <groupId>org.eclipse.tycho</groupId>
            <artifactId>target-platform-configuration</artifactId>
            <version>${tycho.version}</version>

            <configuration>
                <!-- This defines the target definition file -->
                <target>
                    <artifact>
                        <groupId>com.vogella.tychoexample</groupId>
                        <artifactId>com.vogella.build.targetdefinition</artifactId>
                        <version>1.0.0-SNAPSHOT</version>
                    </artifact>
                </target>

                <dependency-resolution>(1)
                    <extraRequirements>
                        <requirement>
                            <type>eclipse-plugin</type>
                            <id>org.eclipse.equinox.event</id>
                            <versionRange>0.0.0</versionRange>
                        </requirement>
                    </extraRequirements>
                </dependency-resolution>

                <environments>
                    <environment>
                        <os>linux</os>
                        <ws>gtk</ws>
                        <arch>x86_64</arch>
                    </environment>
                    <environment>
                        <os>win32</os>
                        <ws>win32</ws>
                        <arch>x86_64</arch>
                    </environment>
                    <environment>
                        <os>macosx</os>
                        <ws>cocoa</ws>
                        <arch>x86_64</arch>
                    </environment>
                    <environment>
                        <os>macosx</os>
                        <ws>cocoa</ws>
                        <arch>aarch64</arch>
                    </environment>
                </environments>
            </configuration>
        </plugin>
    </plugins>
    </build>

</project>| 1 | Add the org.eclipse.equinox.event plug-in as extra requirement in the dependency resolution. |
10.3. Add the SWTBot test to the build
The com.vogella.tycho.rcp.it.tests plug-in has to be added as module to the build, for example to the pom.xml of the folder which aggregates the test plug-ins.
<project>
    <modelVersion>4.0.0</modelVersion>
    <groupId>com.vogella.tycho</groupId>
    <artifactId>com.vogella.tycho.tests</artifactId>
    <version>1.0.0-SNAPSHOT</version>
    <packaging>pom</packaging>

    <parent>
        <groupId>com.vogella.tycho</groupId>
        <artifactId>releng</artifactId>
        <version>1.0.0-SNAPSHOT</version>
        <relativePath>../pom.xml</relativePath>
    </parent>

    <modules>
        <module>com.vogella.tycho.rcp.tests</module>
        <module>com.vogella.tycho.rcp.it.tests</module>
    </modules>
</project>
10.4. Run the build with the tests
Run the build from the main directory. This should work fine.
11. More Tycho settings
11.1. Seeing class files in the Open Resources dialog
If you see .class files in the Open Resources dialog after a Tycho build, you need to set the derived flag for the target folder by right-clicking the folder in the Project Explorer and selecting Properties > Resource > Derived.
11.2. Adding root files to Eclipse features
Eclipse features can contain root files that are copied to the root folder of the product during the build process. This is useful for including files such as README files, license files, configuration files, or native libraries that need to be placed at the product’s root level rather than inside plug-ins.
To add root files to a feature:
-
Create a
rootfolder in your feature project -
Place the files you want to copy to the product root into this
rootfolder -
Configure the
build.propertiesfile in your feature project by adding the following entry:
root=file:root/For platform-specific root files, you can use platform qualifiers:
root.linux.gtk.x86_64=file:root/linux/
root.win32.win32.x86_64=file:root/windows/
root.macosx.cocoa.x86_64=file:root/macos/
root.macosx.cocoa.aarch64=file:root/macos/
During the product build, Tycho will automatically copy the contents of these root folders to the root directory of the generated product. This mechanism allows you to include platform-specific files or general files that need to be at the root level of your Eclipse-based application.
11.3. Using root level features
A root level feature is a feature that can be updated or uninstalled independently of the product.
To define a feature as a root level feature, add installMode="root" behind the feature in the product definition file. You need to use a text editor for this, as the product configuration editor does not expose that in its user interface.
11.4. Build types in a pomless build
The following rules are used for the automatic pom generation.
First of all .qualifier from the Eclipse components is automatically mapped to -SNAPSHOT for the Maven build.
| Property | Mapping |
|---|---|
packaging |
eclipse-plugin if MANIFEST.MF is found eclipse-feature if feature.xml is found eclipse-test-plugin if Bundle-SymbolicName ends with .test or .tests, or if build.properties contains pom.model.packaging = eclipse-test-plugin eclipse-repository if category.xml or a .product file is found eclipse-target-definition if a .target file is found |
groupId |
same as in the parent pom |
artifactId |
eclipse-plugin: Bundle-SymbolicName from MANIFEST.MF eclipse-feature: feature id from feature.xml eclipse-repository: id of the product or the name of the folder for update sites eclipse-target-definition: name of the .target file |
version |
Bundle-Version from MANIFEST.MF or Feature version from feature.xml |
11.5. See all dependencies
Use the following command to see all dependencies of your projects.
mvn dependency:tree -DoutputFile=maven-tree.txt11.6. Defining a specialized pom file for an Eclipse component
If you define a pom file for an Eclipse component, you need to specify the packaging attribute in the pom file.
|
The build requires that the version numbers of each single Maven artifact and its Eclipse plug-ins are in sync. Sometimes developers forget to update the Maven version numbers. In this case the build complains about a version mismatch. Run the following command to correct existing inconsistencies. |
This attribute defines what Eclipse component you are building.
For example, a plug-in must set this attribute to eclipse-plugin.
| Package Attribute | Description |
|---|---|
eclipse-plugin |
Used for plug-ins |
eclipse-test-plugin |
Used for test plug-ins or fragments |
eclipse-feature |
Used for features |
eclipse-repository |
Used for p2 update sites and Eclipse products |
eclipse-target-definition |
Target definition used for the Tycho build |
In addition to packaging attribute, the pom of an Eclipse component must specify the name and the version of the component.
The artifact ID and version in the pom file must match the Bundle-Symbolic-Name and the Bundle-Version from the MANIFEST.MF file.
Eclipse components typical use qualifier as a suffix in the Bundle-Version to indicate that this should be replaced by the build system with a build qualifier.
Maven uses "SNAPSHOT" for this, but Tycho maps these values correctly.
Each module has again a pom.xml configuration file which defines attributes specifically to the corresponding Eclipse component, e.g., the package attribute.
It must contain a link to the main or the configuration pom so that the build can determine the configuration.
The following listing contains an example pom file for a plug-in.
<project>
    <modelVersion>4.0.0</modelVersion>

    <!-- Link to the parent pom -->
    <parent>
        <artifactId>com.example.todo.build.parent</artifactId>
        <groupId>com.example.e4.rcp</groupId>
        <version>0.1.0-SNAPSHOT</version>
        <relativePath>../com.example.todo.build.parent</relativePath>
    </parent>

    <groupId>com.example.e4.rcp</groupId>
    <artifactId>com.vogella.imageloader.services</artifactId>
    <version>1.0.0-SNAPSHOT</version>
    <packaging>eclipse-plugin</packaging>
</project>
11.7. Source Encoding
You can set the source code encoding via the project.build.sourceEncoding parameter.
<properties>
 <project.build.sourceEncoding>UTF-8</project.build.sourceEncoding>
</properties>|
If you do not set this encoding property the maven build throws warnings similar to the following: [WARNING] Using platform encoding (UTF-8) to copy filtered resources, i.e. build is platform-dependent! |
For further information see Maven FAQ for encoding warning (https://maven.apache.org/general.html#encoding-warning).
11.8. Building source features
Tycho allows to generate source features that allow users to browse your code once installed in your IDE.
<!-- enable source feature generation -->
<build>
    <plugins>
      <!-- more entries -->

      <plugin>
        <groupId>org.eclipse.tycho</groupId>
        <artifactId>tycho-source-plugin</artifactId>
        <version>${tycho.version}</version>
        <executions>
          <execution>
            <id>plugin-source</id>
            <goals>
              <goal>plugin-source</goal>
            </goals>
          </execution>
          <execution>
            <id>feature-source</id>
            <goals>
              <goal>feature-source</goal>
            </goals>
            <configuration>
              <excludes>
                <!-- provide plug-ins not containing any source code -->
                <plugin id="com.vogella.tycho.product" />
                <plugin id="com.vogella.tycho.target" />
                <plugin id="com.vogella.tycho.update" />
                <!-- possible to exclude feature-->
              </excludes>
            </configuration>
          </execution>
        </executions>
      </plugin>
    </plugins>
  </build>
You can add the generated source features to your existing update site.
For this, open the category file and add the features and plug-ins to one of your categories with the .sources suffix.
<?xml version="1.0" encoding="UTF-8"?>
<site>
   <feature id="com.vogella.tycho.feature">
      <category name="tychoexample"/>
   </feature>
   <feature id="com.vogella.tycho.feature.source">
      <category name="tychoexample-source"/>
   </feature>

   <category-def name="tychoexample" label="Tycho example"/>
   <category-def name="tychoexample-source" label="Tycho example source bundles"/>
</site>
11.9. Mirroring a p2 update site with Maven Tycho
Tycho allows to mirror a p2 update site. This reduces the dependency on the remote side as you can use your local copy for building the Eclipse application.
The following is an example for such a mirror task which mirrors two features from the latest Eclipse release
<?xml version="1.0" encoding="UTF-8"?>
<project
xsi:schemaLocation="https://maven.apache.org/POM/4.0.0 https://maven.apache.org/xsd/maven-4.0.0.xsd"
xmlns="https://maven.apache.org/POM/4.0.0" xmlns:xsi="https://www.w3.org/2001/XMLSchema-instance">
<modelVersion>4.0.0</modelVersion>
<name>Mirror Update Site</name>
<groupId>com.vogella.p2.mirror</groupId>
<artifactId>mirror</artifactId>
<version>3.5.0-SNAPSHOT</version>
<packaging>pom</packaging>
<properties>
<tycho.version>5.0.4</tycho.version>
</properties>
<build>
<plugins>
<plugin>
<groupId>org.eclipse.tycho.extras</groupId>
<artifactId>tycho-p2-extras-plugin</artifactId>
<version>${tycho.version}</version>
<executions>
<execution>
<phase>prepare-package</phase>
<goals>
<goal>mirror</goal>
</goals>
</execution>
</executions>
<configuration>
<source>
<!-- source repositories to mirror from -->
<repository>
<url>https://download.eclipse.org/releases/latest/</url>
<layout>p2</layout>
<!-- supported layouts are "p2-metadata", "p2-artifacts", and "p2" (for joint repositories; default) -->
</repository>
</source>
<!-- starting from here all configuration parameters are optional -->
<!-- they are only shown here with default values for documentation purpose -->
<!-- List of IUs to mirror. If omitted, allIUs will be mirrored. -->
<!-- Omitted IU version element means latest version of the IU -->
<ius>
<!--
<iu>
<query>
<expression>id == $0 && version == $1</expression>
<parameters>org.eclipse.platform.sdk,4.36.0.I20250528-1300</parameters>
</query>
</iu>
-->
<iu>
<id>org.eclipse.equinox.sdk.feature.group</id>
</iu>
<iu>
<id>org.eclipse.e4.rcp.feature.group</id>
</iu>
</ius>
<!-- The destination directory to mirror to. -->
<destination>${project.build.directory}/repository</destination>
<!-- Whether only strict dependencies should be followed. -->
<!-- "strict" means perfect version match -->
<followStrictOnly>false</followStrictOnly>
<!-- Whether or not to follow optional requirements. -->
<includeOptional>true</includeOptional>
<!-- Whether or not to follow non-greedy requirements. -->
<includeNonGreedy>true</includeNonGreedy>
<!-- Filter properties. E.g. filter only one platform -->
<filter>
<osgi.os>linux</osgi.os>
<osgi.ws>gtk</osgi.ws>
<osgi.arch>x86_64</osgi.arch>
</filter>
<!-- Whether to filter the resulting set of IUs to only -->
<!-- include the latest version of each IU -->
<latestVersionOnly>false</latestVersionOnly>
<!-- do not mirror artifacts, only metadata -->
<mirrorMetadataOnly>false</mirrorMetadataOnly>
<!-- whether to compress the content.xml/artifacts.xml -->
<compress>true</compress>
<!-- whether to append to the target repository content -->
<append>true</append>
</configuration>
</plugin>
</plugins>
</build>
</project>You would execute this task independently of your build and use the newly created local folder in your normal build.
To use your mirror, configure Maven to use it via the settings.xml file in your home folder. Alternatively, you can adjust your target definition file to point to the mirror.
<settings>
 <mirrors>
  <mirror>
   <id>eclipse-mirror</id>
   <mirrorOf>eclipse-release</mirrorOf>
   <name>Local mirror of the Eclipse release repository</name>
   <url>file:///home/vogella/eclipse-mirror</url>
   <layout>p2</layout>
   <mirrorOfLayouts>p2</mirrorOfLayouts>
  </mirror>
 </mirrors>
</settings>
11.10. Removing compiler warning messages from the build
You can remove compiler warnings from the Maven build by configuring the tycho-compiler-plugin.
This is demonstrated with the following snippet.
<build>
    <plugins>
      <plugin>
        <groupId>org.eclipse.tycho</groupId>
        <artifactId>tycho-compiler-plugin</artifactId>
        <version>${tycho.version}</version>
        <configuration>
          <compilerArgs>
            <arg>-warn:-raw,unchecked</arg>
          </compilerArgs>
        </configuration>
      </plugin>
    </plugins>
 </build>
11.11. Using the last Git commit as build qualifier special build settings
You can configure the tycho-packaging-plugin to use the last Git commit as build qualifier instead of the build time.
The following pom file shows how to do this.
This allows building reproducible results if no change happened in the Git repository.
This only works if the project is in a Git repository.
<project>
 <modelVersion>4.0.0</modelVersion>
 <groupId>com.vogella.tycho.jgit.plugin</groupId>
 <artifactId>com.vogella.tycho.jgit.plugin</artifactId>
 <version>1.0.0-SNAPSHOT</version>

 <packaging>eclipse-plugin</packaging>

 <properties>
  <tycho.version>5.0.4</tycho.version>
  <repo.url>https://download.eclipse.org/releases/2026-06</repo.url>
 </properties>

 <repositories>
  <repository>
   <id>eclipse-repo</id>
   <url>${repo.url}</url>
   <layout>p2</layout>
  </repository>

 </repositories>

 <build>
  <plugins>
   <plugin>
    <groupId>org.eclipse.tycho</groupId>
    <artifactId>tycho-maven-plugin</artifactId>
    <version>${tycho.version}</version>
    <extensions>true</extensions>
   </plugin>

   <plugin>
    <groupId>org.eclipse.tycho</groupId>
    <artifactId>target-platform-configuration</artifactId>
   </plugin>
  </plugins>
  <pluginManagement>
   <plugins>
    <plugin>
     <groupId>org.eclipse.tycho</groupId>
     <artifactId>tycho-packaging-plugin</artifactId>
     <version>${tycho.version}</version>
     <dependencies>
      <dependency>
       <groupId>org.eclipse.tycho.extras</groupId>
       <artifactId>tycho-buildtimestamp-jgit</artifactId>
       <version>${tycho.version}</version>
      </dependency>
     </dependencies>
     <configuration>
      <timestampProvider>jgit</timestampProvider>
      <jgit.ignore>
       pom.xml
      </jgit.ignore>
      <jgit.dirtyWorkingTree>ignore</jgit.dirtyWorkingTree>
     </configuration>
    </plugin>
   </plugins>
  </pluginManagement>
 </build>

</project>
11.12. Update the Maven artifact version id in the pom files based on the MANIFEST.MF
If you are using individual pom files, you can update their version numbers based on the versions in the MANIFEST.MF file.
To do this, run the following command.
# update pom files
mvn org.eclipse.tycho:tycho-versions-plugin:update-pom
11.13. Setting version numbers
After releasing an application or several plug-ins, the version number should be increased.
In a Tycho build, versions are defined in multiple locations: the pom.xml files, the MANIFEST.MF files, feature.xml, and .product files.
The Tycho Versions plugin updates all of these in a single command.
If your project includes a Maven Wrapper (./mvnw), use it instead of the system-wide mvn command to ensure a consistent Maven version across all environments.
./mvnw org.eclipse.tycho:tycho-versions-plugin:set-version -DnewVersion=1.1.0-SNAPSHOTThis updates the version in the parent pom.xml and all child modules, including their MANIFEST.MF, feature.xml, and .product files.
The short form ./mvnw tycho-versions:set-version works if org.eclipse.tycho is listed in the <pluginGroups> section of your ~/.m2/settings.xml file.
Eclipse usually uses semantic versioning for plug-ins, so a version number like major.minor.patch is used.
The -SNAPSHOT suffix indicates a development version.
Tycho maps -SNAPSHOT to the .qualifier suffix used by OSGi and Eclipse.
See Semantic versioning for more information.
|
To verify which files were changed, run |
More information about versioning with Tycho can be found in the Tycho Versions plugin documentation.
11.14. Unpack built plug-ins
In case a plug-in contains native code, e.g., dll files or others, which do not work from inside a JAR file, the plug-in itself should be unpacked.
To achieve that, the plug-in’s MANIFEST.MF must consist of the following property.
Eclipse-BundleShape: dirWith this property in the MANIFEST.MF file the plug-in is not packed as JAR file, but installed as directory in the plugins directory of a product.
11.15. Building platform-specific fragments or bundles
You can use pomless builds for platform-specific fragments. It is possible to specify it in the pom of the element in case you do not use pomless builds.
When building a fragment for a certain operating system, you can override the <environments> configuration from your parent POM. This requires a pom file in fragment or bundle.
<project>
    <modelVersion>4.0.0</modelVersion>
    <groupId>com.vogella.tycho</groupId>
    <artifactId>com.vogella.tycho.example.linux.x86_64</artifactId>
    <version>1.0.0-SNAPSHOT</version>
    <packaging>eclipse-plugin</packaging>

    <parent>
        <groupId>com.vogella.tycho</groupId>
        <artifactId>releng</artifactId>
        <version>1.0.0-SNAPSHOT</version>
    </parent>

    <build>
        <plugins>
            <plugin>
                <groupId>org.eclipse.tycho</groupId>
                <artifactId>target-platform-configuration</artifactId>
                <version>${tycho.version}</version>
                <configuration>
                    <environments>
                        <environment>
                            <os>linux</os>
                            <ws>gtk</ws>
                            <arch>x86_64</arch>
                        </environment>
                    </environments>
                </configuration>
            </plugin>
        </plugins>
    </build>

</project>
The following environments are commonly used, the Eclipse platform ships for all of them.
<environments>
    <environment>
        <os>linux</os>
        <ws>gtk</ws>
        <arch>x86_64</arch>
    </environment>
    <environment>
        <os>linux</os>
        <ws>gtk</ws>
        <arch>aarch64</arch>
    </environment>
    <environment>
        <os>win32</os>
        <ws>win32</ws>
        <arch>x86_64</arch>
    </environment>
    <environment>
        <os>win32</os>
        <ws>win32</ws>
        <arch>aarch64</arch>
    </environment>
    <environment>
        <os>macosx</os>
        <ws>cocoa</ws>
        <arch>x86_64</arch>
    </environment>
    <environment>
        <os>macosx</os>
        <ws>cocoa</ws>
        <arch>aarch64</arch>
    </environment>
</environments>
11.16. Shell script for generating pom files
Sometimes it is useful to generate the pom files automatically. Here is an example shell script which creates a module entry for each directory in the current directory.
#!/bin/bash

cd "$(dirname "$0")"

BASEDIR=$(basename "$PWD")
echo "Creating pom.xml for $BASEDIR"

cat > pom.xml <<- EOM
<project xmlns="https://maven.apache.org/POM/4.0.0"
    xmlns:xsi="https://www.w3.org/2001/XMLSchema-instance"
    xsi:schemaLocation="https://maven.apache.org/POM/4.0.0 https://maven.apache.org/maven-v4_0_0.xsd">
    <modelVersion>4.0.0</modelVersion>
    <groupId>com.vogella.tycho</groupId>
    <artifactId>$BASEDIR</artifactId>
    <version>1.0.0-SNAPSHOT</version>
    <packaging>pom</packaging>

    <parent>
        <groupId>com.vogella.tycho</groupId>
        <artifactId>releng</artifactId>
        <version>1.0.0-SNAPSHOT</version>
    </parent>

    <modules>
EOM

modules=$(find . -mindepth 1 -maxdepth 1 -type d | sort | awk -F/ '{ print "<module>"$2"</module>" }')

echo "$modules" >> pom.xml


cat >> pom.xml <<- EOM
    </modules>
</project>
EOM

cat pom.xml
11.17. Building native components
Tycho itself does not compile native code.
Native components, for example JNI libraries written in C or C++, are typically built by calling the native build system like make or cmake via the exec-maven-plugin or the maven-antrun-plugin in an early phase like generate-resources.
The resulting libraries are copied into the bundle and listed in the bin.includes entry of the build.properties file, so that Tycho packages them into the jar.
Libraries for several platforms belong into one fragment per platform, see the section about platform-specific fragments above.
11.18. Useful command-line properties for Tycho builds
Tycho and Maven support a number of system properties that influence how a build resolves dependencies, determines versions, and reports progress. The following table lists properties that are commonly used on the command line for continuous integration or reproducible builds.
| Property | Description |
|---|---|
|
Defines the Tycho version used by the build.
Typically referenced as |
|
Sets the value of the |
|
Disables the use of p2 mirrors when resolving artifacts from a p2 update site. This is helpful in corporate networks or CI environments where only the canonical update site should be contacted. |
|
Points a pomless build to the directory containing the parent |
|
Ignores artifacts installed in the local Maven repository when resolving the target platform. Set this for reproducible CI builds to ensure that only artifacts from the declared target platform or update sites are used. |
|
Maven flag that suppresses the download and upload progress output. Reduces log noise in CI systems while still reporting errors. |
The following example combines these properties into a single command line that runs a reproducible CI build.
mvn -Declipse.p2.mirrors=false \
    -Dtycho.pomless.parent=/path/to/parent \
    -Dtycho.localArtifacts=ignore \
    -Drevision=12.1.0.202604200418 \
    -Dtycho.version=5.0.4 \
    --no-transfer-progress \
    clean install
12. Signing plug-ins
Eclipse warns the user when installing unsigned plug-ins. Tycho supports two ways of signing: a PGP signature in the p2 metadata, or a jar signature with a certificate.
12.1. Signing with PGP
p2 accepts PGP signatures stored in the p2 metadata. They are free, need no certification authority, leave the jars unchanged and also cover non-jar artifacts. The user is asked once whether to trust your key.
Create an Ed25519 key with GnuPG and export it.
# Ed25519 signing key, valid for 10 years
gpg --quick-generate-key "vogella GmbH <release@vogella.com>" ed25519 sign 10y

# export the private key for the build server, keep this file secret
gpg --armor --export-secret-keys release@vogella.com > signing-key.asc

# export the public key for your users
gpg --armor --export release@vogella.com > vogella-release.pub.asc
Add the tycho-gpg-plugin to the POM of your eclipse-repository module.
<plugin>
    <groupId>org.eclipse.tycho</groupId>
    <artifactId>tycho-gpg-plugin</artifactId>
    <version>${tycho.version}</version>
    <executions>
        <execution>
            <id>pgp-sign</id>
            <phase>package</phase>
            <goals>
                <goal>sign-p2-artifacts</goal>
            </goals>
            <configuration>
                <!-- Bouncy Castle signer, together with the key file no gpg installation is required on the build server -->
                <signer>bc</signer>
            </configuration>
        </execution>
    </executions>
</plugin>
Bundles which already have a trusted jar signature, e.g., the Eclipse platform bundles, are not signed again. The public key is added to the update site.
Pass the exported key as file via the tycho.pgp.signer.bc.secretKeys property and the passphrase via the MAVEN_GPG_PASSPHRASE environment variable.
Without the key file, Tycho exports the key from the GnuPG keybox via the gpg executable, even with the Bouncy Castle signer.
export MAVEN_GPG_PASSPHRASE=...
mvn clean verify -Dtycho.pgp.signer.bc.secretKeys=/path/to/signing-key.asc|
Keep the key stable
Generate the key once, back up the exported private key, the passphrase and a revocation certificate offline, and use this one key for all your update sites.
Extend the expiry date with |
|
Signing on the build server
The private key belongs only into the secret store of the CI system, never into the repository. On GitHub Actions write the secret to a temporary file for the Maven step: On Jenkins bind a secret file and a secret text credential to the step: The same two bindings work for the jarsigner variant with the keystore file and its password. |
|
Checking the result
The Your own bundles and features must be listed.
The Eclipse platform bundles are not, as they keep their jar signature, while third party bundles from the Eclipse release repository may already carry a PGP signature of the Eclipse Foundation, so look for your own ids and your own key.
The definitive test is an installation in Eclipse via from the |
Products of your own can ship the public key as trusted key, then their users are not asked.
Add the exported public key to one of your bundles, list it in the bin.includes of its build.properties and register it in the plugin.xml.
<extension point="org.eclipse.equinox.p2.engine.pgp">
    <trustedKeys path="keys/vogella-release.pub.asc"/>
</extension>
12.2. Signing the jars with a certificate
A jar signature works with every Eclipse version and, with a certificate from a certification authority, installs without any dialog.
Buy a code signing certificate from a certification authority, or create a self-signed one for testing.
A self-signed certificate still triggers a warning, but only that the certificate is not trusted.
keytool asks for the keystore password, which is later passed to the build as jarsigner.storepass and jarsigner.keypass.
keytool -genkeypair -alias myplugins -keyalg RSA -keysize 4096 -validity 3650 \
  -storetype PKCS12 -keystore ~/signing.p12 \
  -dname "CN=Jim Knopf, O=Test Company, L=Hamburg, C=DE"
Add the following properties and plugins to your parent POM.
<properties>
    <!-- override these on the build server, never commit real values -->
    <!-- jarsigner.storepass and jarsigner.keypass are only passed on the command line -->
    <jarsigner.skip>true</jarsigner.skip>
    <jarsigner.keystore>${user.home}/signing.p12</jarsigner.keystore>
    <jarsigner.alias>myplugins</jarsigner.alias>
</properties>

<build>
    <plugins>
        <plugin>
            <groupId>org.apache.maven.plugins</groupId>
            <artifactId>maven-jarsigner-plugin</artifactId>
            <version>3.1.0</version>
            <configuration>
                <skip>${jarsigner.skip}</skip>
                <keystore>${jarsigner.keystore}</keystore>
                <storetype>PKCS12</storetype>
                <alias>${jarsigner.alias}</alias>
                <storepass>${jarsigner.storepass}</storepass>
                <keypass>${jarsigner.keypass}</keypass>
                <tsa>http://timestamp.digicert.com</tsa>
                <processAttachedArtifacts>false</processAttachedArtifacts>
            </configuration>
            <executions>
                <execution>
                    <id>sign</id>
                    <phase>package</phase>
                    <goals>
                        <goal>sign</goal>
                    </goals>
                </execution>
            </executions>
        </plugin>
        <!-- must be declared after the jarsigner so that the p2 metadata is generated for the signed jars -->
        <plugin>
            <groupId>org.eclipse.tycho</groupId>
            <artifactId>tycho-p2-plugin</artifactId>
            <version>${tycho.version}</version>
            <configuration>
                <defaultP2Metadata>false</defaultP2Metadata>
            </configuration>
            <executions>
                <execution>
                    <id>p2-metadata</id>
                    <phase>package</phase>
                    <goals>
                        <goal>p2-metadata</goal>
                    </goals>
                </execution>
            </executions>
        </plugin>
    </plugins>
</build>-
The
tycho-p2-pluginblock is required and must come after the jarsigner. Tycho’s default p2 metadata generation runs before any plugin declared in the POM, so its checksums would refer to the unsigned jars and installation from the update site would fail. -
tsatimestamps the signature, otherwise it expires with the certificate. -
Passwords are Maven properties. Pass them via
-Dor thesettings.xmlof the build server. -
Signing is skipped by default, so local builds need no keystore.
-
Every jar in the reactor is signed, including test bundles and the zip of an
eclipse-repositorymodule. To exclude a module, set<skip>true</skip>for the plugin in its POM. A property does not work for this, as a-Dargument on the command line overrides it in every module.
The build server enables the signing:
mvn clean verify -Djarsigner.skip=false \
  -Djarsigner.storepass=$KEYSTORE_PASSWORD \
  -Djarsigner.keypass=$KEY_PASSWORD
Verify a jar with jarsigner -verify -verbose -certs <bundle>.jar.
Native launchers are not covered.
They need osslsigncode (Windows) or codesign plus notarization (macOS).
Eclipse Foundation projects use the CBI eclipse-jarsigner-plugin, eclipse-winsigner-plugin and eclipse-macsigner-plugin instead.
12.3. Which signature to use
| PGP | CA-signed jar | Self-signed jar | |
|---|---|---|---|
Cost |
Free |
Around 70 to 500 EUR per year |
Free |
Key storage |
Software key |
Hardware token or cloud HSM, required by the certification authorities |
Software keystore |
Dialog during installation |
Trust this key, once per key |
None |
Untrusted certificate |
Verified after the installation |
No |
Yes, for jar bundles |
Yes, for jar bundles |
Changes the jar |
No |
Yes |
Yes |
Typical use |
Open source projects |
Commercial products |
Testing the build |
Use PGP for open source projects and a CA-signed jar for commercial products, as only the latter installs without any dialog.
Both can be combined.
The skipIfJarsigned parameter of the tycho-gpg-plugin controls whether jar-signed artifacts also get a PGP signature.
13. Tycho Clean Code Plugin
The tycho-cleancode-plugin runs the code cleanups, the quick fixes and the Organize Manifests action of the Eclipse IDE headless during the build.
This allows you to apply the same cleanups as in the IDE to all bundles in one go and to commit the result to version control.
13.1. Available goals
The plugin provides three goals, all bound to the process-sources phase by default:
-
cleanup: applies the JDT code cleanups to the Java sources, for example formatting, organizing imports and removing unused code. -
quickfix: applies quick fixes for compiler problems, for example the resolutions provided byorg.eclipse.jdt.ui. -
manifest: runs the PDE Organize Manifests action, for example to remove unused dependencies or to calculate theusesdirective.
The goals start a headless Eclipse application resolved from the target platform of the build, so the first run takes a while.
Each goal writes a Markdown report of the applied changes to the target folder, for example target/cleanups.md.
13.2. Configuration example
To use these goals, configure the plugin in your pom.xml, usually in the parent POM.
The following example runs all three goals.
<build>
    <plugins>
        <plugin>
            <groupId>org.eclipse.tycho</groupId>
            <artifactId>tycho-cleancode-plugin</artifactId>
            <version>${tycho.version}</version>
            <executions>
                <execution>
                    <id>cleanup</id>
                    <goals>
                        <goal>cleanup</goal>
                    </goals>
                    <configuration>
                        <!-- Overrides the cleanup profile of the project, the keys are the ones used in org.eclipse.jdt.ui.prefs -->
                        <cleanUpProfile>
                            <cleanup.remove_unused_imports>true</cleanup.remove_unused_imports>
                            <cleanup.format_source_code>true</cleanup.format_source_code>
                        </cleanUpProfile>
                    </configuration>
                </execution>
                <execution>
                    <id>quickfix</id>
                    <goals>
                        <goal>quickfix</goal>
                    </goals>
                </execution>
                <execution>
                    <id>manifest</id>
                    <goals>
                        <goal>manifest</goal>
                    </goals>
                    <configuration>
                        <removeUnusedDependencies>true</removeUnusedDependencies>
                        <calculateUses>true</calculateUses>
                    </configuration>
                </execution>
            </executions>
        </plugin>
    </plugins>
</build>
Without a cleanUpProfile the cleanup goal uses the cleanup settings of the project from its .settings/org.eclipse.jdt.ui.prefs file.
With the updateProjectCleanupProfile parameter the configured profile is written back to this file, so the IDE and the build use the same settings.
13.3. Running the cleanups
The cleanups run as part of your standard build:
mvn clean verifyAlternatively, run the goals directly without a full build:
mvn org.eclipse.tycho:tycho-cleancode-plugin:cleanup org.eclipse.tycho:tycho-cleancode-plugin:quickfix org.eclipse.tycho:tycho-cleancode-plugin:manifestThe short form mvn tycho-cleancode:cleanup works if org.eclipse.tycho is listed in the <pluginGroups> section of your ~/.m2/settings.xml file.
13.4. Finding configuration options
The help:describe goal lists all parameters of a goal in the terminal.
mvn help:describe -Dplugin=org.eclipse.tycho:tycho-cleancode-plugin -Dgoal=cleanup -Ddetail
mvn help:describe -Dplugin=org.eclipse.tycho:tycho-cleancode-plugin -Dgoal=quickfix -Ddetail
mvn help:describe -Dplugin=org.eclipse.tycho:tycho-cleancode-plugin -Dgoal=manifest -Ddetail
The same information is available in the Tycho Clean Code plugin documentation and in the Mojo classes in the Tycho GitHub repository, where the fields annotated with @Parameter are the configuration options.
14. Deploying to a file based Maven repository
You can directly deploy the build result to a file-based Maven repository (which could be used in your target platform as a reference).
mvn deploy -DaltDeploymentRepository=snapshot-repo::file:/path-to-your-repo/test-repo15. Automatic deployment of a p2 update site with Maven
You can use the Maven Wagon plugin to deploy your artifacts, e.g., to an FTP or SFTP server.
The following examples use FTP, for SFTP replace the wagon-ftp extension with wagon-ssh and use an sftp:// URL.
To define the credentials to login to the server you can add an entry for the user credentials to your local ~/.m2/settings.xml file.
<settings xmlns="http://maven.apache.org/SETTINGS/1.0.0"
  xmlns:xsi="http://www.w3.org/2001/XMLSchema-instance"
  xsi:schemaLocation="http://maven.apache.org/SETTINGS/1.0.0
                      http://maven.apache.org/xsd/settings-1.0.0.xsd">
  <localRepository/>
  <interactiveMode/>
  <usePluginRegistry/>
  <offline/>
  <pluginGroups/>
  <servers>
    <server>
      <id>ftp-repository</id>
      <username>youruser</username>
      <password>yourpassword</password>
    </server>
  </servers>
  <mirrors/>
  <proxies/>
  <profiles/>
  <activeProfiles/>
</settings>
You can then configure your pom file to use the wagon plug-in of Maven.
<project>
  <distributionManagement>
    <repository>
      <id>ftp-repository</id>
      <url>ftp://repository.mycompany.com/repository</url>
    </repository>
  </distributionManagement>

  <build>
    <extensions>
      <!-- Enabling the use of FTP -->
      <extension>
        <groupId>org.apache.maven.wagon</groupId>
         <artifactId>wagon-ftp</artifactId>
         <version>3.5.3</version>
      </extension>
    </extensions>
  </build>
</project>
The following command deploys your artifacts to your FTP site.
mvn deployIf you only want to upload your p2 update site, you can configure the wagon-maven-plugin.
<project>
  <modelVersion>4.0.0</modelVersion>

  <parent>
    <relativePath>../com.vogella.tycho.master/pom.xml</relativePath>
    <groupId>com.vogella</groupId>
    <artifactId>parent</artifactId>
    <version>1.0.0-SNAPSHOT</version>
  </parent>

  <artifactId>com.vogella.tycho.p2updatesite</artifactId>
  <packaging>eclipse-repository</packaging>

  <name>Tycho Test Build</name>

 <build>
  <extensions>
   <!-- Enabling the use of FTP -->
   <extension>
    <groupId>org.apache.maven.wagon</groupId>
    <artifactId>wagon-ftp</artifactId>
    <version>3.5.3</version>
   </extension>
  </extensions>
 </build>

 <profiles>
  <!-- This profile is used to upload the repo -->
  <profile>
   <id>uploadRepo</id>
   <properties>
    <!-- Properties relative to the
    distant host where to upload the repo -->
    <ftp.url>ftp://your.server.com</ftp.url>
    <ftp.toDir>/yourpath</ftp.toDir>
    <!-- Relative path to the repo being uploaded -->
    <repo.path>${project.build.directory}/repository/</repo.path>
   </properties>

   <build>
    <plugins>
     <!-- Upload the repo to the server -->
     <plugin>
      <groupId>org.codehaus.mojo</groupId>
      <artifactId>wagon-maven-plugin</artifactId>
      <version>3.0.0</version>
      <executions>
       <execution>
        <id>upload-repo</id>
        <phase>install</phase>
        <goals>
         <goal>upload</goal>
        </goals>
        <configuration>
         <fromDir>${repo.path}</fromDir>
         <includes>**</includes>
         <toDir>${ftp.toDir}</toDir>
         <url>${ftp.url}</url>
         <serverId>p2Repo</serverId>
         <!-- Points to your settings.xml
         where the connection settings are
          stored as shown below -->
         <!-- <server> -->
         <!-- <id>p2Repo</id> -->
         <!-- <username>username</username> -->
         <!-- <password>password</password> -->
         <!-- </server> -->
        </configuration>
       </execution>
      </executions>
     </plugin>
    </plugins>
   </build>
  </profile>
 </profiles>

</project>
You can upload your p2 update site with the following command.
mvn install -P uploadRepo16. Deploy p2 updatesite to Nexus
16.1. Setup Distribution Management
When a Nexus is installed on localhost, the following Distribution Management will likely be used:
<project>
 <distributionManagement>
  <repository>
   <id>nexus</id>
   <name>Internal Releases</name>
   <url>http://localhost:8081/repository/maven-releases/</url>
  </repository>
  <snapshotRepository>
   <id>nexus</id>
   <name>Internal Snapshots</name>
   <url>http://localhost:8081/repository/maven-snapshots/</url>
  </snapshotRepository>
 </distributionManagement>
</project>
16.2. Credentials for the Nexus repository manager
To define the credentials to login to the Nexus Server you can add an entry for the user credentials to your local ~/.m2/settings.xml file.
<settings xmlns="http://maven.apache.org/SETTINGS/1.0.0"
  xmlns:xsi="http://www.w3.org/2001/XMLSchema-instance"
  xsi:schemaLocation="http://maven.apache.org/SETTINGS/1.0.0
                      http://maven.apache.org/xsd/settings-1.0.0.xsd">
  <localRepository/>
  <interactiveMode/>
  <usePluginRegistry/>
  <offline/>
  <pluginGroups/>
  <servers>
    <server>
      <id>nexus</id>
      <username>admin</username>
      <password>admin123</password>
    </server>
  </servers>
  <mirrors/>
  <proxies/>
  <profiles/>
  <activeProfiles/>
</settings>
The id in the setting file must fit to the ID of the repository in the Distribution Management.
Both are named nexus in this example.
16.3. Only deploy the p2 update site
When using mvn clean deploy usually all build artifacts of all modules are deployed to the Nexus.
In the context of Tycho build, you usually want to deploy only the p2 update site, since its content is used by the target definitions or for application updates.
To achieve this, the deploy phase can be skipped by using maven.deploy.skip property in the root parent pom.
<properties>
    <project.build.sourceEncoding>UTF-8</project.build.sourceEncoding>
    <!-- Skip the deployment here, submodules can override this property -->
    <maven.deploy.skip>true</maven.deploy.skip>
</properties>
This property will be derived by all child modules so that they are not deployed unless a child module overrides this property. And this is supposed to be done in the p2 update site module.
This property should be false for all p2 update site modules.
<properties>
    <!-- Do not skip the deployment here since we want this module to be deployed -->
    <maven.deploy.skip>false</maven.deploy.skip>
</properties>
17. Creating native installers with jpackage
The jpackage tool (bundled with JDK 14+) creates native installers for your platform: .deb or .rpm on Linux, .msi on Windows, and .dmg on macOS.
It bundles a Java Runtime Environment so end users do not need Java installed.
A key limitation is that jpackage can only build installers for the operating system it runs on.
Cross-compilation is not supported.
For Eclipse RCP applications, jpackage must use --input with --main-jar pointing to the Equinox launcher JAR and --main-class org.eclipse.equinox.launcher.Main.
The Equinox launcher JAR has a version-dependent filename (e.g., org.eclipse.equinox.launcher_1.6.800.v20240330-0721.jar), so a shell glob is needed to discover it at build time.
|
Do not use the |
17.1. Creating the installer Maven module
Create an installer/ directory in your releng structure with a plain Maven pom.xml.
This module uses pom packaging and is not a Tycho packaging type.
<project>
  <modelVersion>4.0.0</modelVersion>

  <parent>
    <groupId>com.vogella.tycho</groupId>
    <artifactId>releng</artifactId>
    <version>1.0.0-SNAPSHOT</version>
  </parent>

  <artifactId>taskman-installer</artifactId>
  <packaging>pom</packaging>

  <properties>
    <app.name>Taskman</app.name>
    <!-- Path to the materialized product from the product module -->
    <product.dir>${project.basedir}/../com.vogella.tasks.product/target/products/taskmanagement</product.dir>
    <!-- aarch64 for Apple Silicon, override with -Dmacos.arch=x86_64 for Intel Macs -->
    <macos.arch>aarch64</macos.arch>
  </properties>

  <build>
    <plugins>

      <!-- Strip -SNAPSHOT suffix for jpackage compatibility -->
      <plugin>
        <groupId>org.codehaus.mojo</groupId>
        <artifactId>build-helper-maven-plugin</artifactId>
        <version>3.6.1</version>
        <executions>
          <execution>
            <id>parse-version</id>
            <goals>
              <goal>parse-version</goal>
            </goals>
          </execution>
        </executions>
      </plugin>

      <!-- jpackage executions via exec-maven-plugin (activated by OS profiles) -->
      <plugin>
        <groupId>org.codehaus.mojo</groupId>
        <artifactId>exec-maven-plugin</artifactId>
        <version>3.6.3</version>
      </plugin>

    </plugins>
  </build>

  <!-- OS-specific profiles shown below -->
</project>
The build-helper-maven-plugin parses the project version and provides variables like parsedVersion.majorVersion, parsedVersion.minorVersion, and parsedVersion.incrementalVersion.
This strips the -SNAPSHOT suffix because jpackage requires strictly numeric versions (e.g., 1.0.0).
17.2. Linux profile
The Linux profile uses <family>unix</family> combined with <name>Linux</name> for activation.
Using <family>unix</family> alone would also activate on macOS since macOS is a Unix-based system.
<profile>
  <id>installer-linux</id>
  <activation>
    <os>
      <family>unix</family>
      <name>Linux</name>
    </os>
  </activation>
  <build>
    <plugins>
      <plugin>
        <groupId>org.codehaus.mojo</groupId>
        <artifactId>exec-maven-plugin</artifactId>
        <executions>
          <execution>
            <id>jpackage-linux</id>
            <phase>package</phase>
            <goals><goal>exec</goal></goals>
            <configuration>
              <executable>bash</executable>
              <arguments>
                <argument>-c</argument>
                <argument>
LAUNCHER_JAR=$(basename $(ls "${product.dir}/linux/gtk/x86_64/plugins/org.eclipse.equinox.launcher_"*.jar))
jpackage \
  --type deb \
  --name ${app.name} \
  --app-version ${parsedVersion.majorVersion}.${parsedVersion.minorVersion}.${parsedVersion.incrementalVersion} \
  --input "${product.dir}/linux/gtk/x86_64" \
  --main-jar plugins/$LAUNCHER_JAR \
  --main-class org.eclipse.equinox.launcher.Main \
  --dest ${project.build.directory}/installer/linux \
  --icon ${project.basedir}/src/main/resources/taskman.png \
  --linux-shortcut \
  --arguments -clearPersistedState \
  --java-options -Declipse.product=com.vogella.tasks.ui.product \
  --java-options -Dosgi.instance.area=@user.home/.taskman \
  --java-options -Dosgi.configuration.area=@user.home/.taskman/configuration \
  --java-options "-Dosgi.sharedConfiguration.area=/opt/taskman/lib/app/configuration"
                </argument>
              </arguments>
            </configuration>
          </execution>
        </executions>
      </plugin>
    </plugins>
  </build>
</profile>
The bash -c invocation is necessary because the Equinox launcher JAR name includes a version suffix that must be resolved via a shell glob.
Shell variables that may contain spaces are quoted to prevent word-splitting.
The --linux-shortcut flag creates a .desktop file so the application appears in the desktop application menu.
The --java-options flags pass JVM system properties to the embedded JRE launched by jpackage.
These are required because jpackage restructures the product layout under lib/app/, which breaks relative path references in config.ini:
-
-Declipse.producttells the Equinox launcher which product to start. -
-Dosgi.instance.areasets the workspace location to a user-writable path. -
-Dosgi.configuration.arearedirects the configuration (including p2 data) to the user home directory so that/opt/does not need to be writable. -
-Dosgi.sharedConfiguration.areapoints to the read-only shared configuration shipped inside the installer.
The --arguments flags pass arguments directly to the Equinox launcher (not the JVM).
The default install path for .deb packages is /opt/<app-name>/.
You can change it with --install-dir (e.g., --install-dir /usr/local).
Upgrades are supported: sudo dpkg -i package.deb or sudo apt install ./package.deb replaces the previous version.
To force reinstall without changing the version number during development, use sudo dpkg -i --force-overwrite package.deb.
17.3. Windows profile
|
The Windows profile uses |
<profile>
  <id>installer-windows</id>
  <activation>
    <os><family>windows</family></os>
  </activation>
  <build>
    <plugins>
      <plugin>
        <groupId>org.codehaus.mojo</groupId>
        <artifactId>exec-maven-plugin</artifactId>
        <executions>
          <execution>
            <id>jpackage-windows</id>
            <phase>package</phase>
            <goals><goal>exec</goal></goals>
            <configuration>
              <executable>bash</executable>
              <arguments>
                <argument>-c</argument>
                <argument>
LAUNCHER_JAR=$(basename $(ls "${product.dir}/win32/win32/x86_64/plugins/org.eclipse.equinox.launcher_"*.jar))
jpackage \
  --type msi \
  --name ${app.name} \
  --app-version ${parsedVersion.majorVersion}.${parsedVersion.minorVersion}.${parsedVersion.incrementalVersion} \
  --input "${product.dir}/win32/win32/x86_64" \
  --main-jar plugins/$LAUNCHER_JAR \
  --main-class org.eclipse.equinox.launcher.Main \
  --dest ${project.build.directory}/installer/windows \
  --icon ${project.basedir}/src/main/resources/taskman.ico \
  --win-dir-chooser \
  --win-menu \
  --win-shortcut \
  --arguments -clearPersistedState \
  --java-options -Declipse.product=com.vogella.tasks.ui.product \
  --java-options -Dosgi.instance.area=@user.home/.taskman \
  --java-options -Dosgi.configuration.area=@user.home/.taskman/configuration \
  --java-options "-Dosgi.sharedConfiguration.area=C:/Program Files/${app.name}/app/configuration"
                </argument>
              </arguments>
            </configuration>
          </execution>
        </executions>
      </plugin>
    </plugins>
  </build>
</profile>
The --win-dir-chooser flag lets the user choose the install directory.
The --win-menu and --win-shortcut flags add the application to the Start menu and create a desktop shortcut, equivalent to --linux-shortcut on Linux.
The --icon flag expects a .ico file on Windows.
17.4. macOS profile
<profile>
  <id>installer-macos</id>
  <activation>
    <os><family>mac</family></os>
  </activation>
  <build>
    <plugins>
      <plugin>
        <groupId>org.codehaus.mojo</groupId>
        <artifactId>exec-maven-plugin</artifactId>
        <executions>
          <execution>
            <id>jpackage-macos</id>
            <phase>package</phase>
            <goals><goal>exec</goal></goals>
            <configuration>
              <executable>bash</executable>
              <arguments>
                <argument>-c</argument>
                <argument>
LAUNCHER_JAR=$(basename $(ls "${product.dir}/macosx/cocoa/${macos.arch}/plugins/org.eclipse.equinox.launcher_"*.jar))
jpackage \
  --type dmg \
  --name ${app.name} \
  --app-version ${parsedVersion.majorVersion}.${parsedVersion.minorVersion}.${parsedVersion.incrementalVersion} \
  --input "${product.dir}/macosx/cocoa/${macos.arch}" \
  --main-jar plugins/$LAUNCHER_JAR \
  --main-class org.eclipse.equinox.launcher.Main \
  --dest ${project.build.directory}/installer/macos \
  --icon ${project.basedir}/src/main/resources/taskman.icns \
  --arguments -clearPersistedState \
  --java-options -Declipse.product=com.vogella.tasks.ui.product \
  --java-options -XstartOnFirstThread \
  --java-options -Dosgi.instance.area=@user.home/.taskman \
  --java-options -Dosgi.configuration.area=@user.home/.taskman/configuration \
  --java-options "-Dosgi.sharedConfiguration.area=/Applications/${app.name}.app/Contents/app/configuration"
                </argument>
              </arguments>
            </configuration>
          </execution>
        </executions>
      </plugin>
    </plugins>
  </build>
</profile>|
The macOS profile must include |
The macos.arch property selects the aarch64 build for Apple Silicon, run the build with -Dmacos.arch=x86_64 for Intel Macs.
The --icon flag on macOS expects an .icns file.
jpackage can convert a PNG file to .icns automatically if you pass a .png path, but providing a native .icns gives better results at all display densities.
17.5. Application icon
Without --icon, jpackage uses a generic Java icon in the application menu or taskbar.
Provide platform-specific icon files in src/main/resources/:
-
Linux:
taskman.png(512x512 pixels recommended) -
Windows:
taskman.ico(multi-resolution.icowith 16, 32, 48, and 256 px layers) -
macOS:
taskman.icns(ortaskman.png, jpackage converts it automatically)
17.6. Shared installation and writable configuration
System install directories (/opt/ on Linux, C:\Program Files on Windows) are not user-writable.
The osgi.configuration.area and osgi.instance.area properties must therefore be redirected to the user home directory.
Because eclipse.p2.data.area in config.ini defaults to @config.dir/../p2, it resolves relative to the user-writable configuration area.
This means p2 updates and downloaded plug-ins are stored in ~/.taskman/p2/ rather than in the read-only install directory.
p2 self-update therefore works without administrator rights.
17.7. Registering the installer module
Add the installer module to the parent pom.xml after the product module.
The product must be materialized first so that the installer can package its output.
<modules>
  <!-- ... other modules ... -->
  <module>com.vogella.tasks.product</module>
  <module>installer</module>
</modules>
After adding the module, run mvn clean verify to build the product and create the native installer in one step.
The installer output is placed in installer/target/installer/<platform>/.
For version management across all modules, see Setting version numbers.
The installer module picks up the version automatically via build-helper-maven-plugin, which strips the -SNAPSHOT suffix for jpackage.
18. Appendix: Tycho snippets
This section lists various snippets that can be used to modify your Tycho build.
18.1. Using p2 update sites in the target file
Instead of a target file you can use p2 update sites in your build configuration. Prefer the usage of target platform files to ensure you are developing against the same set of plug-ins as your command line build.
 <properties>
  <!-- more properties -->
  <eclipse-repo.url>https://download.eclipse.org/releases/latest</eclipse-repo.url>
 </properties>


 <repositories>
  <repository>
   <id>eclipse-release</id>
   <url>${eclipse-repo.url}</url>
   <layout>p2</layout>
  </repository>
 </repositories>

 <!-- the rest of the configuration... -->
If you want to add the JRE to your build using update sites:
 <repository>
      <id>justj</id>
      <url>https://download.eclipse.org/justj/jres/25/updates/release/latest/</url>
      <layout>p2</layout>
 </repository>
18.2. Setting the Java version
The target configuration allows setting the Java version. This is sometimes required, for example, sometimes Tycho calculates the wrong Java version for a feature.
For example, the following ensures that you are using Java 25 for your build.
<plugin>
 <groupId>org.eclipse.tycho</groupId>
 <artifactId>target-platform-configuration</artifactId>
 <version>${tycho.version}</version>

 <configuration>
 <executionEnvironment>JavaSE-25</executionEnvironment>
   <!-- more settings -->
 </configuration>
</plugin>
18.3. Debugging a Tycho build
Use
mvnDebug clean verifyto allow connecting to a Tycho build via a remote debug session.
18.4. Show the generated pom files
To see the generated pom files, use mvn clean verify -Dpolyglot.dump.pom=pom-for-review.xml.
The file name pom-for-review.xml avoids that the generated pom files are used by the build.
18.5. Configuring SonarQube
Add your SonarQube configuration to your main pom file.
<properties>
    <!-- SonarQube properties -->
    <sonar.projectKey>yourProjectKey</sonar.projectKey>
    <sonar.host.url>https://yourSonarServer:9000</sonar.host.url>
    <!-- Optional: if authentication is required, better pass it via -Dsonar.token on the command line -->
    <sonar.token>yourAuthenticationToken</sonar.token>
    <sonar.sources>src</sonar.sources>
</properties>
Run mvn clean verify sonar:sonar
18.6. Adding modules based on the profile
The listing of modules is additive, e.g., you can define profiles with additional modules and in this case, the modules defined in the profile will be added to the build if the profile is active.
<project>
    <modelVersion>4.0.0</modelVersion>
    <groupId>com.vogella.tycho</groupId>
    <artifactId>releng</artifactId>
    <version>1.0.0-SNAPSHOT</version>
    <packaging>pom</packaging>

    <properties>
        <tycho.version>5.0.4</tycho.version>
        <project.build.sourceEncoding>UTF-8</project.build.sourceEncoding>
    </properties>


    <profiles>
        <profile>
            <id>deploy</id>
            <modules>
                <module>updatesite</module>
            </modules>
        </profile>
    </profiles>

    <build>

        <pluginManagement>
            <plugins>
                <plugin>
                    <groupId>org.eclipse.tycho</groupId>
                    <artifactId>tycho-p2-director-plugin</artifactId>
                    <version>${tycho.version}</version>
                </plugin>
            </plugins>
        </pluginManagement>

        <plugins>
            <plugin>
                <groupId>org.eclipse.tycho</groupId>
                <artifactId>tycho-maven-plugin</artifactId>
                <version>${tycho.version}</version>
                <extensions>true</extensions>
            </plugin>
            <plugin>
                <groupId>org.eclipse.tycho</groupId>
                <artifactId>target-platform-configuration</artifactId>
                <version>${tycho.version}</version>
                <configuration>
                    <target>
                        <file>../target-platform/target-platform.target</file>
                    </target>
                    <resolveWithExecutionEnvironmentConstraints>false</resolveWithExecutionEnvironmentConstraints>

                    <environments>
                        <environment>
                            <os>linux</os>
                            <ws>gtk</ws>
                            <arch>x86_64</arch>
                        </environment>
                        <environment>
                            <os>win32</os>
                            <ws>win32</ws>
                            <arch>x86_64</arch>
                        </environment>
                        <environment>
                            <os>macosx</os>
                            <ws>cocoa</ws>
                            <arch>x86_64</arch>
                        </environment>
                        <environment>
                            <os>macosx</os>
                            <ws>cocoa</ws>
                            <arch>aarch64</arch>
                        </environment>
                    </environments>
                </configuration>
            </plugin>
        </plugins>
    </build>


    <modules>
        <module>com.example.e4.rcp</module>
        <module>com.example.e4.feature</module>
        <module>com.example.e4.product</module>
        <!--
    <module>com.example.e4.swtbottests</module>
-->
        <module>com.vogella.swt.widgets</module>
        <module>com.vogella.tasks.ui</module>
        <module>com.example.e4.renderer.swt</module>
        <module>com.vogella.tasks.feature</module>
        <module>com.vogella.tasks.product</module>
        <module>com.vogella.tasks.model</module>
        <module>com.vogella.tasks.services</module>
        <!--
    <module>com.vogella.tasks.services.tests</module>
    -->
        <module>com.vogella.service.imageloader</module>
        <module>com.vogella.tasks.events</module>
        <module>com.vogella.contribute.parts</module>
        <module>com.vogella.tasks.ui.contribute</module>
        <module>com.vogella.tasks.update</module>
        <module>com.vogella.eclipse.css</module>
        <module>com.vogella.osgi.taskconsumer</module>

    </modules>
</project>
19. Appendix: Individual pom files
Sometimes pomless build fails or you want to configure something directly. Therefore, this section lists individual poms.
19.1. Pom files for target definition files
<project>
    <modelVersion>4.0.0</modelVersion>
    <parent>
        <groupId>com.vogella.tycho</groupId>
        <artifactId>releng</artifactId>
        <version>1.0.0-SNAPSHOT</version>
    </parent>
    <groupId>com.vogella.tycho</groupId>
    <artifactId>target-platform</artifactId>
    <version>1.0.0-SNAPSHOT</version>
    <packaging>eclipse-target-definition</packaging>

</project>
19.2. Pom file for an Eclipse plug-in
<?xml version="1.0" encoding="UTF-8"?>

<project>
  <modelVersion>4.0.0</modelVersion>


  <parent>
    <groupId>com.vogella.tycho</groupId>
    <artifactId>releng</artifactId>
    <version>1.0.0-SNAPSHOT</version>
  </parent>

  <artifactId>com.vogella.tycho.plugin1</artifactId>
  <packaging>eclipse-plugin</packaging>
</project>
19.3. Pom file for product configuration files
The following example shows a pom file for two product configuration files, the ID must be the same as the uid in the product file.
The attachId makes the result unique.
<?xml version="1.0" encoding="UTF-8"?>
<project xsi:schemaLocation="https://maven.apache.org/POM/4.0.0 https://maven.apache.org/xsd/maven-4.0.0.xsd" xmlns="https://maven.apache.org/POM/4.0.0"
    xmlns:xsi="https://www.w3.org/2001/XMLSchema-instance">
  <modelVersion>4.0.0</modelVersion>
  <parent>
    <groupId>com.vogella.tycho</groupId>
    <artifactId>releng</artifactId>
    <version>1.0.0-SNAPSHOT</version>
  </parent>
  <artifactId>com.vogella.tasks.product</artifactId>
  <version>1.0.0-SNAPSHOT</version>
  <packaging>eclipse-repository</packaging>
  <name>[product] to-do, to-do</name>
  <build>
    <plugins>
      <plugin>
        <groupId>org.eclipse.tycho</groupId>
        <artifactId>tycho-p2-director-plugin</artifactId>
        <executions>
          <execution>
            <id>materialize-products</id>
            <goals>
              <goal>materialize-products</goal>
            </goals>
            <configuration>
              <products>
                <product>
                  <id>taskmanagement</id>
                  <attachId>com.vogella.tasks.ui.product</attachId>
                </product>
                <product>
                  <id>taskmanagement2</id>
                  <attachId>com.vogella.tasks.ui.product2</attachId>
                </product>
              </products>
            </configuration>
          </execution>
          <execution>
            <id>archive-products</id>
            <goals>
              <goal>archive-products</goal>
            </goals>
            <configuration>
              <products>
                <product>
                  <id>taskmanagement</id>
                  <attachId>com.vogella.tasks.ui.product</attachId>
                </product>
                <product>
                  <id>taskmanagement2</id>
                  <attachId>com.vogella.tasks.ui.product2</attachId>
                </product>
              </products>
            </configuration>
          </execution>
        </executions>
      </plugin>
    </plugins>
  </build>
</project>
If you want to make the product configurable, you set the ID via a Maven property, this allows it to be set via the Maven command line.
  <properties>
    <!-- Define default values for product IDs; these can be overridden from the command line -->
    <product.id>taskmanagement</product.id>
  </properties>

  <!--  more stuff -->

   <product>
        <id>${product.id}</id>
        <attachId>com.vogella.tasks.ui.product</attachId>
    </product>
You can set the product from the command line: mvn clean verify -Dproduct.id=taskmanagement.
20. Eclipse Tycho resources
20.1. vogella Java example code
If you need more assistance we offer Online Training and Onsite training as well as consulting