
Add JavaFX controls to a SWT Eclipse 4 application – Eclipse RCP Cookbook UPDATE
I wrote about this topic already a while ago on another blog. But since then quite a few things have changed and I wanted to publish an updated version of that blog post. Because of various reasons I decided to publish it here ;-).
As explained in JavaFX Interoperability with SWT it is possible to embed JavaFX controls in a SWT UI. This is useful for example if you want to softly migrate big applications from SWT to JavaFX or if you need to add animations or special JavaFX controls without completely migrating your application.
The following recipe will show how to integrate JavaFX with an Eclipse 4 application. It will cover the usage of Java 8 with integrated JavaFX, and Java 11 with separate JavaFX 11. The steps for Java 11 should also apply for newer versions of Java and JavaFX.
Cookware
- JDK 8
- Download an installer for your platform from the Adoptium Marketplace
- Simply run the executable and follow the installation instructions
- e(fx)clipse 3.9.0
- Download and install/extract Eclipse 2019-09 (or at least 2019-06 because of needed dependencies) https://www.eclipse.org/downloads/packages/
- Update the Eclipse installation
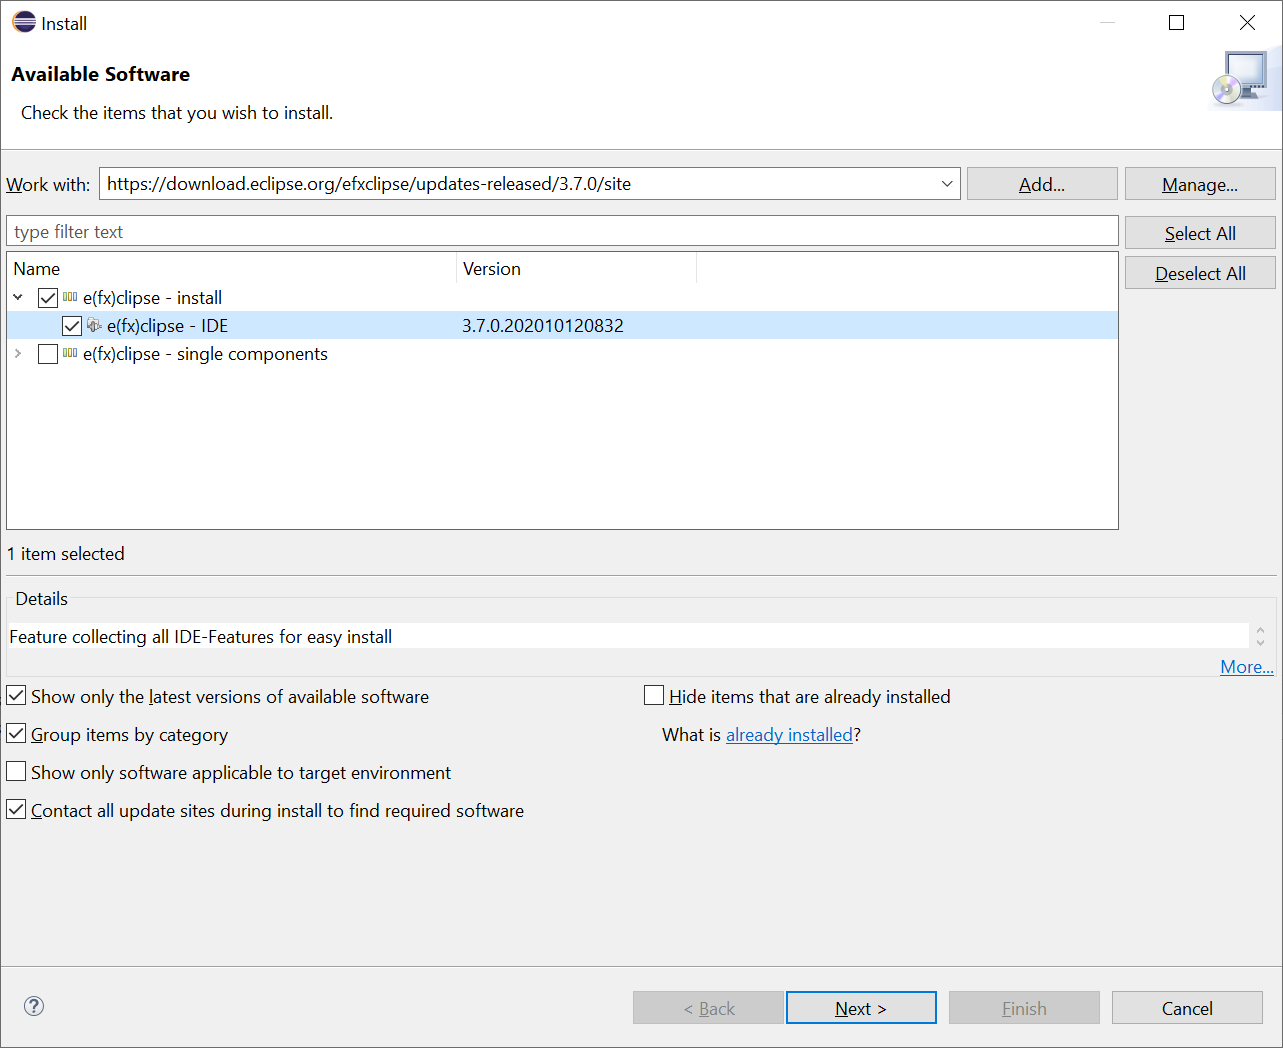
- Main Menu → Help → Install New Software…
- Use the e(fx)clipse 3.9.0 Update Site https://download.eclipse.org/efxclipse/updates-released/3.9.0/site
- Select e(fx)clipse - IDE to get the all IDE features installed needed to develop JavaFX within Eclipse (https://www.eclipse.org/efxclipse/index.html)
- Restart the IDE and choose a workspace
For Java 11 and higher with separate JavaFX the following preparations need to be done:
- JDK 11 and higher
- Download an installer for your platform from the Adoptium Marketplace
- Simply run the executable and follow the installation instructions
- JavaFX 11 and higher
- https://openjfx.io/
- Download the JavaFX 11 archive for your operating system
- Extract it
- e(fx)clipse
- Configure the JavaFX SDK lib folder
- Main Menu → Window → Preferences → JavaFX
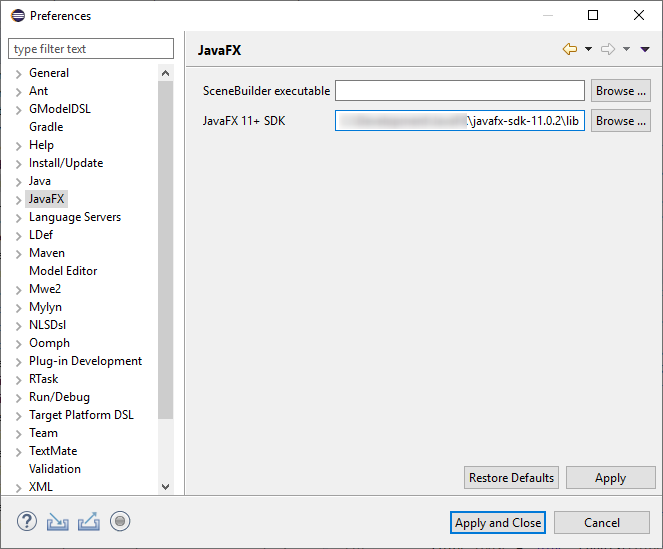
- Main Menu → Window → Preferences → JavaFX
- Configure the JavaFX SDK lib folder
Ingredients
This recipe uses the Eclipse RCP Cookbook – Basic Recipe. To get started fast with this recipe, we have prepared the basic recipe for you on GitHub.
To use the prepared basic recipe to follow this tutorial, import the project by cloning the Git repository:
- File → Import → Git → Projects from Git
- Click Next
- Select Clone URI
- Enter URI https://github.com/fipro78/e4-cookbook-basic-recipe.git
- Click Next
- Select the master branch
- Click Next
- Choose a directory where you want to store the checked out sources
- Click Next
- Select Import existing projects
- Click Next
- Click Finish
Preparation
Step 1: Update the Target Platform
- Open the target definition org.fipro.eclipse.tutorial.target.target in the project org.fipro.eclipse.tutorial.target
- Add a new Software Site by clicking Add… in the Locations section
- Select Software Site
- Software Site for the e(fx)clipse 3.9.0 release build http://download.eclipse.org/efxclipse/runtime-released/3.9.0/site
- Expand FX Target and check Minimal JavaFX OSGi integration bundles (Runtime extension to add JavaFX support)
- Optional: If you use the RCP e4 Target Platform Feature instead for additional e(fx)clipse features that can be included, you additionally need to add p2 and EMF Edit to the target definition because of transitive dependencies
- Select the update site http://download.eclipse.org/releases/2019-06
- Click Edit
- Check Equinox p2, headless functionalities
- Check EMF Edit
- Click Finish
- Activate the target platform by clicking Set as Target Platform in the upper right corner of the Target Definition Editor
Java 11
If you use Java 11 or higher you need to add an additional update site as explained here.
- Add a new Software Site by clicking Add… in the Locations section
- Select Software Site
- http://downloads.efxclipse.bestsolution.at/p2-repos/openjfx-11/repository/
- Disable Group by Category as the items are not categorized and check all available items
- openjfx.media.feature
- openjfx.standard.feature
- openjfx.swing.feature
- openjfx.swt.feature
- openjfx.web.feature
Note:
For Java 17 the Update Site URL is https://downloads.efxclipse.bestsolution.at/p2-repos/openjfx-17.0.2/
Note:
If you are using the Target Definition DSL, the TPD file should look similar to the following snippet which includes the Minimal JavaFX OSGi integration bundles and the RCP e4 Target Platform Feature:
target "E4 Cookbook Target Platform"

with source requirements

location "http://download.eclipse.org/releases/2019-06" {
    org.eclipse.equinox.executable.feature.group
    org.eclipse.sdk.feature.group
    org.eclipse.equinox.p2.core.feature.feature.group
    org.eclipse.emf.edit.feature.group
}

location "http://download.eclipse.org/efxclipse/runtime-released/3.9.0/site" {
    org.eclipse.fx.runtime.min.feature.feature.group
    org.eclipse.fx.target.rcp4.feature.feature.group
}

// only needed for Java 11 with OpenJFX 11
location "http://downloads.efxclipse.bestsolution.at/p2-repos/openjfx-11/repository/" {
    openjfx.media.feature.feature.group
    openjfx.standard.feature.feature.group
    openjfx.swing.feature.feature.group
    openjfx.swt.feature.feature.group
    openjfx.web.feature.feature.group
}
Step 2: Update the Plug-in project
- Open the
InverterPartin the project org.fipro.eclipse.tutorial.inverter- Add a
javafx.embed.swt.FXCanvasto the parentCompositeinInverterPart#postConstruct(Composite) - Create an instance of
javafx.scene.layout.BorderPane - Create a
javafx.scene.Sceneinstance that takes the createdBorderPaneas root node and sets the background color to be the same as the background color of the parentShell - Set the created
javafx.scene.Sceneto theFXCanvas
- Add a
// add FXCanvas for adding JavaFX controls to the UI
FXCanvas canvas = new FXCanvas(parent, SWT.NONE);
GridDataFactory
    .fillDefaults()
    .grab(true, true)
    .span(3, 1)
    .applyTo(canvas);

// create the root layout pane
BorderPane layout = new BorderPane();

// create a Scene instance
// set the layout container as root
// set the background fill to the background color of the shell
Scene scene = new Scene(layout, Color.rgb(
    parent.getShell().getBackground().getRed(),
    parent.getShell().getBackground().getGreen(),
    parent.getShell().getBackground().getBlue()));

// set the Scene to the FXCanvas
canvas.setScene(scene);
Now JavaFX controls can be added to the scene graph via the BorderPane instance.
- Remove the output control of type
org.eclipse.swt.widgets.Text - Create an output control of type
javafx.scene.control.Label - Add the created
javafx.scene.control.Labelto the center of theBorderPane
javafx.scene.control.Label output = new javafx.scene.control.Label();
layout.setCenter(output);
Add some animations to see some more JavaFX features.
- Create a
javafx.animation.RotateTransitionthat rotates the output label. - Create a
javafx.animation.ScaleTransitionthat scales the output label. - Create a
javafx.animation.ParallelTransitionthat combines theRotateTransitionand theScaleTransition. This way both transitions are executed in parallel. - Add starting the animation in the
SelectionAdapterand theKeyAdapterthat are executed for reverting a String.
RotateTransition rotateTransition =
    new RotateTransition(Duration.seconds(1), output);
rotateTransition.setByAngle(360);

ScaleTransition scaleTransition =
    new ScaleTransition(Duration.seconds(1), output);
scaleTransition.setFromX(1.0);
scaleTransition.setFromY(1.0);
scaleTransition.setToX(4.0);
scaleTransition.setToY(4.0);

ParallelTransition parallelTransition =
    new ParallelTransition(rotateTransition, scaleTransition);

button.addSelectionListener(new SelectionAdapter() {
    @Override
    public void widgetSelected(SelectionEvent e) {
        output.setText(StringInverter.invert(input.getText()));
        parallelTransition.play();
    }
});
Step 3: Update the Product Configuration
- Open the file org.fipro.eclipse.tutorial.app.product in the project org.fipro.eclipse.tutorial.product
- Switch to the Contents tab and add additional features
- Option A: Use the Minimal JavaFX OSGi integration bundles
- org.eclipse.fx.runtime.min.feature
- Option B: Use the RCP e4 Target Platform Feature
- org.eclipse.fx.target.rcp4.feature
- org.eclipse.equinox.p2.core.feature
- org.eclipse.ecf.core.feature
- org.eclipse.ecf.filetransfer.feature
- org.eclipse.emf.edit
- Option A: Use the Minimal JavaFX OSGi integration bundles
- Switch to the Launching tab
- Add -Dosgi.framework.extensions=org.eclipse.fx.osgi to the VM Arguments (adapter hook to get JavaFX-SWT integration on the classpath)
Java 11:
You also need to add the openjfx features to bundle it with your application:
- openjfx.media.feature
- openjfx.standard.feature
- openjfx.swing.feature
- openjfx.swt.feature
-
openjfx.web.feature
- Start the application from within the IDE
- Open the Product Configuration in the org.fipro.eclipse.tutorial.product project
- Select the Overview tab
- Click Launch an Eclipse Application in the Testing section
Note:
If you have org.eclipse.equinox.p2.reconciler.dropins in the Start Levels of the Configuration tab, you also need to add org.eclipse.equinox.p2.extras.feature in the included features of the Contents tab so the product build succeeds in later stages. I personally tend to remove it as dropins have been deprecated by the p2 team quite a while ago.
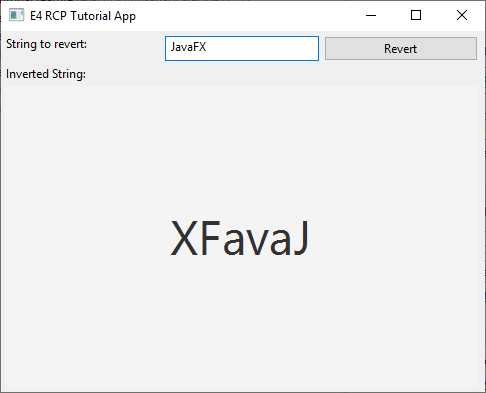
The started application should look similar to the following screenshot.
Maven Tycho build
To build a deliverable product it is recommended to use Maven Tycho. Using pomless Tycho you only need a single pom.xml file for the build configuration and not one pom.xml file per project. Since Tycho 1.5 this is even true for the target platform, update site and product projects.
To enable the Maven build with pomless Tycho for the example project you need to create two files:
- Create e4-cookbook-basic-recipe/.mvn/extension.xml to enable the pomless Tycho extension
<?xml version="1.0" encoding="UTF-8"?> <extensions> <extension> <groupId>org.eclipse.tycho.extras</groupId> <artifactId>tycho-pomless</artifactId> <version>1.5.1</version> </extension> </extensions> - Create e4-cookbook-basic-recipe/pom.xml to configure the Maven build
 <?xml version="1.0" encoding="UTF-8"?>
 <project xmlns="http://maven.apache.org/POM/4.0.0" xmlns:xsi="http://www.w3.org/2001/XMLSchema-instance"
   xsi:schemaLocation="http://maven.apache.org/POM/4.0.0 http://maven.apache.org/xsd/maven-4.0.0.xsd">
   <modelVersion>4.0.0</modelVersion>

   <groupId>org.fipro.eclipse.tutorial</groupId>
   <artifactId>parent</artifactId>
   <version>1.0.0-SNAPSHOT</version>

   <packaging>pom</packaging>

   <modules>
     <module>org.fipro.eclipse.tutorial.target</module>
     <module>org.fipro.eclipse.tutorial.inverter</module>
     <module>org.fipro.eclipse.tutorial.app</module>
     <module>org.fipro.eclipse.tutorial.feature</module>
     <module>org.fipro.eclipse.tutorial.product</module>
   </modules>

   <properties>
     <tycho-version>1.5.1</tycho-version>
     <project.build.sourceEncoding>UTF-8</project.build.sourceEncoding>
   </properties>

   <build>
     <plugins>
       <plugin>
         <groupId>org.eclipse.tycho</groupId>
         <artifactId>tycho-maven-plugin</artifactId>
         <version>${tycho-version}</version>
         <extensions>true</extensions>
       </plugin>
       <plugin>
         <groupId>org.eclipse.tycho</groupId>
         <artifactId>target-platform-configuration</artifactId>
         <version>${tycho-version}</version>
         <configuration>
           <target>
             <artifact>
               <groupId>org.fipro.eclipse.tutorial</groupId>
               <artifactId>org.fipro.eclipse.tutorial.target</artifactId>
               <version>1.0.0-SNAPSHOT</version>
             </artifact>
           </target>
           <environments>
             <environment>
               <os>win32</os>
               <ws>win32</ws>
               <arch>x86_64</arch>
             </environment>
             <environment>
               <os>linux</os>
               <ws>gtk</ws>
               <arch>x86_64</arch>
             </environment>
             <environment>
               <os>macosx</os>
               <ws>cocoa</ws>
               <arch>x86_64</arch>
             </environment>
           </environments>
         </configuration>
       </plugin>
     </plugins>

     <pluginManagement>
       <plugins>
         <plugin>
           <groupId>org.eclipse.tycho</groupId>
           <artifactId>tycho-p2-director-plugin</artifactId>
           <version>${tycho-version}</version>
         </plugin>
       </plugins>
     </pluginManagement>
   </build>
 </project>
As JavaFX is not on the default classpath, the location of the JavaFX libraries need to be configured in the Tycho build for compile time resolution. If the build is executed with Java 8 for Java 8, the following section needs to be added in the pluginManagement section, where the JAVA_HOME environment variable points to your JDK installation:
<plugin>
  <groupId>org.eclipse.tycho</groupId>
  <artifactId>tycho-compiler-plugin</artifactId>
  <version>${tycho-version}</version>
  <configuration>
    <encoding>UTF-8</encoding>
    <extraClasspathElements>
      <extraClasspathElement>
        <groupId>com.oracle</groupId>
        <artifactId>javafx</artifactId>
        <version>8.0.0-SNAPSHOT</version>
        <systemPath>${JAVA_HOME}/jre/lib/jfxswt.jar</systemPath>
        <scope>system</scope>
      </extraClasspathElement>
    </extraClasspathElements>
  </configuration>
</plugin>
Java 11
With Java 11 it is slightly more complicated. On the one hand the OpenJFX libraries are available via Maven Central and can be added as extra classpath elements via Maven. But the javafx-swt module is not available via Maven Central as reported here. That means for OpenJFX 11 following section needs to be added in the pluginManagement section, where the JAVAFX_HOME environment variable points to your OpenJFX installation:
<plugin>
  <groupId>org.eclipse.tycho</groupId>
  <artifactId>tycho-compiler-plugin</artifactId>
  <version>${tycho-version}</version>
  <configuration>
    <encoding>UTF-8</encoding>
    <extraClasspathElements>
      <extraClasspathElement>
        <groupId>org.openjfx</groupId>
        <artifactId>javafx-controls</artifactId>
        <version>11.0.2</version>
      </extraClasspathElement>
      <extraClasspathElement>
        <groupId>org.openjfx</groupId>
        <artifactId>javafx-swt</artifactId>
        <version>11.0.2</version>
        <systemPath>${JAVAFX_HOME}/lib/javafx-swt.jar</systemPath>
        <scope>system</scope>
      </extraClasspathElement>
    </extraClasspathElements>
  </configuration>
</plugin>
Start the build
mvn clean verify
The resulting product variants for each platform is located under e4-cookbook-basic-recipe/org.fipro.eclipse.tutorial.product/target/products
Note:
If you included the openjfx bundles in your product and start the product with Java 8, the JavaFX 8 classes will be used. If you use Java 11 + to start the application, the classes from the openjfx bundles will be loaded. The e(fx)clipse classloader hook will take care of this.
The currently available re-bundled OpenJFX versions can be found in this download area. If you are interested about newer OpenJFX versions you can have a look at the openjfx-osgi repository on GitHub or get in contact with BestSolution.at who created and provide the bundles.
Note:
As an alternative to bundling JavaFX with your application, you can also configure to use externally located JavaFX libraries. For this add -Defxclipse.java-modules.dir=<PATH_TO_YOUR_JAVAFX_LIBS> to the VM Arguments of the Product Configuration. As this approach makes the installation dependent on external states, I did not cover it here. But it is worth to mention as it might be interesting in some cases. There is also a blog post by Tom Schindl about JavaFX, Java 11, RCP and PDE.
Interlude: UI Freeze issue
There is an UI freeze issue related to JavaFX in Eclipse. It is an incompatibility of JavaFX and the glass.dll it tries to load when there are multiple Java versions available, e.g. if you start your application with a Java version that is different to the Java version configured in your PATH system environment variable.
When Eclipse launches it automatically generates an entry for java.library.path that contains the path to the Java installation that is used to start Eclipse, and the PATH system environment variable. If another or additional Java installations are on the PATH, the java.library.path environment variable contains paths to multiple Java versions. It can then happen that JavaFX loads the glass.dll from the not matching Java installation, which then leads to a NoSuchMethodError or similar that cause a crash.
This issue is already reported here.
java.library.path is a Java environment variable that is used to add additional native libraries to the runtime. It is only used in case native libraries should be added to an application that are loaded inside Java via System.loadLibrary(). In Eclipse/OSGi development, native libraries are typically included inside a plug-in project and do not reside external, as this would make the installation dependent on locally installed native libraries on the consumer side. Therefore setting java.library.path to an empty value (or an appropriate value in case it is needed) should not have any effect on other functionalities.
- Open the file org.fipro.eclipse.tutorial.app.product in the project org.fipro.eclipse.tutorial.product
- Switch to the Launching tab
- Add -Djava.library.path= to the VM Arguments (java.library.path will be empty and JavaFX will load the glass.dll from the Java installation that was used to start the application)
The complete source code of the example can be found on GitHub.