
Getting Started with OSGi Remote Services - PDE Edition
At the EclipseCon Europe 2016 I held a tutorial together with Peter Kirschner named Building Nano Services with OSGi Declarative Services. The final exercise should have been the demonstration of OSGi Remote Services. It actually did not really happen because of the lack of time and networking issues. The next year at the EclipseCon Europe 2017 we joined forces again and gave a talk with the name Microservices with OSGi. In that talk we focused on OSGi Remote Services, but we again failed with the demo at the end because of networking issues. At the EclipseCon Europe 2018 I gave a talk on how to use different OSGi specifications for connecting services remotely titled How to connect your OSGi application. Of course I mentioned OSGi Remote Services there, and of course the demonstration failed again because of networking issues.
In the last years I published several blog posts and gave several talks related to OSGi, and often the topic OSGi Remote Services was raised, but never really covered in detail. Scott Lewis, the project lead of the Eclipse Communication Framework, was really helpful whenever I encountered issues with Remote Services. I promised to write a blog post about that topic as a favour for all the support. And with this blog post I finally want to keep my promise. That said, let’s start with OSGi Remote Services.
Motivation
First I want to explain the motivation for having a closer look at OSGi Remote Services. Looking at general software architecture discussions in the past, service oriented architectures and microservices are a huge topic. Per definition the idea of a microservices architecture is to have
- a suite of small services
- each running in its own process
- communicating with a lightweight mechanism, e.g. HTTP
- independently deployable
- easy to replace
While new frameworks and tools came up over the years, the OSGi specification(s) covers these topics for a long time. Via the service registry and the service dynamics you can build up very small modules. Those modules can then be integrated into small runtimes and deployed in different environments (despite the needed JVM or a database if needed). The services in those small independent deployments can then be accessed in different ways, like using the HTTP Whiteboard or JAX-RS Whiteboard. This satisfies the aspect of a communication between services via lightweight mechanisms. For inhomogeneous environments the usage of those specifications is a good match. But it means that you need to implement the access layer on the provider side (e.g. the JAX-RS wrapper to access the service via REST) and you need to implement the service access on the consumer side by using a corresponding framework to execute the REST calls.
Ideally the developer of the service as well as the developer of the service consumer should not need to think about the infrastructure of the whole application. Well, it is always good that everybody in a project knows about everything, but the idea is to not making your code dependent on infrastructure. And this is where OSGi Remote Services come in. You develop the service and the service consumer as if they would be executed in the same runtime. In the deployment the lightweight communication will be added to support service communication over a network.
And as initially mentioned, I want to have a look at ways how to probably get rid of the networking issues I faced in the presentations in the past.
Introduction
To understand this blog post you should be familiar with OSGi services and ideally with OSGi Declarative Services. If you are not familiar with OSGi DS, you can get an introduction by reading my blog post Getting Started with OSGi Declarative Services.
In short, the OSGi Service Layer specifies a Service Producer that publishes a service, and a Service Consumer that listens and retrieves a service. This is shown in the following picture:
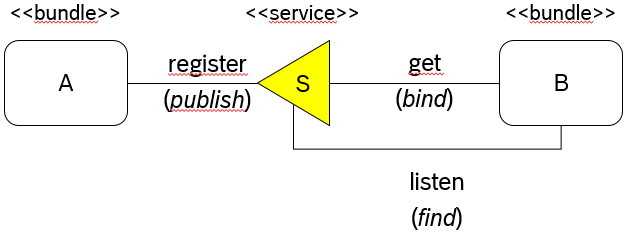
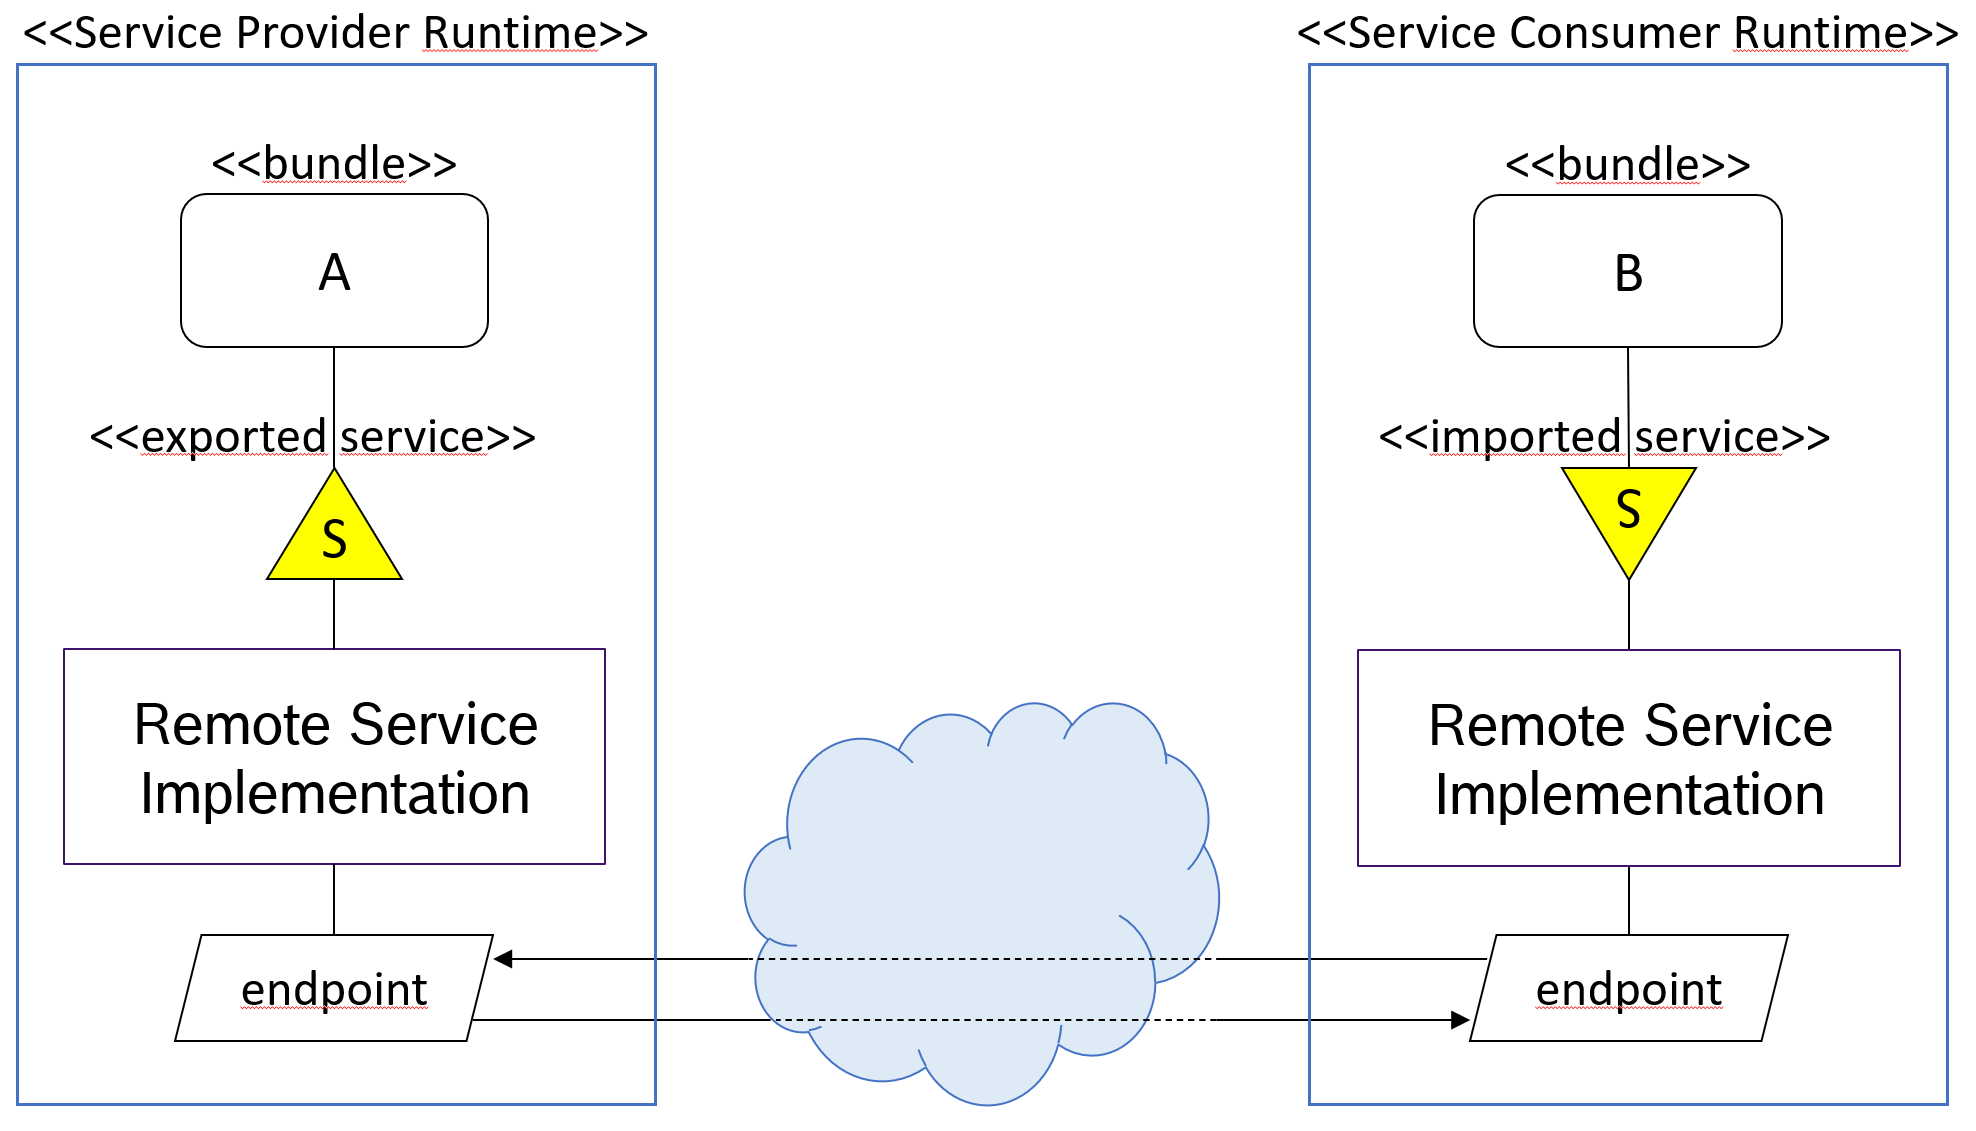
With OSGi Remote Services this picture is basically the same. The difference is that the services are registered and consumed across network boundaries. For OSGi Remote Services the above picture could be extended to look like the following:
Glossary
To understand the above picture and the following blog post better, here is a short glossary for the used terms:
- Remote Service (Distributed Service)
Basic specification to describe how OSGi services can be exported and imported to be available across network boundaries. - Distribution Provider
Exports services by creating endpoints on the producer side, imports services by creating proxies to access endpoints on the consumer side, manages policies around the topology and discovers remote services. - Endpoint
Communication access mechanism to a remote service that requires some protocol for communications. - Topology
Mapping between services and endpoints as well as their communication characteristics. - Remote Service Admin (RSA)
Provides the mechanisms to import and export services through a set of configuration types. It is a passive Distribution Provider, not taking any action to export or import itself. - Topology Manager
Provides the policy for importing and exporting services via RSA and implements a Topology. - Discovery
Discover / announce Endpoint Descriptions via some discovery protocol. - Endpoint Description
A properties based description of an Endpoint that can be exchanged between different frameworks to create connections to each other’s services.
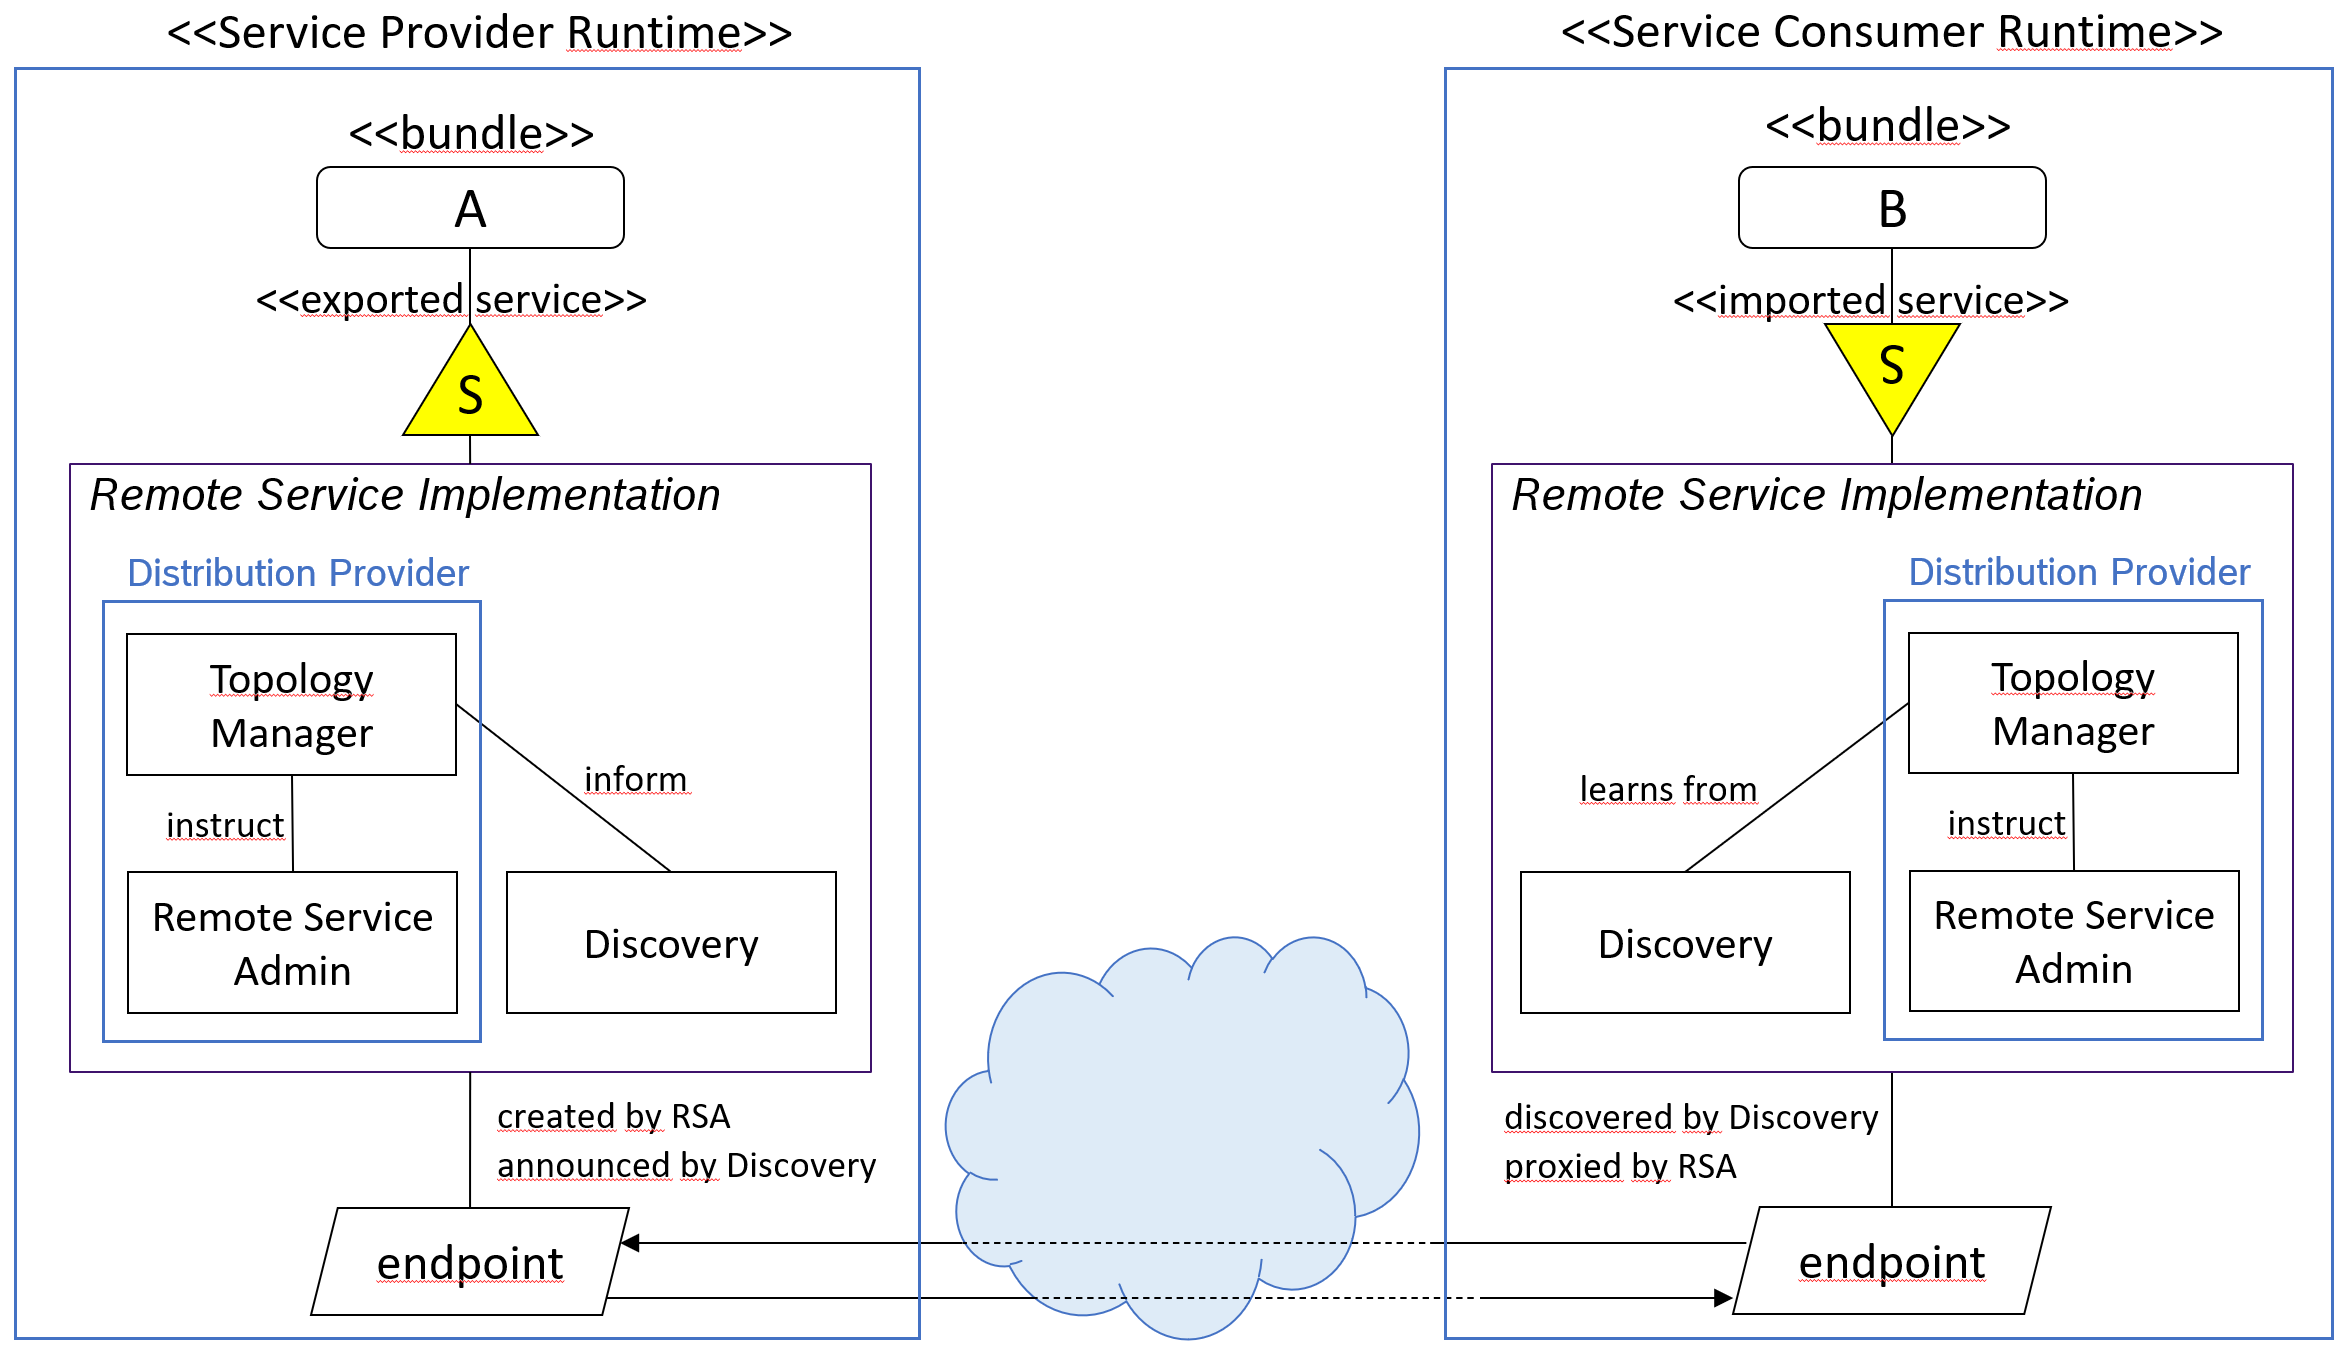
To get a slightly better understanding, the following picture shows some more details inside the Remote Service Implementation block.
Note:
Actually this picture is still a simplified version, as internally there are Endpoint Event Listener and Remote Service Admin Listener that are needed to trigger all the necessary actions. But to get an idea how things play together this picture should be sufficient.
Now let’s explain the picture in more detail:
Service Provider Runtime
- A service is marked to be exported. This is done via service properties.
- The Distribution Provider creates an endpoint for the exported service:
- The Topology Manager gets informed about the exported service.
- If the export configuration matches the Topology it instructs the Remote Service Admin to create an Endpoint.
- The Remote Service Admin creates the Endpoint.
- The Discovery gets informed via Endpoint Event Listener and announces the Endpoint to other systems via Endpoint Description.
Service Consumer Runtime
- The Discovery discovers an Endpoint via Endpoint Description that was announced in the network.
- The Distribution Provider creates a proxy for the service.
- The Topology Manager learns from the Discovery about the newly discovered service (via Endpoint Event Listener), which then instructs the Remote Service Admin to import the service.
- The Remote Service Admin then creates a local service proxy that is registered as service in the local OSGi runtime. This proxy is mapped to the remote service (or an alternative like a webservice).
- The service proxy is used for wiring.
To simplify the picture again, the important takeaways are the Distribution Provider and the Discovery. The Distribution Provider is responsible for exporting and importing the service, the Discovery is responsible for announcing and discovering the service. The other terms are needed for a deeper understanding, but for a high level understanding of OSGi Remote Services, these two are sufficient.
Tutorial
Now it is time to get our hands dirty and play with OSGi Remote Services. This tutorial has several steps:
- Project Setup
- Service Implementation (API & Impl)
- Service Provider Runtime
- Service Consumer Implementation
- Service Consumer Runtime
There are different ways and tools available for OSGi development. In this tutorial I will use the Eclipse PDE Tooling (Plug-in Development Environment). I also published this tutorial with other toolings if you don’t want to use PDE:
Note:
Remember to activate the PDE DS Annotation Processing via Window → Preferences → Plug-in Development → DS Annotations.
ECF - Remote Service Runtime
While the implementation and export of an OSGi service as a Remote Service is trivial in first place, the definition of the runtime can become quite complicated. Especially collecting the necessary bundles is not that easy without some guidance.
As a reference, with Equinox as underlying OSGi framework the following bundles need to be part of the runtime as a basis:
- Equinox OSGi
- org.eclipse.osgi
- org.eclipse.osgi.services
- org.eclipse.equinox.common
- org.eclipse.equinox.event
- org.eclipse.osgi.util
- org.apache.felix.scr
- Equinox Console
- org.apache.felix.gogo.command
- org.apache.felix.gogo.runtime
- org.apache.felix.gogo.shell
- org.eclipse.equinox.console
- ECF and dependencies
- org.eclipse.core.jobs
- org.eclipse.ecf
- org.eclipse.ecf.discovery
- org.eclipse.ecf.identity
- org.eclipse.ecf.osgi.services.distribution
- org.eclipse.ecf.osgi.services.remoteserviceadmin
- org.eclipse.ecf.osgi.services.remoteserviceadmin.proxy
- org.eclipse.ecf.remoteservice
- org.eclipse.ecf.remoteservice.asyncproxy
- org.eclipse.ecf.sharedobject
- org.eclipse.equinox.concurrent
- org.eclipse.osgi.services.remoteserviceadmin
With the above basic runtime configuration the Remote Services will not yet work. There are still two things missing, the Discovery and the Distribution Provider. ECF provides different implementations for both. Which implementations to use needs to be defined by the project. In this tutorial we will use Zeroconf/JmDNS for the Discovery and the Generic Distribution Provider:
- ECF Discovery - Zeroconf
- org.eclipse.ecf.provider.jmdns
- ECF Distribution Provider - Generic
- org.eclipse.ecf.provider
- org.eclipse.ecf.provider.remoteservice
Note:
You can find the list of different implementations with the documentation about the bundles, configuration types and intents in the ECF Wiki:
Project Setup
With the Eclipse PDE tooling (Plug-in Development Environment) it is a best practice to create a Target Definition. This way you explicitly specify what to consume for building your application. For this tutorial all needed plug-ins and features are available via p2 update sites, so the creation of the Target Definition is straight forward.
- Create the target platform project
- Main Menu → File → New → Project… → General → Project
- Set name to org.fipro.remoteservice.target
- Click Finish
- Create a new target definition
- Right click on project → New → Other… → Plug-in Development → Target Definition
- Set the filename to org.fipro.remoteservice.target.target_
- Initialize the target definition with: Nothing: Start with an empty target definition
- Add a new Software Site in the opened Target Definition Editor by clicking Add… in the Locations section
- Select Software Site
- Software Site https://download.eclipse.org/releases/2021-12
- Uncheck Group by Category
- Select the following items (use the filter):
- Eclipse Platform Launcher Executables
- Equinox Compendium SDK
- Equinox Core SDK
- Click Finish
- Add a new Software Site in the opened Target Definition Editor by clicking Add… in the Locations section
- Select Software Site
- Software Site https://download.eclipse.org/rt/ecf/3.14.31/site.p2 (alternatively use https://download.eclipse.org/rt/ecf/latest/site.p2 to always consume the current ECF release)
- Uncheck Group by Category
- Select the following items (use the filter):
- ECF Remote Services SDK
- Click Finish
- Save the changes
- Activate the target platform by clicking Set as Target Platform in the upper right corner of the Target Definition Editor
The source of the .target file should look similar to the following snippet, just in case you are using the Generic Text Editor for creating and editing a Target Definition instead of the wizard based PDE Target Definition Editor.
<?xml version="1.0" encoding="UTF-8" standalone="no"?>
<?pde version="3.8"?>
<target name="org.fipro.remoteservice.target">
    <locations>
        <location includeAllPlatforms="false" includeConfigurePhase="true" includeMode="planner" includeSource="true" type="InstallableUnit">
            <repository location="https://download.eclipse.org/releases/2021-12"/>
            <unit id="org.eclipse.equinox.compendium.sdk.feature.group" version="3.22.200.v20211021-1418"/>
            <unit id="org.eclipse.equinox.core.sdk.feature.group" version="3.23.200.v20211104-1730"/>
            <unit id="org.eclipse.equinox.executable.feature.group" version="3.8.1400.v20211117-0650"/>
        </location>
        <location includeAllPlatforms="false" includeConfigurePhase="true" includeMode="planner" includeSource="true" type="InstallableUnit">
            <repository location="https://download.eclipse.org/rt/ecf/3.14.31/site.p2"/>
            <unit id="org.eclipse.ecf.remoteservice.sdk.feature.feature.group" version="3.14.31.v20220116-0708"/>
        </location>
    </locations>
</target>
Note:
The Eclipse SimRel p2 repository https://download.eclipse.org/releases/2021-12 also contains ECF, but in the older version 3.14.26. That version has a bug (I will notice later) which was fixed with 3.14.31. The current ECF version can be found via the ECF Download page.
After the creation of the Target Platform project, we need to create the Service API project and the Service Implementation project.
Service Interface
- Create the Service API plug-in project
- File -> New -> Plug-in Project
- Set Project name to org.fipro.modifier.api
- Click Next
- Use the following settings:
- Execution Environment: JavaSE-11
- Uncheck Generate an activator
- Uncheck This plug-in will make contributions to the UI
- Create a rich client application? No
- Click Finish
- Create a new package org.fipro.modifier.api
- Copy the following interface
StringModifierinto the created package
package org.fipro.modifier.api;

public interface StringModifier {
    String modify(String input);
}
- Open the MANIFEST.MF file
- on the Overview tab set the Version to 1.0.0.qualifier
- on the Runtime tab add the org.fipro.modifier.api package to the Exported Packages
- Specify the version 1.0.0 on the package via Properties…
Service Implementation
- Create the Service Implementation plug-in project
- File -> New -> Plug-in Project
- Set Project name to org.fipro.modifier.inverter
- Click Next
- Use the following settings:
- Execution Environment: JavaSE-11
- Uncheck Generate an activator
- Uncheck This plug-in will make contributions to the UI
- Create a rich client application? No
- Click Finish
- Open the MANIFEST.MF file and switch to the Dependencies tab
- Add the following two dependencies on the Imported Packages side:
- org.fipro.modifier.api (1.0.0)
- org.osgi.service.component.annotations (1.3.0)
- Mark org.osgi.service.component.annotations as Optional via Properties… to ensure there are no runtime dependencies.
- Add the upper version boundaries to the Import-Package statements by selecting Properties… for both imported packages and specify 2.0.0 as upper bound.
- Add the following two dependencies on the Imported Packages side:
- Create a new package org.fipro.modifier.inverter
- Copy the following class
StringInverterinto the created package
package org.fipro.modifier.inverter;

import org.fipro.modifier.api.StringModifier;
import org.osgi.service.component.annotations.Component;

@Component(property= {
    "service.exported.interfaces=*",
    "service.exported.configs=ecf.generic.server" }
)
public class StringInverter implements StringModifier {

    @Override
    public String modify(String input) {
        return (input != null)
            ? new StringBuilder(input).reverse().toString()
            : "No input given";
    }
}
The only thing that needs to be done additionally in comparison to creating a local OSGi service, is to configure that the service should be exported as Remote Service. This is done by setting the component property service.exported.interfaces. The value of this property needs to be a list of types for which the class is registered as a service. For a simple use case like the above, the asterisk can be used, which means to export the service for all interfaces under which it is registered, but to ignore the classes. For more detailed information have a look at the Remote Service Properties section of the OSGi Compendium Specification.
The other component property used in the above example is service.exported.configs. This property is used to specify the configuration types, for which the Distribution Provider should create Endpoints. If it is not specified, the Distribution Provider is free to choose the default configuration type for the service.
Note:
In the above example we use the ECF Generic Provider. This one by default chooses a SSL configuration type, so without additional configuration the example would not work if we don’t specify the configuration type.
Additionally you can specify Intents via the service.exported.intents component property to constrain the possible communication mechanisms that a distribution provider can choose to distribute a service. An example will be provided at a later step.
Service Provider Runtime
In a PDE based project you either create a launch configuration or a product configuration. With the later you are even able to build an executable runtime from the command line via Tycho that you can then deploy.
- Create a Product Project
- Main Menu → File → New → Project… → General → Project
- Set name to org.fipro.modifier.inverter.product
- Click Finish
- Create a new Product Configuration
- Right click on project → New → Other… → Plug-in Development → Product Configuration
- Click Next
- Set the filename to org.fipro.modifier.inverter.product
- Click Finish
- Configure the product
- Select the Overview tab
- Set the General Information
ID = org.fipro.modifier.inverter.product
Version = 1.0.0.qualifier
Check The product includes native launcher artifacts - In the Product Definition section leave the Product and Application empty and select The product configuration is based on: plug-ins
- Set the General Information
- Select the Contents tab
- Add the following plug-ins
- org.apache.felix.scr
- org.eclipse.core.jobs
- org.eclipse.ecf
- org.eclipse.ecf.discovery
- org.eclipse.ecf.identity
- org.eclipse.ecf.osgi.services.distribution
- org.eclipse.ecf.osgi.services.remoteserviceadmin
- org.eclipse.ecf.osgi.services.remoteserviceadmin.proxy
- org.eclipse.ecf.provider
- org.eclipse.ecf.provider.jmdns
- org.eclipse.ecf.provider.remoteservice
- org.eclipse.ecf.remoteservice
- org.eclipse.ecf.remoteservice.asyncproxy
- org.eclipse.ecf.sharedobject
- org.eclipse.equinox.common
- org.eclipse.equinox.concurrent
- org.eclipse.equinox.event
- org.eclipse.osgi
- org.eclipse.osgi.services
- org.eclipse.osgi.services.remoteserviceadmin
- org.eclipse.osgi.util
- org.fipro.modifier.api
- org.fipro.modifier.inverter
- Add the following plug-ins
- Select Configuration tab
- Add the following bundles to the Start Levels section by clicking the Add… button:
- org.eclipse.ecf.osgi.services.distribution
- org.eclipse.ecf.provider.remoteservice
- org.eclipse.equinox.event
- Set Auto-Start for every bundle in the Start Levels section to
true
- Add the following bundles to the Start Levels section by clicking the Add… button:
- Select Launching tab
- Add
-Declipse.ignoreApp=true -Dosgi.noShutdown=true
to the VM Arguments Skip trying to launch an Eclipse application and avoid that the OSGi Framework is shutdown after an Eclipse application is stopped.
- Add
- Select the Overview tab
Now you can save the changes and start the Inverter Service Runtime from the Overview tab via Launch an Eclipse application. But actually you won’t see anything now, unless a running process in the background.
Service Consumer
The implementation of a Remote Service Consumer also quite simple. From the development perspective there is nothing to consider. The service consumer is implemented without any additions. Only the runtime needs to be extended to contain the necessary bundles for Discovery and Distribution, which is covered in the next section.
The simplest way of implementing a service consumer is a Gogo Shell command.
- Create the Service Consumer plug-in project
- File -> New -> Plug-in Project
- Set Project name to org.fipro.modifier.client
- Click Next
- Use the following settings:
- Execution Environment: JavaSE-11
- Uncheck Generate an activator
- Uncheck This plug-in will make contributions to the UI
- Create a rich client application? No
- Click Finish
- Open the MANIFEST.MF file and switch to the Dependencies tab
- Add the following two dependencies on the Imported Packages side:
- org.fipro.modifier.api (1.0.0)
- org.osgi.service.component.annotations (1.3.0)
- Mark org.osgi.service.component.annotations as Optional via Properties… to ensure there are no runtime dependencies.
- Add the upper version boundaries to the Import-Package statements by selecting Properties… for both imported packages and specify 2.0.0 as upper bound.
- Add the following two dependencies on the Imported Packages side:
- Create a new package org.fipro.modifier.client
- Copy the following class
ModifyCommandinto the created package
package org.fipro.modifier.client;

import java.util.List;

import org.fipro.modifier.api.StringModifier;
import org.osgi.service.component.annotations.Component;
import org.osgi.service.component.annotations.Reference;

@Component(
    property= {
        "osgi.command.scope:String=fipro",
        "osgi.command.function:String=modify"},
    service=ModifyCommand.class
)
public class ModifyCommand {

    @Reference
    volatile List<StringModifier> modifier;

    public void modify(String input) {
        if (modifier.isEmpty()) {
            System.out.println("No StringModifier registered");
        } else {
            modifier.forEach(m -> System.out.println(m.modify(input)));
        }
    }
}
Service Consumer Runtime
Creating a Product Project with a Product Configuration for the Service Consumer is similar to the Service Runtime. Just change the project and configuration name to org.fipro.modifier.client.product. And of course instead of org.fipro.modifier.inverter you need to add org.fipro.modifier.client and the console bundles to the Contents of the Product Configuration.
- Create a Product Project
- Main Menu → File → New → Project… → General → Project
- Set name to org.fipro.modifier.client.product
- Click Finish
- Create a new Product Configuration
- Right click on project → New → Other… → Plug-in Development → Product Configuration
- Set the filename to org.fipro.modifier.client.product
- Configure the product
- Select the Overview tab
- Set the General Information
ID = org.fipro.modifier.client.product
Version = 1.0.0.qualifier
Check The product includes native launcher artifacts - In the Product Definition section leave the Product and Application empty and select The product configuration is based on: plug-ins
- Set the General Information
- Select the Contents tab
- Add the following plug-ins
- org.apache.felix.gogo.command
- org.apache.felix.gogo.runtime
- org.apache.felix.gogo.shell
- org.apache.felix.scr
- org.eclipse.core.jobs
- org.eclipse.ecf
- org.eclipse.ecf.discovery
- org.eclipse.ecf.identity
- org.eclipse.ecf.osgi.services.distribution
- org.eclipse.ecf.osgi.services.remoteserviceadmin
- org.eclipse.ecf.osgi.services.remoteserviceadmin.proxy
- org.eclipse.ecf.provider
- org.eclipse.ecf.provider.jmdns
- org.eclipse.ecf.provider.remoteservice
- org.eclipse.ecf.remoteservice
- org.eclipse.ecf.remoteservice.asyncproxy
- org.eclipse.ecf.sharedobject
- org.eclipse.equinox.common
- org.eclipse.equinox.concurrent
- org.eclipse.equinox.console
- org.eclipse.equinox.event
- org.eclipse.osgi
- org.eclipse.osgi.services
- org.eclipse.osgi.services.remoteserviceadmin
- org.eclipse.osgi.util
- org.fipro.modifier.api
- org.fipro.modifier.client
- Add the following plug-ins
- Select Configuration tab
- Add the following bundles to the Start Levels section by clicking the Add… button:
- org.eclipse.ecf.osgi.services.distribution
- org.eclipse.ecf.provider.remoteservice
- org.eclipse.equinox.event
- Set Auto-Start for every bundle in the Start Levels section to
true
- Add the following bundles to the Start Levels section by clicking the Add… button:
- Select Launching tab
- Add
–console
to the Program Arguments
This activates the OSGi Console in interactive mode. - Add
-Declipse.ignoreApp=true -Dosgi.noShutdown=true
to the VM Arguments
Skip trying to launch an Eclipse application and avoid that the OSGi Framework is shutdown after an Eclipse application is stopped.
- Add
- Select the Overview tab
Now you can save start the Inverter Service Runtime from the Overview tab via Launch an Eclipse application. Once the application is started you can execute the created Gogo Shell command via
modify <input>
If services are available, it will print out the modified results. Otherwise the message “No StringModifier registered” will be printed.
Note:
I have configured the bare minimum autostarting configuration which should actually start all required bundles based on the bundle configurations and dependencies. If you face any issues, try to check if all bundles are Active. Otherwise add additional entries in the Start Levels section.
Remote Service Admin Events
There are several events with regards to importing and exporting Remote Services, that are fired by the Remote Service Admin synchronously once they happen. These events are posted asynchronously via the OSGi Event Admin under the topic
org/osgi/service/remoteserviceadmin/<type>
Where <type> can be one of the following:
- EXPORT_ERROR
- EXPORT_REGISTRATION
- EXPORT_UNREGISTRATION
- EXPORT_UPDATE
- EXPORT_WARNING
- IMPORT_ERROR
- IMPORT_REGISTRATION
- IMPORT_UNREGISTRATION
- IMPORT_UPDATE
- IMPORT_WARNING
A simple event listener that prints to the console on any Remote Service Admin Event could look like this:
@Component(property = EventConstants.EVENT_TOPIC + "=org/osgi/service/remoteserviceadmin/*")
public class RemoteServiceEventListener implements EventHandler {

    @Override
    public void handleEvent(Event event) {
        System.out.println(event.getTopic());
        for (String objectClass :  ((String[])event.getProperty("objectClass"))) {
            System.out.println("\t"+objectClass);
        }
    }

}
For further details on the Remote Service Admin Events have a look at the OSGi Compendium Specification Chapter 122.7.
If you need to react synchronously on these events, you can implement a RemoteServiceAdminListener. I typically would not recommend this, unless you really want blocking calls on import/export events. Typically it is intended to be used internally by the Remote Service Admin. But for debugging purposes the ECF project also provides a DebugRemoteServiceAdminListener. It writes the endpoint description via a Writer to support debugging of Remote Services. Via the following class you could easily register a DebugRemoteServiceAdminListener via OSGi DS that prints the information on the console.
@Component
public class DebugListener
    extends DebugRemoteServiceAdminListener
    implements RemoteServiceAdminListener {
	// register the DebugRemoteServiceAdminListener via DS
}
To test this you can either add the above components to one of the existing bundles, or create a new bundle and add that bundle to the runtimes.
Runtime Debugging
The ECF project provides several ways for runtime inspection and runtime debugging. This is mainly done Gogo Shell commands provided via separate bundles. To enable the OSGi console and the ECF console commands, you need to add the following bundles to your runtime:
- Equinox Console
- org.apache.felix.gogo.command
- org.apache.felix.gogo.runtime
- org.apache.felix.gogo.shell
- org.eclipse.equinox.console
- ECF Console
- org.eclipse.ecf.console
- org.eclipse.ecf.osgi.services.remoteserviceadmin.console
If you add those bundles to the Service Provider Runtime, you also need to add the -console parameter to the Program Arguments of the Product Configuration (Launching tab) to activate the OSGi Console in interactive mode. Of course adding the ECF Console bundles to the Service Consumer Runtime is also very helpful for debugging.
With the ECF Console bundles added to the runtime, there are several commands to inspect and interact with the Remote Service Admin. As an overview the available commands are listed in the wiki: Gogo Commands for Remote Services Development
Additionally the DebugRemoteServiceAdminListener described above is activated by default with the ECF Console bundles. It can be activated or deactivated in the runtime via the command
ecf:rsadebug <true/false>
JAX-RS Distribution Provider
One of the biggest issues I faced when working with Remote Services is networking as mentioned in the introduction. In the above example the ECF Generic Distribution Provider is used for a simpler setup. But for example in a corporate network with enabled firewalls somewhere in the network setup, the example will probably not work. As said before, the ECF project provides multiple Distribution Provider implementations, which gives the opportunity to configure the setup to match the project needs. One interesting implementation in that area is the JAX-RS Distribution Provider. Using that one could probably help solving several of the networking issues related to firewalls. But as with the whole Remote Service topic, the complexity in the setup is quite high because of the increased number of dependencies that need to be resolved.
The JAX-RS Distribution Provider implementation is available for Eclipse Jersey and Apache CXF. It uses the OSGi HttpService to register the JAX-RS resource, and of course it then also needs a Servlet container like Eclipse Jetty to provide the JAX-RS resource. I will show the usage of the Jersey based implementation in the following sections.
Project Setup
As a first step the JAX-RS Distribution Provider needs to be consumed. In PDE this means to add it to the Target Definition. Unfortunately it is not officially released via the Eclipse Foundation infrastructure, but the p2 update site is available via the GitHub project.
- Open the target definition in org.fipro.remoteservice.target/org.fipro.remoteservice.target.target
- Add a new Software Site in the opened Target Definition Editor by clicking Add… in the Locations section
- Select Software Site
- Software Site https://raw.githubusercontent.com/ECF/JaxRSProviders/master/build/
- Uncheck Group by Category
- Select the following items:
- ECF Remote Services JAX-RS Jersey Client Provider
- ECF Remote Services JAX-RS Jersey Server Provider
- Click Finish
- Add Jetty to the Target Definition
- Select the Software Site https://download.eclipse.org/releases/2021-12/
- Select Edit…
- Select the following item:
- Jetty Http Server Feature
- Activate the target platform by clicking Set as Target Platform in the upper right corner of the Target Definition Editor
The source of the .target file should look similar to the following snippet, just in case you are using the Generic Text Editor for creating and editing a Target Definition instead of the wizard based PDE Target Definition Editor.
<?xml version="1.0" encoding="UTF-8" standalone="no"?>
<?pde version="3.8"?>
<target name="org.fipro.remoteservice.target">
    <locations>
        <location includeAllPlatforms="false" includeConfigurePhase="true" includeMode="planner" includeSource="true" type="InstallableUnit">
            <repository location="https://download.eclipse.org/releases/2021-12"/>
            <unit id="org.eclipse.equinox.compendium.sdk.feature.group" version="3.22.200.v20211021-1418"/>
            <unit id="org.eclipse.equinox.core.sdk.feature.group" version="3.23.200.v20211104-1730"/>
            <unit id="org.eclipse.equinox.executable.feature.group" version="3.8.1400.v20211117-0650"/>
            <unit id="org.eclipse.equinox.server.jetty.feature.group" version="1.10.900.v20211021-1418"/>
        </location>
        <location includeAllPlatforms="false" includeConfigurePhase="true" includeMode="planner" includeSource="true" type="InstallableUnit">
            <repository location="https://raw.githubusercontent.com/ECF/JaxRSProviders/master/build/"/>
            <unit id="org.eclipse.ecf.provider.jersey.client.feature.feature.group" version="0.0.0"/>
            <unit id="org.eclipse.ecf.provider.jersey.server.feature.feature.group" version="0.0.0"/>
        </location>
        <location includeAllPlatforms="false" includeConfigurePhase="true" includeMode="planner" includeSource="true" type="InstallableUnit">
            <repository location="https://download.eclipse.org/rt/ecf/3.14.31/site.p2"/>
            <unit id="org.eclipse.ecf.remoteservice.sdk.feature.feature.group" version="3.14.31.v20220116-0708"/>
        </location>
    </locations>
</target>
JAX-RS Remote Service Implementation
The implementation of the service already looks different compared to what you have seen so far. Instead of only adding the necessary Component Properties to configure the service as a Remote Service, the service implementation does directly contain the JAX-RS annotations. That of course also means that the annotations need to be available.
- Create the Service Implementation plug-in project
- File -> New -> Plug-in Project
- Set name to org.fipro.modifier.uppercase
- Click Next
- Use the following settings:
- Execution Environment: JavaSE-11
- Uncheck Generate an activator
- Uncheck This plug-in will make contributions to the UI
- Create a rich client application? No
- Click Finish
- Open the MANIFEST.MF file and switch to the Dependencies tab
- Add the following dependencies on the Imported Packages side:
- javax.ws.rs
- javax.ws.rs.core
- org.fipro.modifier.api (1.0.0)
- org.osgi.service.component.annotations (1.3.0)
- Mark org.osgi.service.component.annotations as Optional via Properties… to ensure there are no runtime dependencies.
- Add the following dependencies on the Imported Packages side:
- Create a new package org.fipro.modifier.uppercase
- Copy the following
UppercaseModifierclass into that package
package org.fipro.modifier.uppercase;

import java.util.Locale;

import org.fipro.modifier.api.StringModifier;
import org.osgi.service.component.annotations.Component;

import javax.ws.rs.GET;
import javax.ws.rs.Path;
import javax.ws.rs.PathParam;
import javax.ws.rs.Produces;
import javax.ws.rs.core.MediaType;

//The JAX-RS path annotation for this service
@Path("/modify")
//The OSGi DS component annotation
@Component(
    immediate = true,
    property = {
        "service.exported.interfaces=*",
        "service.exported.intents=jaxrs"})
public class UppercaseModifier implements StringModifier {

    @GET
    // The JAX-RS annotation to specify the result type
    @Produces(MediaType.TEXT_PLAIN)
    // The JAX-RS annotation to specify that the last part
    // of the URL is used as method parameter
    @Path("/{value}")
    @Override
    public String modify(@PathParam("value") String input) {
        return (input != null)
            ? input.toUpperCase(Locale.getDefault())
            : "No input given";
    }
}
For the JAX-RS annotations, please have a look at various existing tutorials and blog posts in the internet, for example
- Overview of JAX-RS (Part 1)
- Overview of JAX-RS Annotations (Part 2)
- Overview of JAX-RS Annotations (Part 3)
About the OSGi DS configuration:
- The service is an Immediate Compontent, so it is consumed by the OSGi Http Whiteboard on startup
- Export all interfaces as Remote Service via
**service.exported.interfaces=*** - Configure that JAX-RS is used as communication mechanism by the distribution provider via
**service.exported.intents=jaxrs**
Note:
As mentioned earlier there is a bug in ECF 3.14.26 which is integrated in the Eclipse 2021-21 SimRel repo. The service.exported.intents property is not enough to get the JAX-RS resource registered. Additionally it is necessary to set service.exported.configs=ecf.jaxrs.jersey.server to make it work. This was fixed shortly after I reported it and is included with the current ECF 3.14.31 release. The basic idea of the intent configuration is to make the service independent of the underlying JAX-RS Distribution Provider implementation (Jersey vs. Apache CXF).
JAX-RS Jersey Distribution Provider Dependencies
For the JAX-RS Distribution Provider Runtime a lot more dependencies are required. The following list should cover the additional necessary base dependencies:
- Jackson
- com.fasterxml.jackson.core.jackson-annotations
- com.fasterxml.jackson.core.jackson-core
- com.fasterxml.jackson.core.jackson-databind
- com.fasterxml.jackson.jaxrs.jackson-jaxrs-base
- com.fasterxml.jackson.jaxrs.jackson-jaxrs-json-provider
- com.fasterxml.jackson.module.jackson-module-jaxb-annotations
- Jersey / Glassfish / Dependencies
- org.glassfish.hk2.api
- org.glassfish.hk2.external.aopalliance-repackaged
- org.glassfish.hk2.external.jakarta.inject
- org.glassfish.hk2.locator
- org.glassfish.hk2.osgi-resource-locator
- org.glassfish.hk2.utils
- org.glassfish.jersey.containers.jersey-container-servlet
- org.glassfish.jersey.containers.jersey-container-servlet-core
- org.glassfish.jersey.core.jersey-client
- org.glassfish.jersey.core.jersey-common
- org.glassfish.jersey.core.jersey-server
- org.glassfish.jersey.ext.jersey-entity-filtering
- org.glassfish.jersey.inject.jersey-hk2
- org.glassfish.jersey.media.jersey-media-jaxb
- org.glassfish.jersey.media.jersey-media-json-jackson
- com.sun.activation.javax.activation
- jakarta.annotation-api
- jakarta.servlet-api
- jakarta.ws.rs-api
- jakarta.xml.bind-api
- javassist
- javax.validation.api
- org.slf4j.api
For the Service Provider we need the following dependencies, which are the JAX-RS Jersey Distribution Provider Server bundles, the Jetty as embedded server and the HTTP Whiteboard:
- ECF Distribution Provider - JAX-RS Jersey
- org.eclipse.ecf.provider.jaxrs
- org.eclipse.ecf.provider.jaxrs.server
- org.eclipse.ecf.provider.jersey.server
- Jetty
- org.eclipse.jetty.http
- org.eclipse.jetty.io
- org.eclipse.jetty.security
- org.eclipse.jetty.server
- org.eclipse.jetty.servlet
- org.eclipse.jetty.util
- org.eclipse.jetty.util.ajax
- OSGi Whiteboard (Equinox / Jetty)
- org.eclipse.equinox.http.jetty
- org.eclipse.equinox.http.servlet
For the Service Consumer we need the following dependencies, which are the JAX-RS Jersey Distribution Provider Client bundles to be able to access the JAX-RS resource:
- ECF Distribution Provider - JAX-RS Jersey
- org.eclipse.ecf.provider.jaxrs
- org.eclipse.ecf.provider.jaxrs.client
- org.eclipse.ecf.provider.jersey.client
Service Provider Runtime
- Create a Product Project
- Main Menu → File → New → Project → General → Project
- Set name to org.fipro.modifier.uppercase.product
- Click Finish
- Create a new Product Configuration
- Right click on project → New → Other… → Plug-in Development → Product Configuration
- Set the filename to org.fipro.modifier.uppercase.product
- Configure the product
- Select the Overview tab
- Set the General Information
ID = org.fipro.modifier.uppercase.product
Version = 1.0.0.qualifier
Check The product includes native launcher artifacts - In the Product Definition section leave the Product and Application empty and select The product configuration is based on: plug-ins
- Set the General Information
- Select the Contents tab
- Add the following plug-ins
- com.fasterxml.jackson.core.jackson-annotations
- com.fasterxml.jackson.core.jackson-core
- com.fasterxml.jackson.core.jackson-databind
- com.fasterxml.jackson.jaxrs.jackson-jaxrs-base
- com.fasterxml.jackson.jaxrs.jackson-jaxrs-json-provider
- com.fasterxml.jackson.module.jackson-module-jaxb-annotations
- com.sun.activation.javax.activation
- jakarta.annotation-api
- jakarta.servlet-api
- jakarta.ws.rs-api
- jakarta.xml.bind-api
- javassist
- javax.validation.api
- org.apache.felix.gogo.command
- org.apache.felix.gogo.runtime
- org.apache.felix.gogo.shell
- org.apache.felix.scr
- org.eclipse.core.jobs
- org.eclipse.ecf
- org.eclipse.ecf.console
- org.eclipse.ecf.discovery
- org.eclipse.ecf.identity
- org.eclipse.ecf.osgi.services.distribution
- org.eclipse.ecf.osgi.services.remoteserviceadmin
- org.eclipse.ecf.osgi.services.remoteserviceadmin.console
- org.eclipse.ecf.osgi.services.remoteserviceadmin.proxy
- org.eclipse.ecf.provider.jaxrs
- org.eclipse.ecf.provider.jaxrs.server
- org.eclipse.ecf.provider.jersey.server
- org.eclipse.ecf.provider.jmdns
- org.eclipse.ecf.remoteservice
- org.eclipse.ecf.remoteservice.asyncproxy
- org.eclipse.ecf.sharedobject
- org.eclipse.equinox.common
- org.eclipse.equinox.concurrent
- org.eclipse.equinox.console
- org.eclipse.equinox.event
- org.eclipse.equinox.http.jetty
- org.eclipse.equinox.http.servlet
- org.eclipse.jetty.http
- org.eclipse.jetty.io
- org.eclipse.jetty.security
- org.eclipse.jetty.server
- org.eclipse.jetty.servlet
- org.eclipse.jetty.util
- org.eclipse.jetty.util.ajax
- org.eclipse.osgi
- org.eclipse.osgi.services
- org.eclipse.osgi.services.remoteserviceadmin
- org.eclipse.osgi.util
- org.fipro.modifier.api
- org.fipro.modifier.uppercase
- org.glassfish.hk2.api
- org.glassfish.hk2.external.aopalliance-repackaged
- org.glassfish.hk2.external.jakarta.inject
- org.glassfish.hk2.locator
- org.glassfish.hk2.osgi-resource-locator
- org.glassfish.hk2.utils
- org.glassfish.jersey.containers.jersey-container-servlet
- org.glassfish.jersey.containers.jersey-container-servlet-core
- org.glassfish.jersey.core.jersey-client
- org.glassfish.jersey.core.jersey-common
- org.glassfish.jersey.core.jersey-server
- org.glassfish.jersey.ext.jersey-entity-filtering
- org.glassfish.jersey.inject.jersey-hk2
- org.glassfish.jersey.media.jersey-media-jaxb
- org.glassfish.jersey.media.jersey-media-json-jackson
- org.slf4j.api
- Add the following plug-ins
- Select Configuration tab
- Add the following bundles to the Start Levels section by clicking the Add… button:
- org.eclipse.ecf.osgi.services.distribution
- org.eclipse.equinox.event
- org.eclipse.equinox.http.jetty
- Set Auto-Start for every bundle in the Start Levels section to
true
- Add the following bundles to the Start Levels section by clicking the Add… button:
- Select Launching tab
- Add
–console
to the Program Arguments - Add
-Declipse.ignoreApp=true -Dosgi.noShutdown=true
to the VM Arguments - Add
-Dorg.osgi.service.http.port=8181
to the VM Arguments to configure the Http Service
- Add
- Select the Overview tab
Now you can start the Uppercase JAX-RS Service Runtime from the Overview tab via Launch an Eclipse application. After the runtime is started the service will be available as JAX-RS resource and can be accessed in a browser, e.g. http://localhost:8181/modify/remoteservice
Note:
Don’t worry if you see a SelectContainerException in the console. It is only an information that tells that the service from the first part of the tutorial can not be imported in the runtime of this part of the tutorial and vice versa. The first service is distributed via the Generic Provider, while the second service is distributed by the JAX-RS Provider. But both are using the JmDNS Discovery Provider.
The URL path is defined via the JAX-RS annotations, “modify” via @Path("/modify") on the class, “remoteservice” is the path parameter defined via @Path("/{value}") on the method (if you change that value, the result will change accordingly). You can extend the URL via configurations shown below:
- Add a prefix URL path segment on runtime level:
Add the following system property to your runtime configuration via VM Arguments
-Decf.jaxrs.server.pathPrefix=<value>
(e.g.-Decf.jaxrs.server.pathPrefix=/services) - Add a leading URL path segment on service level:
Add the following component property to the@Componentannotation
ecf.jaxrs.server.pathPrefix=<value>e.g.@Component( immediate = true, property = { "service.exported.interfaces=*", "service.exported.intents=jaxrs", "ecf.jaxrs.server.pathPrefix=/upper"})
If all of the above configurations are added, the new URL to the service is, e.g. http://localhost:8181/services/upper/modify/remoteservice
Additional information about available component properties can be found here: Jersey Service Properties
Note:
Especially the auto-start configuration is quite annoying with the Equinox launcher when you know that the Bnd launcher or the Felix launcher have configuration attributes for auto-starting all bundles. The Equinox launcher does not have such a configuration AFAIK, but you could achieve something similar by either implementing a custom Configurator or by registering a BundleListener that starts all bundles in RESOLVED state. I stick to the Equinox default to avoid additional topics here, but for the interested, have a look at the provided links.
Note:
With the latest version of the JAX-RS Distribution Provider, the autostart configuration is much more comfortable than before. There were several improvements to make the definition of a runtime more user friendly, so if you are already familiar with the JAX-RS Distribution Provider and used it in the past, be sure to update it to the latest version to benefit from those modifications.
Service Consumer Runtime
To consume the Remote Service provided via JAX-RS Distribution Provider, the runtime needs to be extended to include the additional dependencies:
- Open the Product Configuration in org.fipro.modifier.client.product
- Select the Contents tab
- Add the following plug-ins to the existing configuration
- com.fasterxml.jackson.core.jackson-annotations
- com.fasterxml.jackson.core.jackson-core
- com.fasterxml.jackson.core.jackson-databind
- com.fasterxml.jackson.jaxrs.jackson-jaxrs-base
- com.fasterxml.jackson.jaxrs.jackson-jaxrs-json-provider
- com.fasterxml.jackson.module.jackson-module-jaxb-annotations
- com.sun.activation.javax.activation
- jakarta.annotation-api
- jakarta.servlet-api
- jakarta.ws.rs-api
- jakarta.xml.bind-api
- javassist
- javax.validation.api
- org.eclipse.ecf.provider.jaxrs
- org.eclipse.ecf.provider.jaxrs.client
- org.eclipse.ecf.provider.jersey.client
- org.glassfish.hk2.api
- org.glassfish.hk2.external.aopalliance-repackaged
- org.glassfish.hk2.external.jakarta.inject
- org.glassfish.hk2.locator
- org.glassfish.hk2.osgi-resource-locator
- org.glassfish.hk2.utils
- org.glassfish.jersey.containers.jersey-container-servlet
- org.glassfish.jersey.containers.jersey-container-servlet-core
- org.glassfish.jersey.core.jersey-client
- org.glassfish.jersey.core.jersey-common
- org.glassfish.jersey.core.jersey-server
- org.glassfish.jersey.ext.jersey-entity-filtering
- org.glassfish.jersey.inject.jersey-hk2
- org.glassfish.jersey.media.jersey-media-jaxb
- org.glassfish.jersey.media.jersey-media-json-jackson
- Add the following plug-ins to the existing configuration
- Select the Contents tab
If you now start the Service Consumer Runtime and have the Service Provider Runtime also running, you can execute the following command
modify jax
This will actually lead to an error if you followed my tutorial step by step:
ServiceException: Service exception on remote service proxy
The reason is that the Service Interface does not contain the JAX-RS annotations as the service actually does, and therefore the mapping is working. So while for providing the service the interface does not need to be modified, it has to for the consumer side.
Note:
I sometimes encountered a **Circular reference detected** error. After some investigation this issue seems to be related to autostarting org.apache.felix.scr. If you have auto-start set to true for that bundle and see that issue, try to remove the autostart configuration for that bundle.
Also ensure that the workspace data is cleared on start, as the previous execution might have left some cached data that conflicts with the updated runtime configuration. To do this:
- Main Menu → Run → Run Configurations… → Select the product configuration in the tree → Main tab → Activate Clear: workspace
If that doesn’t help, try to delete the run configuration and create a new one via the Product Configuration.
Extend the Service Interface
- Open the file org.fipro.modifier.api/META-INF/MANIFEST.MF
- Add the following entries to Imported Packages
- javax.ws.rs
- javax.ws.rs.core
- Add the following entries to Imported Packages
- Open the
StringModifierclass and add the JAX-RS annotations to be exactly the same as for the Service Implementation
package org.fipro.modifier.api;

import javax.ws.rs.GET;
import javax.ws.rs.Path;
import javax.ws.rs.PathParam;
import javax.ws.rs.Produces;
import javax.ws.rs.core.MediaType;

@Path("/modify")
public interface StringModifier {
    @GET
    @Produces(MediaType.TEXT_PLAIN)
    @Path("/{value}")
    String modify(@PathParam("value") String input);
}
If you now start the Uppercase Service Provider Runtime and the Service Consumer Runtime again, the error should be gone and you should see the expected result.
Update the “Inverter” Service Provider Runtime
After the Service Interface was extended to include the JAX-RS annotations, the first Service Provider Runtime will not resolve anymore because of missing dependencies. To fix this:
- Open the Product Configuration in org.fipro.modifier.inverter.product
- Select the Contents tab
- Add the following plug-ins
- com.sun.activation.javax.activation
- jakarta.ws.rs-api
- jakarta.xml.bind-api
- Add the following plug-ins
- Select the Contents tab
Now you can start that Service Provider Runtime again. If the other Service Provider and the Service Consumer are also active, executing the modify command will now output the result of both services.
Endpoint Description Extender Format (EDEF)
In the tutorial we used JmDNS/Zeroconf as Discovery Provider. This way there is not much we have to do as a developer or administrator despite adding the according bundle to the runtime. This kind of Discovery is using a broadcast mechanism to announce the service in the network. In cases this doesn’t work, e.g. firewall rules that block broadcasting, it is also possible that you use a static file-based discovery. This can be done using the Endpoint Description Extender Format (EDEF) and is also supported by ECF.
Let’s create an additional service that is distributed via JAX-RS. But this time we exclude the org.eclipse.ecf.provider.jmdns bundle, so there is no additional discovery inside the Service Provider Runtime. We also add the console bundles to be able to inspect the runtime.
Note: If you don’t want to create another service, you can also modify the previous uppercase service. In that case remove the org.eclipse.ecf.provider.jmdns bundle from the product configuration and ensure that the console bundles are added to be able to inspect the remote service runtime via the OSGi Console.
-
Create the Service Implementation plug-in project
- File -> New -> Plug-in Project
- Set name to org.fipro.modifier.camelcase
- Click Next
- Use the following settings:
- Execution Environment: JavaSE-11
- Uncheck Generate an activator
- Uncheck This plug-in will make contributions to the UI
- Create a rich client application? No
- Click Finish
- Open the MANIFEST.MF file and switch to the Dependencies tab
- Add the following dependencies on the Imported Packages side:
- javax.ws.rs
- javax.ws.rs.core
- org.fipro.modifier.api (1.0.0)
- org.osgi.service.component.annotations (1.3.0)
- Mark org.osgi.service.component.annotations as Optional via Properties… to ensure there are no runtime dependencies.
- Add the following dependencies on the Imported Packages side:
- Create a new package org.fipro.modifier.camelcase
- Copy the following
CamelCaseModifierclass into that package
package org.fipro.modifier.camelcase;

import javax.ws.rs.GET;
import javax.ws.rs.Path;
import javax.ws.rs.PathParam;
import javax.ws.rs.Produces;
import javax.ws.rs.core.MediaType;

import org.fipro.modifier.api.StringModifier;
import org.osgi.service.component.annotations.Component;

@Path("/modify")
@Component(
    immediate = true,
    property = {
        "service.exported.interfaces=*",
        "service.exported.intents=jaxrs",
        "ecf.jaxrs.server.pathPrefix=/camelcase"})
public class CamelCaseModifier implements StringModifier {

    @GET
    @Produces(MediaType.TEXT_PLAIN)
    @Path("/{value}")
    @Override
    public String modify(@PathParam("value") String input) {
        StringBuilder builder = new StringBuilder();
        if (input != null) {
            for (int i = 0; i < input.length(); i++) {
                char currentChar = input.charAt(i);
                if (i % 2 == 0) {
                    builder.append(Character.toUpperCase(currentChar));
                } else {
                    builder.append(Character.toLowerCase(currentChar));
                }
            }
        }
        else {
            builder.append("No input given");
        }
        return builder.toString();
    }
}
- Create a Product Project
- Main Menu → File → New → Project → General → Project
- Set name to org.fipro.modifier.camelcase.product
- Click Finish
- Create a new Product Configuration
- Right click on project → New → Other… → Plug-in Development → Product Configuration
- Set the filename to org.fipro.modifier.camelcase.product
- Configure the product
- Select the Overview tab
- Set the General Information
ID = org.fipro.modifier.camelcase.product
Version = 1.0.0.qualifier
Check The product includes native launcher artifacts - In the Product Definition section leave the Product and Application empty and select The product configuration is based on: plug-ins
- Set the General Information
- Select the Contents tab
- Add the following plug-ins
- com.fasterxml.jackson.core.jackson-annotations
- com.fasterxml.jackson.core.jackson-core
- com.fasterxml.jackson.core.jackson-databind
- com.fasterxml.jackson.jaxrs.jackson-jaxrs-base
- com.fasterxml.jackson.jaxrs.jackson-jaxrs-json-provider
- com.fasterxml.jackson.module.jackson-module-jaxb-annotations
- com.sun.activation.javax.activation
- jakarta.annotation-api
- jakarta.servlet-api
- jakarta.ws.rs-api
- jakarta.xml.bind-api
- javassist
- javax.validation.api
- org.apache.felix.gogo.command
- org.apache.felix.gogo.runtime
- org.apache.felix.gogo.shell
- org.apache.felix.scr
- org.eclipse.core.jobs
- org.eclipse.ecf
- org.eclipse.ecf.console
- org.eclipse.ecf.discovery
- org.eclipse.ecf.identity
- org.eclipse.ecf.osgi.services.distribution
- org.eclipse.ecf.osgi.services.remoteserviceadmin
- org.eclipse.ecf.osgi.services.remoteserviceadmin.console
- org.eclipse.ecf.osgi.services.remoteserviceadmin.proxy
- org.eclipse.ecf.provider.jaxrs
- org.eclipse.ecf.provider.jaxrs.server
- org.eclipse.ecf.provider.jersey.server
- org.eclipse.ecf.remoteservice
- org.eclipse.ecf.remoteservice.asyncproxy
- org.eclipse.ecf.sharedobject
- org.eclipse.equinox.common
- org.eclipse.equinox.concurrent
- org.eclipse.equinox.console
- org.eclipse.equinox.event
- org.eclipse.equinox.http.jetty
- org.eclipse.equinox.http.servlet
- org.eclipse.jetty.http
- org.eclipse.jetty.io
- org.eclipse.jetty.security
- org.eclipse.jetty.server
- org.eclipse.jetty.servlet
- org.eclipse.jetty.util
- org.eclipse.jetty.util.ajax
- org.eclipse.osgi
- org.eclipse.osgi.services
- org.eclipse.osgi.services.remoteserviceadmin
- org.eclipse.osgi.util
- org.fipro.modifier.api
- org.fipro.modifier.camelcase
- org.glassfish.hk2.api
- org.glassfish.hk2.external.aopalliance-repackaged
- org.glassfish.hk2.external.jakarta.inject
- org.glassfish.hk2.locator
- org.glassfish.hk2.osgi-resource-locator
- org.glassfish.hk2.utils
- org.glassfish.jersey.containers.jersey-container-servlet
- org.glassfish.jersey.containers.jersey-container-servlet-core
- org.glassfish.jersey.core.jersey-client
- org.glassfish.jersey.core.jersey-common
- org.glassfish.jersey.core.jersey-server
- org.glassfish.jersey.ext.jersey-entity-filtering
- org.glassfish.jersey.inject.jersey-hk2
- org.glassfish.jersey.media.jersey-media-jaxb
- org.glassfish.jersey.media.jersey-media-json-jackson
- org.slf4j.api
- Add the following plug-ins
- Select Configuration tab
- Add the following bundles to the Start Levels section by clicking the Add… button:
- org.eclipse.ecf.osgi.services.distribution
- org.eclipse.equinox.event
- org.eclipse.equinox.http.jetty
- Set Auto-Start for every bundle in the Start Levels section to
true
- Add the following bundles to the Start Levels section by clicking the Add… button:
- Select Launching tab
- Add
–console
to the Program Arguments - Add
-Declipse.ignoreApp=true -Dosgi.noShutdown=true
to the VM Arguments - Add
-Dorg.osgi.service.http.port=8282
to the VM Arguments to configure the Http Service - Add
-Decf.jaxrs.server.pathPrefix=/services
to the VM Arguments to configure the URL path prefix similar to the uppercase service
- Add
- Select the Overview tab
Once the runtime is started the service should be available via http://localhost:8282/services/camelcase/modify/remoteservice
You probably noticed a console output on startup that shows the Endpoint Description XML. This is actually what we need for the EDEF file. You can also get the endpoint description at runtime via the ECF Gogo Command listexports <endpoint.id>:
osgi> listexports
endpoint.id                          |Exporting Container ID                       |Exported Service Id
5918da3a-a971-429f-9ff6-87abc70d4742 |http://localhost:8282/services/camelcase     |38

osgi> listexports 5918da3a-a971-429f-9ff6-87abc70d4742
<endpoint-descriptions xmlns="http://www.osgi.org/xmlns/rsa/v1.0.0">
  <endpoint-description>
    <property name="ecf.endpoint.id" value-type="String" value="http://localhost:8282/services/camelcase"/>
    <property name="ecf.endpoint.id.ns" value-type="String" value="ecf.namespace.jaxrs"/>
    <property name="ecf.endpoint.ts" value-type="Long" value="1642667915518"/>
    <property name="ecf.jaxrs.server.pathPrefix" value-type="String" value="/camelcase"/>
    <property name="ecf.rsvc.id" value-type="Long" value="1"/>
    <property name="endpoint.framework.uuid" value-type="String" value="80778aff-63c7-448d-92a5-7902eb6782ae"/>
    <property name="endpoint.id" value-type="String" value="5918da3a-a971-429f-9ff6-87abc70d4742"/>
    <property name="endpoint.package.version.org.fipro.modifier" value-type="String" value="1.0.0"/>
    <property name="endpoint.service.id" value-type="Long" value="38"/>
    <property name="objectClass" value-type="String">
      <array>
        <value>org.fipro.modifier.StringModifier</value>
      </array>
    </property>
    <property name="remote.configs.supported" value-type="String">
      <array>
        <value>ecf.jaxrs.jersey.server</value>
      </array>
    </property>
    <property name="remote.intents.supported" value-type="String">
      <array>
        <value>passByValue</value>
        <value>exactlyOnce</value>
        <value>ordered</value>
        <value>osgi.async</value>
        <value>osgi.private</value>
        <value>osgi.confidential</value>
        <value>jaxrs</value>
      </array>
    </property>
    <property name="service.imported" value-type="String" value="true"/>
    <property name="service.imported.configs" value-type="String">
      <array>
        <value>ecf.jaxrs.jersey.server</value>
      </array>
    </property>
    <property name="service.intents" value-type="String">
      <array>
        <value>jaxrs</value>
      </array>
    </property>
  </endpoint-description>
</endpoint-descriptions>
The endpoint description is needed by the Service Consumer to discover the new service. Without a Discovery that is broadcasting, the service needs to be discovered statically via an EDEF file. As the EDEF file is registered via manifest header, we create a new plug-in. You could also place it in an existing bundle like org.fipro.modifier.client, but for some more OSGi dynamics fun, let’s create a new plug-in.
- Create the EDEF configuration plug-in project
- File -> New -> Plug-in Project
- Set name to org.fipro.modifier.client.edef
- Click Next
- Use the following settings:
- Execution Environment: JavaSE-11
- Uncheck Generate an activator
- Uncheck This plug-in will make contributions to the UI
- Create a rich client application? No
- Click Finish
- Create a new folder edef
- Create a new file camelcase.xml in that folder
- Copy the Endpoint Description XML from the previous console command execution into that file
- Open the build.properties file and add the edef folder to the Binary Build
- Open the META-INF/MANIFEST.MF file and add the following header
Remote-Service: edef/camelcase.xml
- Open the Product Configuration in org.fipro.modifier.client.product
- Select the Contents tab
- Add the plug-in org.fipro.modifier.client.edef
- Select the Contents tab
If you start the Service Consumer Runtime, the service will not be available. This is because the new org.fipro.modifier.client.edef bundle is not activated as nobody requires it (the Equinox default!). But we can activate it via the console. First we need to find the bundle-id via lb and then start it via start <bundle-id>. The output should look similar to the following snippet:
osgi> lb edef
START LEVEL 6
   ID|State      |Level|Name
   63|Resolved   |    4|EDEF Discovery Configuration (1.0.0.qualifier)|1.0.0.qualifier

osgi> start 63
Now the service should be available via the modify command. If you stop the bundle, the service becomes unavailable again.
ECF Extensions to EDEF
The EDEF specification itself would not be sufficient for productive usage. For example, the values of the endpoint description properties need to match. For the endpoint.id this would be really problematic, as that value is a random generated uuid and changes on each runtime start. So if the Service Provider Runtime is restarted there is a new endpoint.id value. ECF includes a mechanism to support the discovery and the distribution even if the endpoint.id of the importer and the exporter do not match. This actually makes the EDEF file support work in productive environments.
ECF also provides a mechanism to create an endpoint description using a properties file. All the necessary endpoint description properties need to be included as properties with the respective types and values. The following example shows the properties representation for the EDEF XML of the above example. Note that for endpoint.id and endpoint.framework.uuid the type is set to uuid and the value is 0. This way ECF will generate a random UUID and the matching feature will ensure that the distribution will work even without matching id values.
ecf.endpoint.id=http://localhost:8282/services/camelcase
ecf.endpoint.id.ns=ecf.namespace.jaxrs
ecf.endpoint.ts:Long=1642761763599
ecf.jaxrs.server.pathPrefix=/camelcase
ecf.rsvc.id:Long=1
endpoint.framework.uuid:uuid=0
endpoint.id:uuid=0
endpoint.package.version.org.fipro.modifier.api=1.0.0
endpoint.service.id:Long=38
objectClass:array=org.fipro.modifier.api.StringModifier
remote.configs.supported:array=ecf.jaxrs.jersey.server
remote.intents.supported:array=passByValue,exactlyOnce,ordered,osgi.async,osgi.private,osgi.confidential,jaxrs
service.imported:boolean=true
service.imported.configs:array=ecf.jaxrs.jersey.server
service.intents:array=jaxrs
Properties files can be used to override values in an underlying XML EDEF file and even as an alternative, so the XML file is not needed anymore. It is even possible to override properties values for different environments, which makes it very interesting in a productive environment. So there can be a default Properties file for the basic endpoint description, then an endpoint description per service that derives from the basic settings, and even profile specific settings that changes for example the ecf.endpoint.id URLs per profile (DEV/INT/PROD). More details on that topic can be found in the ECF Wiki.
Alternatively you can also trigger a remote service import via EDEF programmatically using classes from the org.osgi.service.remoteserviceadmin package (see below). This way it is possible to dynamically import and close remote service registrations at runtime (without operating via low level OSGi bundle operations). The following snippet is an example for the programmatic registration of the service above:
Map<String, Object> properties = new HashMap<>();

properties.put("ecf.endpoint.id", "http://localhost:8282/services/camelcase");
properties.put("ecf.endpoint.id.ns", "ecf.namespace.jaxrs");
properties.put("ecf.endpoint.ts", 1642489801532l);
properties.put("ecf.jaxrs.server.pathPrefix", "/camelcase");
properties.put("ecf.rsvc.id", 1l);
properties.put("endpoint.framework.uuid", "0");
properties.put("endpoint.id", "0");
properties.put("endpoint.package.version.org.fipro.modifier.api", "1.0.0");
properties.put("endpoint.service.id", 38l);
properties.put("objectClass", new String[] { "org.fipro.modifier.api.StringModifier" });
properties.put("remote.configs.supported", new String[] { "ecf.jaxrs.jersey.server" });
properties.put("remote.intents.supported", new String[] { "passByValue", "exactlyOnce", "ordered", "osgi.async", "osgi.private", "osgi.confidential", "jaxrs" });
properties.put("service.imported", "true");
properties.put("service.intents", new String[] { "jaxrs" });
properties.put("service.imported.configs", new String[] { "ecf.jaxrs.jersey.server" });

EndpointDescription desc = new EndpointDescription(properties);
ImportRegistration importRegistration = admin.importService(desc);
Conclusion
The OSGi specification has several chapters and implementations to support a microservice architecture. The Remote Service and Remote Service Admin specifications are one of these and probably the most complicated ones, which was confirmed by several OSGi experts I talked with at conferences. Also the specification itself is not easy to understand, but I hope that this blog post helps to get a better understanding.
While Remote Services are pretty easy to implement, the complicated steps are in the setup of the runtime by collecting all necessary bundles. While the ECF project provides several examples and also tries to provide support for better bundle resolving, it is still not a trivial task. I hope this tutorial helps also in solving that topic a little bit.
Of course at runtime you might face networking issues, as I did in every talk for example. The typical fallacies are even referred in the Remote Service Specification. With the usage of JAX-RS and HTTP for the distribution of services and EDEF for a static file-based discovery, this might be less problematic. Give them a try if you are running into troubles.
At the end I again want to thank Scott Lewis for his continuous work on ECF and his support whenever I faced issues with my examples and had questions on some details. If you need an extension or if you have other requests regarding ECF or the JAX-RS Distribution Provider, please get in touch with him.
References
- Tutorial Sources
- EclipseCon Europe 2016 - Building Nano Services with OSGi DS
- EclipseCon Europe 2017 - Microservices with OSGi
- EclipseCon Europe 2018 - How to connect your OSGi application
- Blog Posts
- ECF Wiki