
Getting Started with OSGi Declarative Services
In the last weeks I worked intensively on getting a deeper knowledge in OSGi declarative services. I use them for a while with Eclipse 4, but never had a deep understanding of everything. Well, basically it is not that complicated at all, but it is the details that matter. And although there are several tutorials and blog posts out there, I had to search a lot to find the detail information I was searching for. And most of the time I ended up reading the OSGi specification.
This fact by the way is one of the most common remarks regarding OSGi. It is complicated and there is no really good documentation besides the specification. But this is getting better, and the enRoute project now delivers an already quite good documentation regarding OSGi. It also helped me a lot, but as this project is quite young and there is a lot to document, it is not complete yet. I can see good progress in that project and definitely suggest everyone who is interested in OSGi to read the enRoute documentation and play with the tutorials to get a basic understanding. Kudos to Peter Kriens and everyone working and contributing to enRoute. You are doing a great job!
While the enRoute documentation, the tutorials and blog posts I have found were really useful to understand the basics, they were also sometimes quite frustrating for me. They of course focus on plain OSGi and therefore use Bndtools. There is no mentioning of the limitations we have in Eclipse RCP development (e.g. still only DS 1.2 is supported). The information about the DS annotations are mostly special to bnd or Apache Felix, as they have their own set or implementation of DS annotations. And for sure tutorials and blog posts use Bndtools, because for plain OSGi this is the tooling that fits best. Another frustrating fact, because as an Eclipse RCP developer I can not use Bndtools. Mainly the reason is that when writing an Eclipse RCP application you rely on Equinox specific things like features, a target platform and the p2 update mechanism. But as writing this blog post Bndtools doesn’t support the Equinox p2 specific things. Therefore Eclipse RCP developers are still forced to use PDE. I heard of people writing Eclipse RCP applications using Bndtools, but it doesn’t sound like an easy way to go. There are so much workarounds necessary to get things together. Maybe these workarounds got better or are not necessary anymore with the new modifications to the Maven support added lately, but I haven’t looked at that in detail. I really hope that sometimes it will be easily possible to create Eclipse RCP applications using Bndtools, so that people can choose the tooling that they like the most.
I also want to mention that the discussion Bndtools vs. PDE was quite frustrating. While I was researching and playing around with declarative services I also learned a lot about OSGi in general. I also learned how good Bndtools is compared to PDE for example when it comes to the MANIFEST.MF generation. This is one of the biggest pain points in PDE, because you have to configure it manually and you need to be aware of all the specific things yourself. The result is almost never close to an OSGi recommendation (search for Require-Bundle vs. Import-Package to get an idea). But as explained before, as an Eclipse RCP developer I can not use Bndtools. Asking questions on various forums or reading answers on Stackoverflow, reading comments on blog posts or user groups, the answer was always like “Use Bndtools then you don’t have to think about that. PDE is crap!”. Not very helpful answers when trying to dig deeper in OSGi and being forced to use PDE.
At this point I want to thank Neil Bartlett for his high quality answers on various channels, like Stackoverflow, Twitter, Google Groups and even email. Of course I also got a lot of support from others, e.g. from the Equinox team, but the support by Neil was really special. So thanks a lot!
Because of the above I decided to write some tutorials about OSGi declarative services. I want to show the information I had to search for the last weeks. And I also want to show Eclipse RCP developers how to make the most out of declarative services in their projects.
In this tutorial I want to give an introduction to OSGi declarative services. What a component is and how it is created using DS annotations. I will use the Declarative Services Annotations Support that was introduced as part of PDE with Eclipse Neon. But basically the information about declarative services and the annotations are kept general so they can be useful with any tooling.
You can expect:
- General information about OSGi Declarative Services
- The usage of Declarative Services Annotations with Eclipse Neon (PDE)
- A very basic comparison between PDE and Bndtools
- An introduction to the Declarative Services Specification 1.3 (which is not usable with Eclipse Equinox at the time writing this tutorial)
The tutorial is similar to the Bndtools tutorial. Therefore we basically create three bundles:
- Service API
- Service Provider
- Service Consumer (a Felix Shell command)
If you are interested in using Bndtools and not PDE, you can read on for the general information and then move over to the Bndtools tutorial or even the enRoute Base Tutorial. Both are very good to get started with Bndtools and Declarative Services. For the curious I will try to point out the differences between PDE and Bndtools. But only with regards to this tutorial. For sure Bndtools serves a lot more features, but I don’t want to focus on that topic and just give an idea on the differences to start with.
1. Introduction
OSGi has a layered model to provide several concepts. Mostly the Bundles and Modules are seen when talking about OSGi, where the focus is on modularization. But the Services layer is at least as interesting as the Bundles and Modules. Regarding OSGi services you will find the following (or similar) picture in various documentations and tutorials .
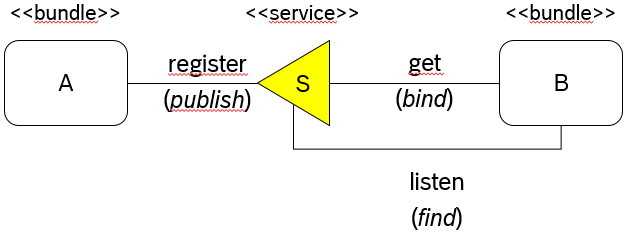
Without repeating the already existing documentation, it means that a bundle A can provide/publish a service implementation S and another bundle B can consume it. This is done by finding a service and binding to it when it is found. As there can be multiple service implementations published at the same time for the same type, and services in OSGi are dynamic and can come and go at runtime, the service consumer is listening to be able to react accordingly. This contract is implemented by the OSGi ServiceRegistry.
Compared with the Equinox only extension points, that are widely used in Eclipse 3.x based RCP applications, there are several advantages when using OSGi declarative services. First is the fact that multiple bundles can provide services and multiple bundles can consume them, which means there is a many-to-many relationship. In Equinox one bundle specifies an extension point and multiple bundles can contribute extensions to it, which makes it technically a one-to-many relationship. Of course you can also access the extension points of another bundle via the ExtensionRegistry, but conceptually this feels like a workaround compared with the general publish-find-bind mechanism of OSGi services. The second fact is that you access extension points via ID, while OSGi services are retrieved by type. That means OSGi service retrieval is type-safe, while extension points are not. Further information about the comparison between extension points and OSGi services can be found here: A Comparison of Eclipse Extensions and OSGi Services
With declarative services it is not necessary to register or consume services programmatically. This needs to be done with plain OSGi services where a service is typically registered (publish) to the ServiceRegistry in an Activator and consumed (find-bind) via ServiceTracker (also mostly via Activator). Instead of this a Service Component is declared via Component Description when using declarative services. The Component Description is an XML file that is processed by a Service Component Runtime (SCR, e.g. Equinox DS or Felix SCR) when a bundle is activated. It is responsible for managing the components and their life cycle. That means, if you want to use declarative services in your application, you need to ensure that a Service Component Runtime bundle is installed and activated in your environment.
1.1 Components
When talking about OSGi declarative services you will always talk about components. The following list will give an overview of the necessary wordings related to components to distinguish the different parts:
- Service Component
A Java class inside a bundle that is declared via Component Description and managed by a Service Component Runtime. Note that although we are talking about Declarative Services and Service Components, not every component provides a service! - Component Description
The declaration of a Service Component, contained in an XML document. - Component Configuration
A Component Description that is parameterized with component properties. It is used to track the component dependencies and manages the Component Instance. - Component Instance
The instance of the component implementation class. It is created when a Component Configuration is activated and discarded if the Component Configuration is deactivated.
As nobody wants to write XML files manually nowadays and the Component Definition Editor in PDE is the worst Eclipse editor ever, we will use the Declarative Service Annotations to get the Component Definition generated. I will therefore also not look at the generated XML document. If you are interested in that, have a look at the specification.
1.2 References to Services
Components can have dependencies on other components. If these dependencies should be managed automatically by the SCR, this is restricted to components that provide a service. Otherwise the SCR is not able to resolve the dependency.
There are different terms used when reading about service references. These terms are mostly related to the state they are in:
- Reference
The definition of a dependency to another service. - Target Services
The services that match the reference interface and target property filter. They are needed to satisfy a Component Configuration. - Bound Services
The services that are bound to a Component Configuration. The binding is done on activating a Component Configuration.
There are different strategies to access a Bound Service. The probably most common is the Event Strategy. With this strategy the SCR calls Event Methods when a service becomes bound, unbound or its configuration properties are updated. Additionally there is the Lookup Strategy, where the bound service is located programmatically via ComponentContext.
With DS 1.3 the Field Strategy was added, which simply updates a field in case a service becomes bound, unbound or its configuration properties are updated.
I will add more detailed information on references at the end of this tutorial, with the description of the @Reference annotation.
1.3 Lifecycle
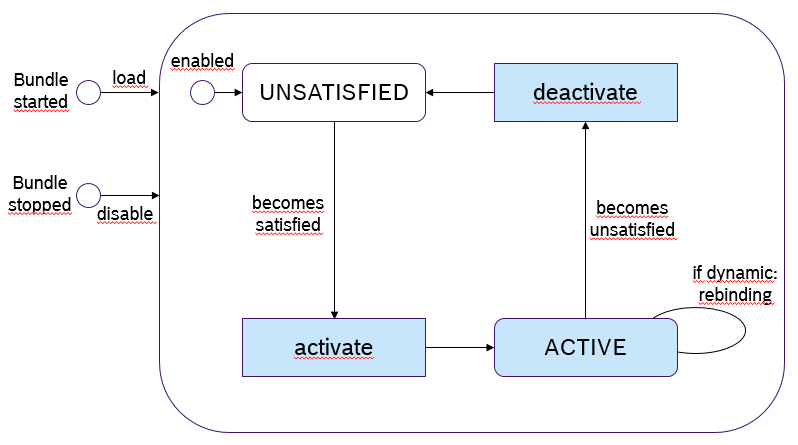
An important information regarding Service Components is that they have their own lifecycle, which is contained in the life cycle of a bundle. The most important question regarding Service Components is, when is it available for usage. To answer this question it is also important to know that there are basically three types of components with regards to the component life cycle:
- Delayed Component
Activation is not done until there is a request for a service object. Therefore even class loading and instantiation can be delayed until that time. A Delayed Component needs to specify a service. - Immediate Component
Activated as soon as its dependencies are satisfied. An Immediate Component does not need to specify a service. - Factory Component
Creates and activates new Component Configurations on request. The created Component Configurations are not re-used if they become unsatisfied or unregistered.
Typically you find information about Delayed Components when reading about OSGi Declarative Services.
The following states are possible:
- Enabled/Disabled
The initial enabled state of a component is specified via Component Description. All components are disabled when the bundle is stopped. It is possible to change the enabled state programmatically at runtime viaCompontentContext. - UNSATISFIED
The component is not ready to be started. See Satisfied for the necessary criteria. This status can also be reached again if a component is not Satisfied anymore. - Satisfied
A component is in a Satisfied state when it is enabled and the required referenced services are available. In case the ConfigurationAdmin is used and theconfiguration-policy=requiredis specified, also a configuration object needs to be available to bring a component to satisfied state. - REGISTERED
A component is in REGISTERED state if it Satisfied and not yet requested. Only applies for Delayed Components. - ACTIVE
The component was activated due to immediate activation or, in case of a Delayed Component, it was requested.
The following images show the lifecycle of an Immediate Component and a Delayed Component. As I will not write about Factory Components here, I leave them out and come up with it in another post.
Immediate Component Lifecycle
Delayed Component Lifecycle
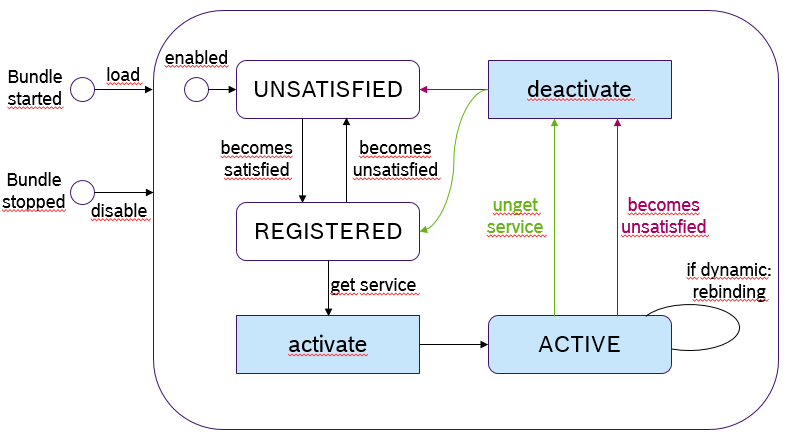
When a bundle is started, the SCR is checking if the bundle contains Component Descriptions. This is done via Extender Pattern, which means it searches for a Service-Component entry in the bundle MANIFEST header. If it finds one it will start to process the Component Description and create a Component Configuration. One of the first checks is the initial enabled state. Only if the Component Configuration is enabled, the SCR will try to satisfy the dependencies by finding and binding the specified references. It will also try to satisfy the configuration, if that is required by the Component Description. That means it checks for required references and configurations if necessary. After the Component Configuration is satisfied, it can be activated. An Immediate Component will activate immediately, a Delayed Component moves to the REGISTERED state, awaiting the first request to the provided service. If a Component Configuration contains dynamic references, the references can rebind in ACTIVE state, otherwise it will be re-activated. If a Component Configuration becomes unsatisfied (e.g. a bound service becomes unavailable), the Component Configuration will be deactivated. Note that a Delayed Component will also be deactivated and gets back to REGISTERED state in case no other bundle references it anymore.
The activation of a component and the time when it is done makes the real difference between an Immediate and a Delayed Component. It consists of the following steps:
- Load the component implementation class
- Create the component instance and component context
- Bind the target services
- Call the activate method if present
For Delayed Components the initial memory footprint and the load time is therefore delayed on startup until the first request on a service object (see Declarative Services Specification – 112.5.6 Activation).
In the above diagrams the light-blue highlighted states and state transitions indicate that a Component Instance exists. Correlated to the explanation on the activation of a component, this should make it more clear where a Component Instance (and therefore a real object) comes to play.
This is also a big difference to Eclipse Extension Points. While with OSGi Declarative Services and Delayed Components a bundle can be safely activated without issues regarding startup performance and initial memory footprint, the policy in Equinox and Eclipse is to optimize the startup on bundle level. That means you can use Extension Points and Core Expressions to avoid starting a bundle until the first usage of an extension.
Now enough with the general basics and let’s get started with the tutorial! I will place some further general information (e.g. describing the DS annotations) alongside the matching places in the tutorial and at the end.
2. IDE Setup
If you are using Eclipse Neon, you need to enable the DS support. To do this open the preferences via Window -> Preferences -> Plug-in Development -> DS Annotations and check Generate descriptors from annotated sources.
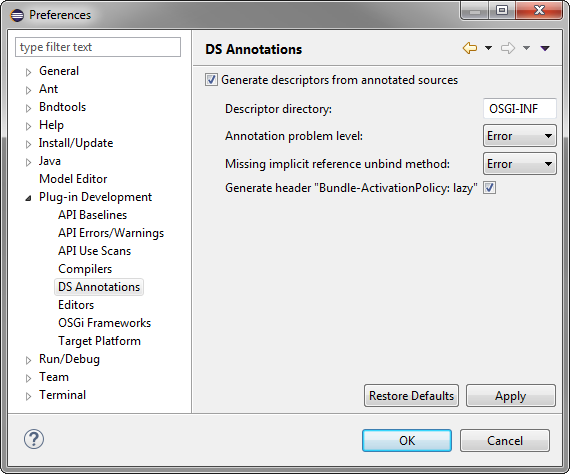
After that the following four configurations are available:
- Descriptor directory
The directory to which the component description files will be generated. Default is OSGI-INF, and you should leave that setting unchanged. - Annotation problem level
If issues on annotation level should be reported as an Error, Warning or to Ignore them. Default is Error and it is a good idea to keep that to see if the annotation is used correctly. - Missing implicit reference unbind method
If a missing unbind method for a service reference should be reported as an Error, Warning or to Ignore them. The default is Error. The DS specification does not require an unbind method, but it is strongly suggested in case of dynamic references that are stored locally. Further details on that topic will follow. A discussion on that topic is started in Bug 492726. - Generate header “Bundle-ActivationPolicy: lazy”
If this setting is enabled, the bundle manifest header will be generated. The default is enabled, and it should be enabled in case Equinox is used as OSGi framework.
Note:
If you are using Eclipse Mars, you can install the Declarative Services Annotations Support from the marketplace.
Bndtools vs. PDE
The difference to Bndtools, well you need to install Bndtools into your Eclipse installation. And there is no need to configure the annotation processing separately.
Interlude: Bundle-ActivationPolicy: lazy
The Lazy Activation Policy that is configured via Bundle-ActivationPolicy, is a bundle life cycle policy that tells the OSGi framework that a bundle should be lazily activated when the first successful class load is made from its local class space. From my research I’ve found out that this policy is typically not used when working with other OSGi frameworks. Apache Felix or Eclipse Concierge for example can be configured to automatically install and start all bundles in a specified directory. Also Equinox can be configured to automatically install and start all bundles, but that needs to be explicitly configured for every bundle itself. The default Eclipse Configurator, currently SimpleConfigurator and the deprecated update configurator, only install all bundles in the plugins directory but doesn’t start them. By specifying the Lazy Activation Policy you basically specify an auto-start behavior for bundles without the need to specify the auto-start manually in a launch configuration. As you typically don’t specify an auto-start for every bundle that provides service implementations via DS, the lazy activation policy is mandatory in Eclipse with Equinox to be sure that the service implementation is available. Otherwise the bundle that provides the service might never be started. The main idea behind not automatically starting all bundles was to reduce the startup time by reducing the number of bundles to activate. From my understanding the startup performance issues in the past (when that policy was added) where related to ineffectively implemented bundle activators. If you follow the best practices in OSGi development and use declarative services, you shouldn’t use Activators at all. The bundle startup should take almost no time and the component activation can be delayed to the first request (see lifecycle above). There should be only rare cases where you can’t use Service Components and an Activator is really needed.
3. API Project
Let’s start with the tutorial by specifying the service API. This is typically done in a separate API project to decouple the service contract and the service implementation, which makes it possible to exchange or provide multiple implementations for a service.
I recently heard the remark that it is “old-school” to always create an interface if there is only one implementation. But regarding a service-oriented-design you should always consider using interfaces and even separate the interfaces in an API bundle. Even if you only see one implementation, consider the following two statements:
- Don’t forget testing!
By separating API and implementation you can simply create a test implementation of a service that is provided by a separate bundle. Especially for UI testing you can deploy the bundle with the test implementation of a service instead of deploying the real service implementation that needs to be mocked in test execution. - Clean dependency hierarchies
An API should typically have no or at least little dependencies to other libraries. Only implementations should have such dependencies. If the API without additional third-party-depencies is separated in an API bundle, and a service consumer only depends on the API, the consumer also has a simpler dependency graph.
Regarding Service Components that provide a service it is therefore always recommended to have the API in a separate bundle. For sure there are also exceptions to that rule, e.g. Immediate Components that are used for initial configuration or used to open a socket for communication.
3.1 Create an API project
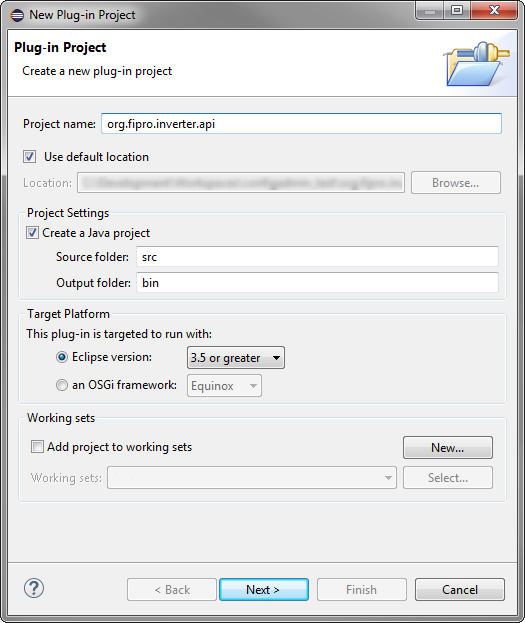
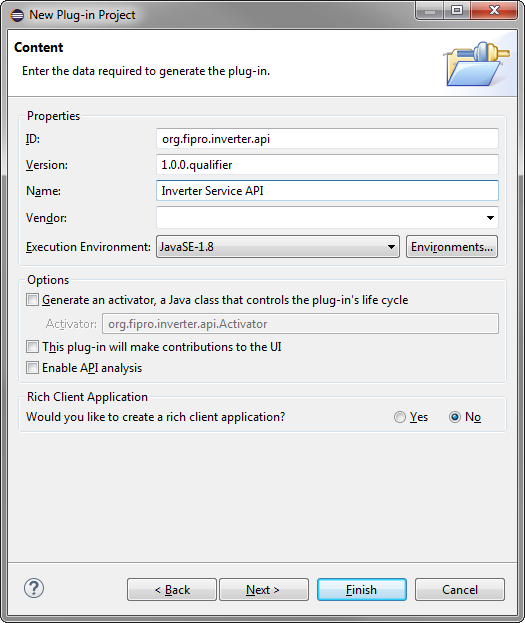
In the Plug-in Perspective create a new Plug-in Project via File -> New -> Plug-in Project. Choose a name that indicates that this is a bundle that provides an API (e.g. org.fipro.inverter.api), and on the following wizard page ensure that no Activator is generated, no UI contributions will be added and that no Rich Client Application is created. The following screenshots show how the wizard pages should look like:
3.2 Specify the API
- Create a new package org.fipro.inverter
- Create an interface StringInverter
    package org.fipro.inverter;

    public interface StringInverter {

        String invert(String input);

    }
3.3 Define / Export the bundle
An OSGi bundle differs from a simple JAR by additional meta information. This meta information is configured in the META-INF/MANIFEST.MF file. In PDE this file needs to be modified manually.
- Open the MANIFEST.MF file and on the Overview tab set the Version to 1.0.0 (remove the qualifier).
- Switch to the Runtime tab and export the org.fipro.inverter.api package.
- Specify the version 1.0.0 on the package via Properties…
PDE does not generate the jar file automatically, you need to export it via File -> Export -> Plugin -> Deployable. This step is not necessary now, I just wanted to mention it already here.
Bndtools vs. PDE
With Bndtools you create a Bndtools OSGi Project. Additionally you need to create a configuration project if you don’t have one yet. Typically this is called the cnf project that contains workspace-wide configurations, like the repositories that are used to resolve the dependencies. They have their own workspace concept additionally to the Eclipse workspace, and since Bndtools 3.2 they have workspace templates that help with the creation.
PDE uses the concept of a Target Platform, where you specify the repositories and the bundles that are used to create an application. The target platform typically contains p2 repositories and the Eclipse IDE itself can be used as target platform for the development. In a professional environment you typically create a project specific target definition in a separate project (I explained that in my basic recipe). So conceptually the usage of a repository or configuration project is similar when comparing PDE and Bndtools. But as Bndtools doesn’t support p2 and the target platform concept of PDE, the cnf project is different and required for OSGi development with Bndtools.
In Bndtools you configure the bundle in the bnd.bnd file. So the bundle version and the exported packages are configured there. The MANIFEST.MF file is generated with the correct information. The creation of the MANIFEST.MF file is a major advantage of Bndtools compared with PDE, as this is one of the more complicated things regarding OSGi.
Another difference is that the resulting bundle JAR file is automatically generated. After saving the bnd.bnd file, the bundle jar is available for usage in the generated folder.
4. Service Provider
After the API bundle is specified, a service provider bundle with a service implementation can be created.
4.1. Create and configure the service provider bundle
In the Plug-in Perspective create a new Plug-in Project via File -> New -> Plug-in Project. Choose a name that indicates that this is a bundle that provides a service implementation (e.g. org.fipro.inverter.provider), and on the following wizard page ensure that no Activator is generated, no UI contributions will be added and that no Rich Client Application is created. The steps are the same as for creating the API bundle.
Note:
In Eclipse projects you also often find bundle names that end with .impl instead of .provider. IMHO suffixing such bundles with .provider makes more sense, but in the end it is a project decision.
- Open the MANIFEST.MF file and switch to the Dependencies tab
- Add the following two dependencies on the Imported Packages side:
- org.fipro.inverter (1.0.0)
- org.osgi.service.component.annotations (1.2.0)
- Mark org.osgi.service.component.annotations as Optional via Properties… to ensure there are no runtime dependencies. We only need this dependency at build time.
- Add the upper version boundaries to the Import-Package statements. Open the Properties… for both imported packages and specify 2.0.0 as upper bound to ensure we don’t get into runtime issues if a newer major version is deployed whose API doesn’t match the old one. Following the rules of semantic versioning a new major number means an API breakage has occured. Therefore it is always a good idea to specify the upper bound accordingly. This is not done automatically by PDE.
Note:
The fact that we need to add org.osgi.service.component.annotations as an optional dependency is a necessary but nasty task to do. It is needed to make the declarative service annotations available in the project. But as they are only needed at build time, it shouldn’t be necessary to specify that dependency at all. There are already two tickets on this topic: Bug 488800 and Bug 490061. They weren’t fixed for Neon, probably because of the API freeze in the release process. Hopefully they will get in for Eclipse Oxygen.
4.2 Create the service implementation class
- Create a new package
org.fipro.inverter.provider - Create a new class
StringInverterImpl
package org.fipro.inverter.provider;

import org.fipro.inverter.StringInverter;
import org.osgi.service.component.annotations.Component;

@Component
public class StringInverterImpl implements StringInverter {

    @Override
    public String invert(String input) {
        return new StringBuilder(input).reverse().toString();
    }
}
The usage of the @Component annotation is the important thing in this step. On save it triggers the generation of the Component Description. You will find the XML file in the OSGI-INF folder in the org.fipro.inverter.provider project, which also has been created if it didn’t exist before (note that in PDE the file is also called Component Definition, just in case you are getting confused by names). It also updates the MANIFEST.MF file by adding (or updating) the Service-Component header to point to the Component Description. This is necessary for the SCR to find, load and process the Component Description. The build.properties file is updated aswell to include the Component Description file. Unfortunately this generates a warning saying the OSGI-INF folder itself is not included. To remove that warning you can simply open the build.properties file and add the OSGI-INF folder itself. This is at least sufficient for this simple example.
There is nothing more to do at this point. You will find a more detailed description on the @Component annotation at the end of this tutorial.
Note:
The fact that after code generation warnings are shown is IMHO really annoying. I suggested to always add the whole OSGI-INF folder to the build.properties, but this was declined with the comment that not everybody wants to always add all files in that folder to the resulting bundle JAR. This is of course a valid remark. I therefore created another ticket to either rethink that warning (not sure if that warning is really valid) or if it should be possible to disable that warning somehow. There has been no action on that topic while writing this tutorial, but you can follow the discussion in Bug 491666.
Bndtools vs. PDE
- With Bndtools you create a new Bndtools project with the Component Definition Template.
- In the bnd.bnd file specify the DS annotations to use on the Contents tab (OSGi DS vs. Bnd). With DS 1.3 I couldn’t find a reason for using the Bnd annotations anymore, I therefore suggest to use the default OSGi DS Annotations.
- On the Build tab you add the build time dependency to the API bundle, which will be used to calculate the necessary imports in the MANIFEST.MF file.
As explained before, the advantage is clearly the generation of the OSGi meta-data in the MANIFEST.MF file.
Interlude: Capabilities
There is no need to specify a bundle dependency to the SCR on package level. But without specifying such a dependency, the OSGi framework doesn’t know about that dependency when resolving the provider bundle. As we don’t need to import a package from an SCR implementation, we need another way to specify the dependency. In OSGi this is done via Requirements and Capabilities. With the DS 1.3 specification the SCR needs to provide the following capability:
Provide-Capability: osgi.extender;
 osgi.extender="osgi.component";
 version:Version="1.3";
 uses:="org.osgi.service.component"
A provider bundle can require the osgi.extender capability which wires the bundle to the SCR implementation and ensures that both use the same version of the org.osgi.service.component package. This can be done by adding the following header to the bundle MANIFEST.
Require-Capability: osgi.extender;
 filter:="(&(osgi.extender=osgi.component)(version>=1.3)(!(version>=2.0)))"
The Equinox DS implementation is still only 1.2, but some users liked the idea so much that the osgi.extender capability was even introduced there for version 1.2 with Eclipse Neon. So it is possible to require the osgi.extender capability for version 1.2 if you are using Equinox DS 1.4.400 (Neon). Simply replace the 1.3 in the above Require-Capability header with 1.2.
Note:
The PDE Plug-in Manifest Editor has not build in support for specifying capabilities. You therefore have to add that header in the MANIFEST.MF source tab manually.
Unfortunately this comes with two new issues:
- The DS 1.2 specification does not specify the capability, therefore other implementations of that specification doesn’t provide it. If you try to deploy your service in an environment that only supports the 1.2 spec (e.g. a Felix SCR 1.2 on Concierge) your bundle will not be started and therefore your service will not be available.
- p2 does not support OSGi capabilities. This is tracked in Bug 313553. This is especially an issue when trying to build such bundles using Tycho, which internally uses the p2 resolver.
While there is not much you can do on the first topic, there is a way to solve the second one by Customizing Metadata via p2. The Equinox DS implementation also provides the capabilities that way, additionally to the OSGi capabilities. To specify the corresponding requirement, you need to add a p2.inf file in the META-INF folder, so the p2 resolver is able to resolve the capabilities. The file needs to have the following content:
requires.0.namespace = osgi.extender
requires.0.name = osgi.component
For adding a version constraint it is possible to specify a range like this:
requires.0.range = [1.2.0, 2)
Don’t forget to add the p2.inf file to the build.properties!
Update: Since Eclipse Photon OSGi capabilities are supported by p2. The usage of p2.inf files is therefore not needed anymore and it is even advised to NOT add them to avoid any side effects!
You could also provide the osgi.service capability to make consumers able to declare a dependency on the service that is provided. As per specification this would look like the following snippet for the service of this tutorial:
Provide-Capability: osgi.service;
 objectClass:List<String>="org.fipro.inverter.StringInverter"
But remember that you would also need to add the corresponding p2 capabilities to make that work with the p2 resolver.
I created Bug 490063 so the DS Annotations in PDE also create the Provide-Capability header. We could even think about automatically generating the necessary p2.inf files. But personally I would like it more if p2 would add support for OSGi capabilities so the additional work is not necessary.
On the consumer side you could then require the osgi.service capability like this:
Require-Capability: osgi.service;
 filter:="(objectClass=org.fipro.inverter.StringInverter)";effective:=active
You should notice the effective:=active directive here. It is necessary so the OSGi Framework will resolve the bundle without checking if another bundle provides that capability. Without that directive or setting effective:=resolve the resolution of the bundle would be prevented. Unfortunately it then also has no effect for the resolution by p2. If the capability resolution needs to be added at resolve time, it needs to be specified via p2.inf like with the osgi.extender above.
The service provider would need to add the following lines to the p2.inf:
provides.1.namespace = osgi.service
provides.1.name = org.fipro.inverter.StringInverter
The consumer would require it like this in a p2.inf file:
requires.1.namespace = osgi.service
requires.1.name = org.fipro.inverter.StringInverter
After that the resolving works with p2 and at runtime in the OSGi framework.
Note:
The default OSGi services in Equinox currently also doesn’t provide the osgi.service capability. This is tracked by Bug 416047 and hopefully added soon.
Bndtools vs. PDE
With Bndtools the capability headers are automatically generated. It always provides the osgi.service capability. But it will only require the osgi.extender capability in case the component XML file is generated for DS spec 1.3. The Component Description file generation always uses the lowest necessary specification dependent on the features used by the component. So for our simple example we would not see the Require-Capability header on osgi.extender. But the generation of a Component Description file with a minimum namespace version of 1.3 can be forced by adding the following option to the bnd.bnd file:
-dsannotations-options: extender
This also adds the requirement for the osgi.extender capability.
5. Service Consumer
To show that our service is working, we need to implement a consumer. As an Eclipse developer it would be natural to create a small Eclipse RCP application for that. But I want to stick to the Bndtools tutorial and just create a console command for that. This is also easier to achieve without adding Eclipse RCP specifics to this tutorial.
Note:
The Eclipse OSGi console is based on the Felix Gogo Shell. We can therefore easily use the same approach for creating a console command as shown in the Bndtools tutorial.
5.1 Create and configure the service consumer bundle
In the Plug-in Perspective create a new Plug-in Project via File -> New -> Plug-in Project. Choose a name that indicates that this is a bundle that provides a service implementation (e.g. org.fipro.inverter.command), and on the following wizard page ensure that no Activator is generated, no UI contributions will be added and that no Rich Client Application is created. The steps are the same as for the bundles before.
- Open the MANIFEST.MF file and switch to the Dependencies tab
- Add the following dependencies on the Imported Packages side:
- org.apache.felix.service.command (0.10.0)
- org.fipro.inverter (1.0.0)
- org.osgi.service.component.annotations (1.2.0)
- Mark org.osgi.service.component.annotations as Optional via Properties… to ensure there are no runtime dependencies. We only need this dependency at build time.
- Specify the upper version bounds for the packages accordingly.
- Specify status=provisional for the import of the package org.apache.felix.service.command. Otherwise it won’t be resolved correctly. Basically you only need that import to use the constants from the
CommandProcessor. Without using that, there is no need to specify it.
Note:
You need to switch to the MANIFEST.MF tab in the Plug-in Manifest Editor and add the status=provisional entry manually. It is not possible to add such properties on the Dependencies tab.
The Import-Package statement should look like the following snippet after these changes.
Import-Package: org.apache.felix.service.command;status=provisional;version="[0.10.0,1.0.0)",
 org.fipro.inverter;version="[1.0.0,2.0.0)",
 org.osgi.service.component.annotations;version="[1.2.0,2.0.0)";resolution:=optional
5.2 Create the service consumer class
- Create a new package
org.fipro.inverter.command - Create a new class
StringInverterCommand
package org.fipro.inverter.command;

import org.apache.felix.service.command.CommandProcessor;
import org.fipro.inverter.StringInverter;
import org.osgi.service.component.annotations.Component;
import org.osgi.service.component.annotations.Reference;

@Component(
    property= {
        CommandProcessor.COMMAND_SCOPE + ":String=fipro",
        CommandProcessor.COMMAND_FUNCTION + ":String=invert"
    },
    service=StringInverterCommand.class
)
public class StringInverterCommand {

    private StringInverter inverter;

    @Reference
    void bindStringInverter(StringInverter inverter) {
        this.inverter = inverter;
    }

    public void invert(String input) {
        System.out.println(inverter.invert(input));
    }
}
We are specifying some elements on the @Component annotation for additional configuration. First we specify configuration properties that are needed for the configuration of the command. We specify the osgi.command.scope and the osgi.command.function property, so our command can be triggered by executing fipro:invert on the console. The method that gets triggered needs to have the same as the configured function property. With the service element we specify that we provide a service. This is necessary so the command is registered as a service. The component would be otherwise an Immediate Component, because we don’t implement an interface.
As the command is intended to be a service consumer, it needs to consume a StringInverter. We specify the service dependency via a so called Event Method to bind to a StringInverter component. The bindStringInverter(StringInverter) method is marked as bind event method by adding the @Reference annotation.
Further information on the annotations can be found at the end of the tutorial.
Bndtools vs. PDE
In the bnd.bnd file of the command project you need to switch to the Build tab and add
- org.fipro.inverter.api
- org.apache.felix.gogo.runtime
Despite the fact that you need to choose the annotation implementation, there is nothing more to do.
6. Run
Now that our bundles are ready we need to launch an OSGi application to test it. For this we create a launch configuration, so we can start directly from the IDE.
- Select the menu entry Run -> Run Configurations…
- In the tree view, right click on the OSGi Framework node and select New from the context menu
- Specify a name, e.g. OSGi Inverter
- Deselect All
- Select the following bundles
- org.fipro.inverter.api
- org.fipro.inverter.command
- org.fipro.inverter.provider
- org.apache.felix.gogo.command
- org.apache.felix.gogo.runtime
- org.apache.felix.gogo.shell
- org.eclipse.equinox.console
- org.eclipse.equinox.ds
- org.eclipse.equinox.event
- org.eclipse.equinox.util
- org.eclipse.osgi
- org.eclipse.osgi.services
- Ensure that Default Auto-Start is set to true
- Click Run
The Console view should open with an osgi> prompt. Now you can type in the invert command with a parameter and see the result. Note that it is not necessary to specify the scope here, because there is no other invert command published.
The result should look similar to this:
osgi> invert Simpson
nospmiS
osgi>
Bndtools vs. PDE
You will find a launch.bndrun file in the command bundle project, that can be used to launch our small OSGi application. The OSGi Framework and the Execution Environment needs to be selected and the org.fipro.* bundles need to be added to the Run Requirements. Click on Resolve so the Run Bundles are automatically determined. After that you simply click on Run OSGi in the upper right corner of the editor and the application starts up, opening the Console view for interaction.
The creation of the launch configuration in Bndtools feels more comfortable than the one with PDE. On the other hand I had sometimes strange issues with that editor. It sometimes forgot my changes in the Run tab on save, which left me editing the launch configuration in the Source tab directly. This happened mostly when trying to create a launch configuration with Equinox as OSGi Framework.
7. DS Annotations
That’s it with the tutorial. Now let’s have a closer look at the DS annotations.
7.1 @Component
Let’s start with the @Component annotation. It is the first Declarative Service Annotation we used. It indicates that the annotated class is intended to be an OSGi component and triggers the generation of the Configuration Description as explained above. If nothing else is specified, the annotation defaults will create the easiest to use component:
- Its name is the full qualified class name
- It registers all of the class’s directly implemented interfaces as services
- The instance will be shared by all bundles
- It is enabled
- It is immediate if it has no services, otherwise it is delayed
- It has an optional configuration policy
- The configuration PID is the full qualified class name
These defaults can be changed via annotation type elements (or annotation parameter if that is better understandable). The following elements are supported by the @Component annotation:
| Annotation Type Element | Description |
|---|---|
| configurationPid | The configuration PID that is used for the configuration of the component in conjunction with the ConfigurationAdmin. |
| configurationPolicy | Configure whether a configuration object for the component needs to be present via ConfigurationAdmin. |
| enabled | The initial enabled state of the component when the containing bundle is started. |
| factory | The factory identifier for this component, indicating that this component is a Factory Component. |
| immediate | Control whether a component configuration should be immediately activated after becoming satisfied or if the activation should be delayed. Needs to be false in case the factory attribute is set also, needs to be true if no service is provided. |
| name | The name of the component which needs to be unique within a bundle. |
| properties | References a Java Properties File entry in the bundle. |
| property | Array of Strings to specify a set of component properties. Can be seen as additional meta-information of a component that is used for configuration. It is a number of key-value pairs in the format _ |
| service | The name(s) of the interface or class this component is registered under as a service. Needs to be a full qualified class name. |
| servicefactory | By setting this value to true, a new Component Instance will be created for each distinct bundle that request the service. Note: this element is replaced by scope with DS 1.3 |
| xmlns | The XML name space of the Component Description for this component. By default the lowest Declarative Services XML name space is used, that supports all the specification features used by this component. |
Note:
The configuration related type elements will be explained in an upcoming post that will focus on the ConfigurationAdmin.
With DS 1.3 two additional elements were added to the @Component annotation:
| Annotation Type Element | Description |
|---|---|
| reference | Array of @Reference annotations with specified name and service elements. Used to accesss references via Lookup Strategy. |
| scope | The scope of the provided service. SINGLETON by default which means the Component Instance will be used by all bundles. BUNDLE if every bundle should get its own Component Instance. PROTOTYPE to create a new Component Instance for each distinct request. Note: This element replaces the servicefactory element. |
7.2 @Activate, @Deactivate, @Modified
Although we don’t use them in the example, I want to show and explain the life cycle annotations. A component can specify methods that should be called when a life cycle event happens. This is the activation, modification or deactivation of a component. Using the DS annotations you can mark a method as such a life cycle method.
| Annotation | Description |
|---|---|
@Activate |
The method that should be called on component activation. |
@Modified |
The method that should be called if a configuration is updated using the ConfigurationAdmin. |
@Deactivate |
The method that should be called on component deactivation. |
These methods can have zero or more arguments, where each argument must be one of the following types:
ComponentContext
The component context for the component configuration.BundleContext
The bundle context of the components bundle.Map<String, ?>
An unmodifiable map containing the component properties.
The following snippet is an example for an activate method that takes all supported parameters:
@Activate
private void activate(
    ComponentContext c,
    BundleContext b,
    Map<String, ?> properties) {

    //do some initialization stuff
}
@Deactivate accepts an additional int or Integer parameter for the deactivation reason. The different deactivation reasons are specified in org.osgi.service.component.ComponentConstants which is contained in the SCR implementation.
With DS 1.3 there is an additional parameter type that is accepted by the life cycle methods. It is called a Component Property Type, which allows type safe access to component properties. You can also access the component properties via the Map parameter, but in an unsafe manner. You need to check the type and cast accordingly. As the component properties can come from anywhere (specified via @Component property or properties element, via ConfigurationAdmin or factory component) it is nicer to have a type safe access via Component Property Type, as the framework will do the conversion. As this tutorial is about getting started with Declarative Services, I will not cover this here in more detail. Have a look at the Configuring OSGi Declarative Services blog post for further information.
Note that you can only use each annotation once in your component implementation. There is no overriding capability but a strict order which method will be chosen in such a case. I therefore suggest to only add one method per life cycle annotation and choose the parameter list that matches the best.
The OSGi best practices suggest to not use the public access modifier for the life cycle methods. They are only intended to be called by the SCR and should not be called from other code.
7.3 @Reference
The last available annotation is @Reference. It is used to specify the dependency on other services. With DS 1.2 it can only be used with Event Methods. DS 1.3 also introduced the usage of @Reference on fields and the type element reference of @Component .
Let’s first explain Event Methods. An Event Method is called by the SCR when a service becomes bound, unbound or its configuration properties are updated. With DS 1.2 it is necessary to bind a service reference via bind event method. With DS 1.3 Event Methods are still useful in case actions need to be performed if a service is bound, unbound or changes its configuration. There are three Event Methods per service reference:
- bind
Called to bind a new service to the component. For static references this method is called before the activate method. For dynamic references this method can also be called while the component is active. - updated
Called when the configuration properties of a bound service are modified. - unbind
Called when the SCR needs to unbind the service. For static references this method is called after the deactivate method. For dynamic references this method can also be called while the component is active.
With DS 1.2 the bind method is mandatory to specify the reference. The updated and unbind methods are optional as per specification, although specifying the unbind method is often recommended (see below).
The @Reference annotation needs to be applied on the bind event method. The following defaults are used in that case:
- The name of the bind method is used for the name of the reference. That means the method name after the prefix (e.g.
setStringInverter()-> StringInverter). Mind the case sensitivity, as the name in that case starts with an upper case letter. - 1:1 cardinality.
- Static reluctant policy.
- The requested service is the type of the first argument of the bind method.
- It will infer a default unset method and updated method based on the name of the bind method.
The defaults can be changed via annotation type elements, which will be explained shortly.
Note:
When using Event Methods for reference binding, typically the bind method is used to store the service reference instance in a field. In case of a dynamic reference there should be always an unbind method to clean up such a reference. This is necessary as for dynamic references the reference binding/unbinding can happen while the Component Configuration is ACTIVE. The unbind method is not necessary for static references, as a Component Configuration would be deactivated if the bound service is not available anymore, and activated again if another target service could be bound.
Event Methods accept different parameters. With DS 1.2 these can be:
ServiceReference
The service reference to the bound service, which can later be used for the Lookup Strategy.- Service Type
The type of the referenced service, so the Service Instance itself is passed. - Service Type +
Map<String, ?>
The Service Instance itself is passed together with the unmodifyable map that contains the configuration properties of the bound service.
The following snippet shows the bind method for the StringInverter reference, that also takes the configuration properties as parameter:
@Reference
void bindStringInverter(
        StringInverter inverter, Map<String, ?> properties) {
    // check the properties for some initialization
    this.inverter = inverter;
}
The bind event methods are typically prefixed with either bind, set or add. The unbind method should have the corresponding prefixes unbind, unset or remove, so they are automatically picked up by @Reference. The updated event method follows that principle by replacing the bind prefix with updated. Alternatively it is possible to explicitly specify the unbind and the updated event methods via type element.
With DS 1.3 an additional parameter is supported for usage with the PROTOTYPE scope, ComponentServiceObjects. Also additional parameter combinations are supported with DS 1.3. So it is for example possible to only get the map of configuration properties injected, or a combination of ServiceReference, Service Type, ComponentServiceObjects and the map of configuration properties. Additional information about scopes and ComponentServiceObjects in DS 1.3 can be found in my Control OSGi DS Component Instances blog post.
Also introduced with DS 1.3 is the Field Strategy for binding services. With this it is not necessary to specify a bind event method for a reference. Instead it is possible to apply the @Reference annotation to a field in the component implementation class. For a static reference the field will be set before the component instance is activated. Dynamic references need to be marked as volatile so that changes to that field are also visible to other threads.
When applying @Reference on a field, the following defaults are used:
- The name of the field is used for the name of the reference.
- 1:1 cardinality if the field is not a collection. 0..n cardinality if the field is a collection.
- Static reluctant policy if the field is not declared
volatile. Dynamic reluctant policy if the field is declaredvolatile. - The requested service is the type of the field in case the field type is a service type.
The @Reference annotation can be applied to different field types. The following list shows the supported types for references with unary cardinality:
- Service Type
The type of the referenced service, so the Service Instance itself is passed. ServiceReference
The service reference to the bound service, which can later be used for the Lookup Strategy.ComponentServiceObjects
The actual service object or objects for services with prototype scope.Map<String, ?>
The unmodifyable map that contains the configuration properties of the bound service.Map.Entry<Map<String, ?>, Service Type>
An unmodifiableMap.Entrywhose key is an unmodifiable Map containing the service properties of the bound service, as above, and whose value is the bound service object.
The cardinality of the reference is determined by the field type. If multiple service references should be bound (or at least one service reference) one of the following types needs to be used, where the type of objects in the collection can be one of the above:
CollectionList- A subtype of
Collection
This can only be used for dynamic references using the UPDATE field-option. The collection object needs to be initialized in the component instances constructor.
Note:
Only instance fields are supported. The @Reference annotation can not be applied to static fields.
There are various options to configure service references. The following annotation type elements are supported by the @Reference annotation for configuration:
| Annotation Type Element | Description |
|---|---|
| cardinality | Specify if the reference is optional and if single or multiple bound services are supported. Supported values are specified in the ReferenceCardinality enum: <ul><li>0..1 = OPTIONAL</li> <li>1..1 = MANDATORY</li> <li>0..n = MULTIPLE</li> <li>1..n = AT_LEAST_ONE</li></ul> |
| name | The component local name of the reference which can be used for the Lookup Strategy. |
| policy | The reference policy regarding dynamicity. Supported values are specified in the ReferencePolicy enum: <ul><li> STATICThe component instance doesn’t see any dynamics. Dependent on the policy-option it is either ignored that a new or higher ranking service becomes available, or the Component Configuration is deactivated and reactivated.</li> <li>DYNAMIC The SCR can change the set of bound services without deactivating the Component Configuration.</li></ul> |
| policyOption | Specify the binding behavior when a new, potentially with a higher ranking, target service becomes available. Supported values are specified via ReferencePolicyOption enum:<ul><li>RELUCTANTIn case of OPTIONAL or MANDATORY cardinality, the new service is ignored for both STATIC and DYNAMIC policy (except if a service comes up for an OPTIONAL reference that is not bound yet). In case of MULTIPLE or AT_LEAST_ONE cardinality, the new service is ignored for the STATIC policy, and simply bound with the DYNAMIC policy.</li> <li>GREEDY In case of STATIC references a new service causes reactivation for any cardinality. In case of DYNAMIC references a binding is triggered. For OPTIONAL and MANDATORY this means rebinding in case there is already a bound service.</li></ul> |
| service | The full qualified class name of the referenced service.Typically this type element is not specified manually! |
| target | OSGi Framework filter expression to constrain the set of target services. It uses the LDAP Filter Syntax and is empty by default. |
| unbind | The name of the unbind method. |
| updated | The name of the updated event method, which is used to notify that a bound service has modified its properties. |
With DS 1.3 additional element types are added.
| Annotation Type Element | Description |
|---|---|
| bind | The name of the bind event method. Can be used to combine Field Strategy and Event Strategy, for example to only get the configuration properties map in the bind method. |
| field | The name of the field in the component implementation class that is used to hold the bound services. Typically this type element is not specified manually! |
| fieldOption | Specify how the field value needs to be managed with the Field Strategy. Supported values are specified via FieldOption enum:<ul><li>REPLACESCR must set the field value. Values set by the constructor are overwritten. This is the default value. Static references and unary dynamic references must use this option.</li> <li>UPDATE SCR must update the collection set in the field. It will update the content, not replace the collection instance. This way it is possible to choose the Collection implementation that should be used to track the service references. Can only be used for dynamic references with MULTIPLE or AT_LEAST_ONE cardinality.</li></ul> |
| scope | The reference scope for this reference. Supported values are specified via ReferenceScope enum:<ul><li>BUNDLEAll activated components within a bundle must uses the same service object.</li> <li>PROTOTYPE Each activated component instance may use a single, distinct service object.</li> <li>PROTOTYPE_REQUIRED Each activated component instance must use a single, distinct service object.</li></ul> |
Note:
The so called Target Property of a reference, to filter by properties additionally to the service interface, can also be configured dynamically via ConfigurationAdmin, which I will cover in a follow up blog post.
At last here are four snippets to show the usage of @Reference with different strategies:
Event Strategy
@Component(
    property= {
        "osgi.command.scope:String=fipro",
        "osgi.command.function:String=invert"},
    service=StringInverterCommand.class
)
public class StringInverterCommand {

    private StringInverter inverter;

    @Reference
    void setStringInverter(StringInverter inverter) {
        this.inverter = inverter;
    }

    // Note: static reference, therefore no unbind method needed

    public void invert(String input) {
        System.out.println(inverter.invert(input));
    }
}
Lookup Strategy (DS 1.2)
@Component(
    property= {
        "osgi.command.scope:String=fipro",
        "osgi.command.function:String=invert"},
    service=StringInverterCommand.class
)
public class StringInverterCommand {

    private ComponentContext context;
    private ServiceReference<StringInverter> reference;

    @Activate
    void activate(ComponentContext context) {
        this.context = context;
    }

    @Reference
    void setStringInverter(ServiceReference<StringInverter> reference) {
        this.reference = reference;
    }

    public void invert(String input) {
        StringInverter inverter =
            context.locateService("StringInverter", reference);
        if (inverter != null) {
            System.out.println(inverter.invert(input));
        } else {
            System.out.println("StringInverter not available!");
        }
    }
}
Lookup Strategy (DS 1.3)
@Component(
    property= {
        "osgi.command.scope:String=fipro",
        "osgi.command.function:String=invert"},
    service=StringInverterCommand.class,
    reference=@Reference(name="inverter", service=StringInverter.class)
)
public class StringInverterCommand {

    private ComponentContext context;

    @Activate
    void activate(ComponentContext context) {
        this.context = context;
    }

    public void invert(String input) {
        StringInverter inverter =
            (StringInverter) context.locateService("inverter");
        if (inverter != null) {
            System.out.println(inverter.invert(input));
        } else {
            System.out.println("StringInverter not available!");
        }
    }
}
Field Strategy (DS 1.3)
@Component(
    property= {
        "osgi.command.scope:String=fipro",
        "osgi.command.function:String=invert"},
    service=StringInverterCommand.class
)
public class StringInverterCommand {

    @Reference
    private StringInverter inverter;

    public void invert(String input) {
        System.out.println(inverter.invert(input));
    }
}
Finish
Now I’m done with this blog post. It has become much longer than I initially planned, but well, there are also a lot of information I gathered the last months. And I still haven’t blogged about everything. Next up will be the configuration of components via ConfigurationAdmin and the deployment of the components with different OSGi implementations.
I hope you enjoyed following my blog post and it gives you the necessary information to get started with OSGi Declarative Services (in Eclipse and plain OSGi). If you find something incorrect it would be great if you contact me, so I am able to update the information accordingly.
The sources for this tutorial are hosted on GitHub:
In the following list you can find most of the links to resources that I used to gather the information in this tutorial. As I come across different blog posts, forum discussions, mailing lists, Google Groups and Stackoverflow posts, I can’t link all of them.
- https://www.osgi.org/developer/specifications/
- http://bndtools.org/tutorial.html
- https://www.osgi.org/developer/architecture/
- https://enrouteclassic.github.io/doc/100-about-osgi.html
- https://enrouteclassic.github.io/doc/215-sos.html
- https://enrouteclassic.github.io/services/org.osgi.service.component.html
- http://www.aqute.biz/Bnd/Components