
Configuring OSGi Declarative Services
In my blog post about Getting Started with OSGi Declarative Services I provided an introduction to OSGi declarative services. How to create them, how they behave at runtime, how to reference other services, and so on. But I left out an important topic there: configuring OSGi components. Well to be precise I mentioned it, and one sort of configuration was also used in the examples, but it was not explained in detail. As there are multiple aspects with regards to component configuration I wanted to write a blog post that is dedicated to that topic, and here it is.
After reading this blog post you should have a deeper understanding of how OSGi components can be configured.
Basics
A component can be configured via Component Properties. Properties are key-value-pairs that can be accessed via Map<String, Object>. With DS 1.3 the Component Property Types are introduced for type safe access to Component Properties.
Component Properties can be defined in different ways:
- inline
- via Java properties file
- via OSGi Configuration Admin
- via argument of the
ComponentFactory.newInstancemethod (only for factory components, and as I didn’t cover them in the previous blog post, I won’t cover that topic here aswell)
Component Properties that are defined inline or via properties file can be overridden by using the OSGi Configuration Admin or the ComponentFactory.newInstance argument. Basically the property propagation is executed sequentially. Therefore it is even possible to override inline properties with properties from a properties file, if the properties file is specified after the inline properties.
The SCR (Service Component Runtime) always adds the following Component Properties that can’t be overridden:
- component.name - The component name.
- component.id - A unique value (
Long) that is larger than all previously assigned values. These values are not persistent across restarts.
In a life cycle method (activate/modified/deactivate) you can get the Component Properties via method parameter. The properties that are retrieved in event methods for referencing other services (bind/updated/unbind) are called Service Properties. The SCR performs a property propagation in that case, which means that all non-private Component Properties are propagated as Service Properties. To mark a property as private, the property name needs to be prefixed with a full stop (‘.’).
First I will explain how to specify Component Properties in different ways. I will use a simple example that inspects the properties in a life cycle method. After that I will show some examples on the usage of properties of service references.
Let’s start to create a new project for the configurable components:
- Create a new Plug-in Project via File -> New -> Plug-in Project. (Plug-in Perspective needs to be active)
- Set the Plug-in name to org.fipro.ds.configurable
- Press Next
- Ensure that no Activator is generated, no UI contributions will be added and that no Rich Client Application is created
- Press Finish
- Open the MANIFEST.MF file and switch to the Dependencies tab
- Add the following dependency on the Imported Packages side:
- org.osgi.service.component.annotations (1.2.0)
- Mark org.osgi.service.component.annotations as Optional via Properties… to ensure there are no runtime dependencies. We only need this dependency at build time.
- Create the package org.fipro.ds.configurable
Inline Component Properties
You can add Component Properties to a declarative service component via the @Component annotation property type element. The value of that annotation type element is an array of Strings, which need to be given as key-value pairs in the format _
The following types are supported:
String (default)BooleanByteShortIntegerLongFloatDoubleCharacter
There are typically two use cases for specifying Component Properties inline:
- Define default values for Component Properties
- Specify some sort of meta-data that is examined by referencing components
Of course the same applies for Component Properties that are applied via Properties file, as they have an equal ranking.
- Create a new class
StaticConfiguredComponentlike shown below. It is a simple Immediate Component with the Component Properties message and iteration, where message is a String and iteration is an Integer value. In the@Activatemethod the Component Properties will be inspected and the message will be printed out to the console as often as specified in iteration. Remember that it is an Immediate Component, as it doesn’t implement an interface and it doesn’t specify the service type element.
package org.fipro.ds.configurable;

import java.util.Map;
import org.osgi.service.component.annotations.Activate;
import org.osgi.service.component.annotations.Component;

@Component(
    property = {
         "message=Welcome to the inline configured service", "iteration:Integer=3"
    }
)
public class StaticConfiguredComponent {

	@Activate
	void activate(Map<String, Object> properties) {
		String msg = (String) properties.get("message");
		Integer iter = (Integer) properties.get("iteration");

		for (int i = 1; i <= iter; i++) {
			System.out.println(i + ": " + msg);
		}
		System.out.println();
	}
}
Now execute the example as a new OSGi Framework run configuration (please have a look at Getting Started with OSGi Declarative Services - 6. Run to see how to setup such a configuration). If you used the same property values as specified in the above example, you should see the welcome message printed out 3 times to the console.
It is for sure not a typical use case to inspect the inline specified properties at activation time. But it should give an idea on how to specify Component Properties statically inline via @Component.
Component Properties from resource files
Another way specify Component Properties statically is to use a Java Properties File that is located inside the bundle. It can be specified via the @Component annotation properties type element, where the value needs to be an entry path relative to the root of the bundle.
- Create a simple properties file named config.properties inside the OSGI-INF folder of the org.fipro.ds.configurable bundle.
message=Welcome to the file configured service
iteration=4
- Create a new class
FileConfiguredComponentlike shown below. It is a simple Immediate Component like the one before, getting the Component Properties message and iteration from the properties file.
package org.fipro.ds.configurable;

import java.util.Map;
import org.osgi.service.component.annotations.Activate;
import org.osgi.service.component.annotations.Component;

@Component( properties="OSGI-INF/config.properties" )
public class FileConfiguredComponent {

	@Activate
	void activate(Map<String, String> properties) {
		String msg = (String) properties.get("message");
		String iter = (String) properties.get("iteration");

		if (msg != null && iter != null) {
			Integer count = Integer.valueOf(iter);
			for (int i = 1; i <= count; i++) {
				System.out.println(i + ": " + msg);
			}
			System.out.println();
		}
	}
}
- Add the OSGI-INF/config.properties file to the build.properties to include it in the resulting bundle jar file. This is of course only necessary in case you haven’t added the whole directory to the build.properties.
On executing the example you should now see the console outputs for both components.
I’ve noticed two things when playing around with the Java Properties File approach:
- Compared with the inline properties it is not possible to specify a type. You can only get Strings, which leads to manual conversions (at least before DS 1.3 - see below).
- The properties file needs to be located in the same bundle as the component. It can not be added via fragment.
Having these two facts in mind, there are not many use cases for this approach. IMHO this approach was intended to support client specific properties that are for example placed inside the bundle in the build process.
Bndtools vs. PDE
- Create the config.properties file in the project root
-
Add the
-includeresourceinstruction to the bnd.bnd file This is necessary to include the config.properties file to the resulting bundle jar file. The instruction should look similar to the following snippet to specify the destination and the source.-includeresource: OSGI-INF/config.properties=config.propertiesNote: The destination is on the left side of the assignment and the source is on the right. If only the source is specified (that means no assignment), the file is added to the bundle root without the folder where it is included in the sources.
Component Properties via OSGi Configuration Admin
Now let’s have a look at the dynamic configuration by using the OSGi Configuration Admin. For this we create a new component, although it would not be necessary, as we could also use one of the examples before (remember that we could override the statically defined Component Properties dynamically via the Configuration Admin). But I wanted to start with creating a new component, to have a class that can be directly compared with the previous ones.
To specify properties via Configuration Admin it is not required to use any additional type element. You only need to know the configuration PID of the component to be able to provide a configuration object for it. The configuration PID (Persistent IDentity) is used as a key for objects that need a configuration dictionary. With regards to the Component Configuration this means, we need the configuration PID to be able to provide the configuration object for the component.
The PID can be specified via the configurationPid type element of the @Component annotation. If not specified explicitly it is the same as the component name, which is the fully qualified class name, if not explicitly set to another value.
Via the configurationPolicy type element it is possible to configure the relationship between component and component configuration, e.g. whether there needs to be a configuration object provided via Configuration Admin to satisfy the component. The following values are available:
ConfigurationPolicy.OPTIONALUse the corresponding configuration object if present, but allow the component to be satisfied even if the corresponding configuration object is not present. This is the default value.ConfigurationPolicy.REQUIREThere must be a corresponding configuration object for the component configuration to become satisfied. This means that there needs to be a configuration object that is set via Configuration Admin before the component is satisfied and therefore can be activated. With this policy it is for example possible to control the startup order or component activation based on configurations.ConfigurationPolicy.IGNOREAlways allow the component configuration to be satisfied and do not use the corresponding configuration object even if it is present. This basically means that the Component Properties can not be changed dynamically using the Configuration Admin.
If a configuration change happens at runtime, the SCR needs to take actions based on the configuration policy. Configuration changes can be creating, modifying or deleting configuration objects. Corresponding actions can be for example that a Component Configuration becomes unsatisfied and therefore Component Instances are deactivated, or to call the modified life cycle method, so the component is able to react on a change.
To be able to react on a configuration change at runtime, a method to handle the modified life cycle can be implemented. Using the DS annotations this can be done by using the @Modified annotation, where the method parameters can be the same as for the other life cycle methods (see the Getting Started Tutorial for further information on that).
Note:
If you do not specify a modified life cycle method, the Component Configuration is deactivated and afterwards activated again with the new configuration object. This is true for the configuration policy require as well as for the configuration policy optional.
Now create a component similar to the previous ones, that should only be satisfied if a configuration object is provided via the Configuration Admin. It should also be prepared to react on configuration changes at runtime. Specify an alternative configuration PID so it is not necessary to use the full qualified class name of the component.
- Create a new class
AdminConfiguredComponentlike shown below. It is an Immediate Component that prints out a message for a specified number of iterations.- Specify the configuration PID AdminConfiguredComponent so it is not necessary to use the full qualified class name of the component when trying to configure it.
- Set the configuration policy REQUIRE, so the component will only be activated once a configuration object is set by the Configuration Admin.
- Add life cycle methods for modified and deactivate to be able to play around with different scenarios.
package org.fipro.ds.configurable;

import java.util.Map;
import org.osgi.service.component.annotations.Activate;
import org.osgi.service.component.annotations.Component;
import org.osgi.service.component.annotations.ConfigurationPolicy;
import org.osgi.service.component.annotations.Deactivate;
import org.osgi.service.component.annotations.Modified;

@Component(
    configurationPid = "AdminConfiguredComponent",
    configurationPolicy = ConfigurationPolicy.REQUIRE )
public class AdminConfiguredComponent {

	@Activate
	void activate(Map<String, Object> properties) {
		System.out.println();
		System.out.println("AdminConfiguredComponent activated");
		printMessage(properties);
	}

	@Modified
	void modified(Map<String, Object> properties) {
		System.out.println();
		System.out.println("AdminConfiguredComponent modified");
		printMessage(properties);
	}

	@Deactivate
	void deactivate() {
		System.out.println("AdminConfiguredComponent deactivated");
		System.out.println();
	}

	private void printMessage(Map<String, Object> properties) {
		String msg = (String) properties.get("message");
		Integer iter = (Integer) properties.get("iteration");

		if (msg != null && iter != null) {
			for (int i = 1; i <= iter; i++) {
				System.out.println(i + ": " + msg);
			}
		}
	}
}
If we now execute our example, we will see nothing new. The reason is of course that there is no configuration object yet provided by the Configuration Admin.
Before we are able to do this we need to prepare our environment. That means that we need to install the Configuration Admin Service to the Eclipse IDE or the used Target Platform, as it is not part of the default installation.
To install the Configuration Admin to the Eclipse IDE you need to perform the following steps:
- Select Help -> Install New Software… from the main menu
- Select the Neon - http://download.eclipse.org/releases/neon repository (assuming you are following the tutorial with Eclipse Neon, otherwise use the matching update site)
- Disable Group items by category
- Filter for Equinox
- Select the _Equinox Compendium SDK
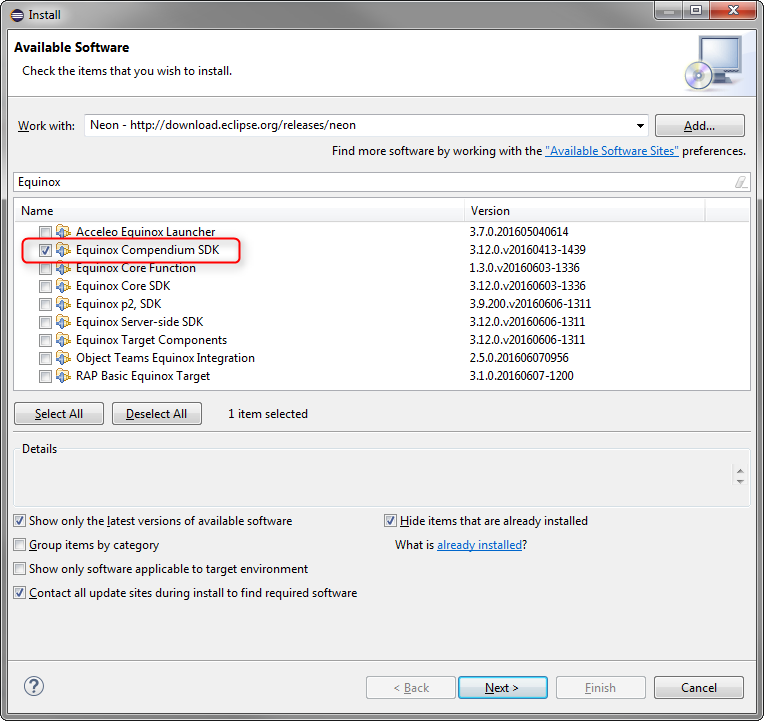
- Click Next
- Click Next
- Accept the license agreement and Finish
- Restart the Eclipse IDE to safely apply the changes
Now we can create a Gogo Shell command that will be used to change a configuration object at runtime.
- Open MANIFEST.MF of org.fipro.ds.configurable
- Add
org.osgi.service.cmto the Imported Packages
- Add
- Create a new package org.fipro.ds.configurable.command
- Create a new class
ConfigureServiceCommandin that package that looks similar to the following snippet. It is a Delayed Component that will be registered as a service for theConfigureCommandclass. It has a reference to theConfigurationAdminservice, which is used to create/get theConfigurationobject for the PID AdminConfiguredComponent and updates the configuration with the given values.
package org.fipro.ds.configurable.command;

import java.io.IOException;
import java.util.Hashtable;

import org.osgi.service.cm.Configuration;
import org.osgi.service.cm.ConfigurationAdmin;
import org.osgi.service.component.annotations.Component;
import org.osgi.service.component.annotations.Reference;

@Component(
    property = {
        "osgi.command.scope=fipro",
        "osgi.command.function=configure"
    },
    service=ConfigureCommand.class )
public class ConfigureCommand {

	ConfigurationAdmin cm;

	@Reference
	void setConfigurationAdmin(ConfigurationAdmin cm) {
		this.cm = cm;
	}

	public void configure(String msg, int count) throws IOException {
		Configuration config = cm.getConfiguration("AdminConfiguredComponent");
		Hashtable<String, Object> props = new Hashtable<>();
		props.put("message", msg);
		props.put("iteration", count);
		config.update(props);
	}
}
Note:
The ConfigurationAdmin reference is a static reference. Therefore it doesn’t need an unbind method. If you follow the example with Eclipse Neon you will probably see an error mentioning the missing unbind method. Either implement the unbind method for now or disable the error via Preferences. This is fixed with Eclipse Oxygen M2.
Note:
The two Component Properties osgi.command.scope and osgi.command.function are specified inline. These are necessary so the Apache Gogo Shell recognizes the component as a service that can be triggered by entering the corresponding values as a command to the console. This shows the usage of Component Properties as additional meta-data that is examined by other components. Also note that we need to set the service type element, as only services can be referenced by other components.
To execute the example you need to include the org.eclipse.equinox.cm bundle to the Run configuration.
On executing the example you should notice that the AdminConfiguredComponent is not activated on startup, although it is an Immediate Component. Now execute the following command on the console: configure foo 2
As a result you should get an output like this:
AdminConfiguredComponent activated
1: foo
2: foo
If you execute the command a second time with different parameters (e.g. configure bar 3), the output should change to this:
AdminConfiguredComponent modified
1: bar
2: bar
3: bar
The component gets activated after we created a configuration object via the Configuration Admin. The reason for this is ConfigurationPolicy.REQUIRED which means that there needs to be a configuration object for the component configuration in order to be satisfied. Subsequent executions change the configuration object, so the modified method is called then. Now you can play around with the implementation to get a better feeling. For example, remove the modified method and see how the component life cycle handling changes on configuration changes.
Note:
To start from a clean state again you need to check the option Clear the configuration area before launching in the Settings tab of the Run configuration.
Using the modified life cycle event enables to react on configuration changes inside the component itself. To be able to react to configuration changes inside components that reference the service, the updated event method can be used.
- Create a simple component that references the
AdminConfiguredComponentto test this:
package org.fipro.ds.configurable;

import java.util.Map;

import org.osgi.service.component.annotations.Activate;
import org.osgi.service.component.annotations.Component;
import org.osgi.service.component.annotations.Deactivate;
import org.osgi.service.component.annotations.Modified;
import org.osgi.service.component.annotations.Reference;

@Component
public class AdminReferencingComponent {

	AdminConfiguredComponent component;

	@Activate
	void activate() {
		System.out.println("AdminReferencingComponent activated");
	}

	@Modified
	void modified() {
		System.out.println("AdminReferencingComponent modified");
	}

	@Deactivate
	void deactivate() {
		System.out.println("AdminReferencingComponent deactivated");
	}

	@Reference
	void setAdminConfiguredComponent(
            AdminConfiguredComponent comp,
            Map<String, Object> properties) {
		System.out.println("AdminReferencingComponent: set service");
		printMessage(properties);
	}

	void updatedAdminConfiguredComponent(
            AdminConfiguredComponent comp,
            Map<String, Object> properties) {
		System.out.println("AdminReferencingComponent: update service");
		printMessage(properties);
	}

	void unsetAdminConfiguredComponent( AdminConfiguredComponent comp) {
		System.out.println("AdminReferencingComponent: unset service");
	}

	private void printMessage(Map<String, Object> properties) {
		String msg = (String) properties.get("message");
		Integer iter = (Integer) properties.get("iteration");
		System.out.println("\[" + msg + "|" + iter + "\]");
	}
}
- Configure the
AdminConfiguredComponentto be a service component by adding the attribute service=AdminConfiguredComponent.class to the@Componentannotation. Otherwise it can not be referenced.
@Component(
    configurationPid = "AdminConfiguredComponent",
    configurationPolicy = ConfigurationPolicy.REQUIRE,
    service=AdminConfiguredComponent.class )
public class AdminConfiguredComponent {
Now execute the example and call the configure command two times. The result should look similar to this:
osgi> configure blubb 2
AdminConfiguredComponent activated
1: blubb
2: blubb
AdminReferencingComponent: set service [blubb|2]
AdminReferencingComponent activated
osgi> configure dingens 3
AdminConfiguredComponent modified
1: dingens
2: dingens 3: dingens
AdminReferencingComponent: update service [dingens|3]
Calling the configure command the first time triggers the activation of the AdminConfiguredComponent, which then can be bound to the AdminReferencingComponent, which is satisfied and therefore can be activated afterwards. The second execution of the configure command triggers the modified life cycle event of the AdminConfiguredComponent and the updated event method of the AdminReferencingComponent.
If you ask yourself why the AdminConfiguredComponent is still immediately activated, although we made it a service now, the answer is, because it is referenced by an Immediate Component. Therefore the target services need to be bound, which means the referenced services need to be activated too.
This example is also helpful in getting a better understanding of the component life cycle. For example, if you remove the modified life cycle method from the AdminConfiguredComponent and call the configure command subsequently, both components get deactivated and activated, which results in new instances. Modifying the @Reference attributes will also lead to different results then. Change the cardinality, the policy and the policyOption to see the different behavior. Making the service reference OPTIONAL|DYNAMIC|GREEDY results in only re-activating the AdminConfiguredComponent but keeping the AdminReferencingComponent in active state. Changing it to OPTIONAL|STATIC|GREEDY will lead to re-activation of both components, while setting it OPTIONAL|STATIC|RELUCTANT any changes will be ignored, and actually nothing happens as the AdminReferencingComponent never gets satisfied, and therefore the AdminConfiguredComponent never gets activated.
The correlation between cardinality, reference policy and reference policy option is explained in detail in the OSGi Compendium Specification (table 112.1 in chapter 112.3.7 Reference Policy Option in Specification Version 6).
Location Binding
Some words about location binding here. The example above created a configuration object using the single parameter version of ConfigurationAdmin#getConfiguration(String). The parameter specifies the PID for which a configuration object is requested or should be created. This means that the configuration is bound to the location of the calling bundle. It then can not be consumed by other bundles. So the method is used to ensure that only the components inside the same bundle are affected.
A so-called bound configuration object is sufficient for the example above, as all created components are located in the same bundle. But there are also other cases where for example a configuration service in another bundle should be used to configure the components in all bundles of the application. This can be done by creating an unbound configuration object using the two argument version of ConfigurationAdmin#getConfiguration(String, String). The first parameter is the PID and the second parameter specifies the bundle location string.
Note:
The location parameter only becomes important if a configuration object will be created. If a configuration for the given PID already exists in the ConfigurationAdmin service, the location parameter will be ignored and the existing object will be returned.
You can use different values for the location argument:
-
Exact bundle location identifier
In this case you explicitly specify the location identifier of the bundle to which the configuration object should be bound. The location identifier is set when a bundle is installed and typically it is a file URL that points to the bundle jar. It is impossible to have that hard coded and work across multiple installations. But you could retrieve it via a snippet similar to this:Bundle adminBundle = FrameworkUtil.getBundle(AdminConfiguredComponent.class); String location = adminBundle.getLocation();But doing this introduces a dependency to the bundle that should be configured, which is typically not a good practice.
- null
The location value for the binding will be set when a service with the corresponding PID is registered the first time. Note that this could lead to issues if you have multiple services with the same PID in different bundles. In that case only the services in the first bundle that requests a configuration object would be able to get it because of the binding. -
Multi-locations
By using a multi-location binding, the configurations are dispatched to any target that has visibility to the configuration. A multi-location is specified with a leading question mark. It is possible to use only the question mark or adding a multi-location name behind the question mark, e.g.Configuration config = cm.getConfiguration("AdminConfiguredComponent", "?");Configuration config = cm.getConfiguration("AdminConfiguredComponent", "?org.fipro");Note:
The multi-location name only has importance in case security is turned on and a ConfigurationPermission is specified. Otherwise it doesn’t has an effect. That means, it can not be used to restrict the targets based on the bundle symbolic name without security turned on.
Note:
The Equinox DS implementation has some bugs with regards to location binding. Basically the location binding is ignored. I had a discussion on Stackoverflow (thanks again to Neil Bartlett) and created the ticket Bug 493637 to address that issue. I also created Bug 501898 to report that multi-location binding doesn’t work.
To get familiar with the location binding basics create two additional bundles:
- Create the bundle org.fipro.ds.configurator
- Open the MANIFEST.MF file and switch to the Dependencies tab
- Add the following dependencies on the Imported Packages side:
- org.osgi.service.cm
- org.osgi.service.component.annotations (1.2.0)
- Mark org.osgi.service.component.annotations as Optional
- Create the package org.fipro.ds.configurator
- Create the class
ConfCommand- Copy the
ConfigureCommandimplementation - Change the property value for osgi.command.function to conf
- Change the method name from
configuretoconfto match the osgi.command.function property
- Copy the
- Create the bundle org.fipro.ds.other
- Open the MANIFEST.MF file and switch to the Dependencies tab
- Add the following dependency on the Imported Packages side:
- org.osgi.service.component.annotations (1.2.0)
- Mark org.osgi.service.component.annotations as Optional
- Create the package org.fipro.ds.other
- Create the class
OtherConfiguredComponent- Copy the
AdminConfiguredComponentimplementation - Change the console outputs to show the new class name
- Ensure that it is an Immediate Component (i.e. remove the service property or add the immediate property)
- Ensure that configurationPID and configurationPolicy are the same as in
AdminConfiguredComponent
- Copy the
Use three different scenarios:
- Use the single parameter
getConfiguration(String)
Calling the conf command on the console will result in nothing. As the configuration object is bound to the bundle of the command, the other bundles don’t see it and the contained components don’t get activated. - Use the double parameter
getConfiguration(String, String)where location == null
Only the component(s) of one bundle will receive the configuration object, as it will be bound to the bundle that first registers a service for the corresponding PID. - Use the double parameter
getConfiguration(String, String)where location == “?”
The components of both bundles will receive the configuration object, as it is dispatched to all bundles that have visibility to the configuration. And as we didn’t mention and configure permissions, all our bundles receive it.
Note:
Because of the location binding issues in Equinox DS (see above), the examples doesn’t work using it. For testing I replaced Equinox DS with Apache Felix SCR in the Run Configuration, which worked well. To make this work just download SCR (Declarative Services) from the Apache Felix Download page and put it in the dropins folder of your Eclipse installation. After restarting the IDE you are able to select org.apache.felix.scr as bundle in the Run Configuration. Remember to remove org.eclipse.equinox.ds to ensure that only one SCR implementation is running.
Bndtools vs. PDE
For the org.fipro.ds.configurable bundle you need to add the package org.fipro.ds.configurable.command to the Private Packages in the bnd.bnd file. Otherwise it will not be part of the resulting bundle.
While we needed to add the Import-Package statement for org.osgi.service.cm manually in PDE, that import is automatically calculated by Bndtools. So at that point there is no action necessary. Only the launch configuration needs to be updated manually to include the Configuration Admin bundle.
- Open the launch.bndrun file
- On the Run tab click on Resolve
- Verify the values values shown in the opened dialog in the Required Resources section
- Click Finish
If you change a component class while the example is running, you will notice that the OSGi framework automatically restarts and the values set before via Configuration Admin are gone. This is because the Bndtools OSGi Framework launch configuration has two options enabled by default on the OSGi tab:
- Framework: Update bundles during runtime.
- Framework: Clean storage area before launch.
To test the behavior of components in case of persisted configuration values, you need to disable these settings.
DS 1.3
A new feature added to the DS 1.3 specification are the Component Property Types. They can be used as alternative to the component property Map<String, Object> parameter for retrieving the Configuration Properties in a life cycle method. The Component Property Type is specified as a custom annotation type, that contains property names, property types and default values. The following snippet shows the definition of such an annotation for the above examples:
package org.fipro.ds.configurable;

public @interface MessageConfig {
	String message() default "";
	int iteration() default 0;
 }
Most of the examples found in the web show the definition of the annotation inside the component class. But of course it is also possible to create a public annotation in a separate file so it is reusable in multiple components.
The following snippet shows one of the examples above, modified to use a Component Property Type instead of the property Map<String, Object>.
package org.fipro.ds.configurable;

import java.util.Map;
import org.osgi.service.component.annotations.Activate;
import org.osgi.service.component.annotations.Component;

@Component(
    property = {
        "message=Welcome to the inline configured service",
        "iteration:Integer=3"
    }
)
public class StaticConfiguredComponent {

	@Activate
	void activate(MessageConfig config) {
		String msg = config.message(); int iter = config.iteration();

		for (int i = 1; i <= iter; i++) {
			System.out.println(i + ": " + msg);
		}
	}
}
Note:
If properties are needed that are not specified in the Component Property Type, you can have both as method arguments. Since DS 1.3 there are different method signatures supported, including the combination of Component Property Type and the component property Map<String, Object>.
Although the Component Property Type is defined as an annotation type, it is not used as an annotation. The reasons for choosing annotation types are:
- Limitations on annotation type definitions match component property types (no-argument methods and limited return types supported)
- Support of default values
As Component Property Types are intended to be type safe, an automatic conversion happens. This is also true for Component Properties that are specified via Java Properties files.
To set configuration values via ConfigurationAdmin service you still need to operate on a Dictionary, which means you need to know the parameter names. But of course on setting the values you are type safe.
Another new feature in DS 1.3 is that you can specify multiple configuration PIDs for a component. This way it is for example possible to specify configuration objects for multiple components that share a common PID, while at the same time having a specific configuration object for a single component. To specify multiple configuration PIDs and still keep the default (that is the component name), the placeholder “$” can be used. By adding the following property to the StaticConfiguredComponent and the FileConfiguredComponent created before, the execution of the configure command will update all three components at once.
@Component( configurationPid = {"$", "AdminConfiguredComponent"}, ... )
Note that we don’t update the configurationPid value of AdminConfiguredComponent. The reason for this is that we use the configuration policy REQUIRE, which means that the component only gets satisfied if there are configuration objects available for BOTH configuration PIDs. And our example does not create a configuration object for the default PID of the AdminConfiguredComponent.
The order of the configuration PIDs matters with regards to property propagation. The configuration object for a PID at the end overrides values that were applied by another configuration object for a PID before. This is similar to the propagation of inline properties or property files. The processing is sequential and therefore later processed instructions override previous ones.
Service Properties
As initially explained there is a slight difference between Component Properties and Service Properties. Component Properties are all properties specified for a component that can be accessed in life cycle methods via method parameter. Service Properties can be retrieved via Event Methods (bind/updated/unbind) or since DS 1.3 via field strategy. They contain all public Component Properties, which means all excluding those whose property names start with a full stop. Additionally some service properties are added that are intended to give additional information about the service. These properties are prefixed with service, set by the framework and specified in the OSGi Core Specification (service.id, service.scope and service.bundeid).
To play around with Service Properties we set up another playground. For this create the following bundles to simulate a data provider service:
- API bundle
- Create the bundle org.fipro.ds.data.api
-
Add the following service interface
package org.fipro.ds.data; public interface DataService { /** * @param id The id of the requested data value. * @return The data value for the given id. */ String getData(int id); } - Modify the MANIFEST.MF to export the package
- Online data service provider bundle
- Create the bundle org.fipro.ds.data.online
- Add the necessary package import statements to the MANIFEST.MF
-
Create the following simple service implementation, that specifies the property fipro.connectivity=online for further use
  package org.fipro.ds.data.online;

  import org.fipro.ds.data.DataService;
  import org.osgi.service.component.annotations.Component;

  @Component(property="fipro.connectivity=online")
  public class OnlineDataService implements DataService {

      @Override
      public String getData(int id) {
      	return "ONLINE data for id " + id;
      }
  }
- Offline data service provider bundle
- Create the bundle org.fipro.ds.data.offline
- Add the necessary package import statements to the MANIFEST.MF
-
Create the following simple service implementation, that specifies the property fipro.connectivity=offline for further use
  package org.fipro.ds.data.offline;

  import org.fipro.ds.data.DataService;
  import org.osgi.service.component.annotations.Component;

  @Component(property="fipro.connectivity=offline")
  public class OfflineDataService implements DataService {

      @Override
      public String getData(int id) {
      	return "OFFLINE data for id " + id;
      }
  }
Note:
For Java best practices you would of course specify the property name and the possible values as constants in the API bundle to prevent typing errors.
To be able to interact with the data provider services, we create an additional console command in the bundle that references the services and shows the retrieved data on the console on execution. Add it to the bundle org.fipro.ds.configurator or create a new bundle if you skipped the location binding example.
package org.fipro.ds.configurator;

import java.util.ArrayList;
import java.util.List;
import java.util.Map;

import org.fipro.ds.data.DataService;
import org.osgi.service.component.annotations.Component;
import org.osgi.service.component.annotations.Reference;
import org.osgi.service.component.annotations.ReferenceCardinality;
import org.osgi.service.component.annotations.ReferencePolicy;

@Component(
    property= {
        "osgi.command.scope:String=fipro",
        "osgi.command.function:String=retrieve"
    },
    service=DataRetriever.class
)
public class DataRetriever {

	private List<DataService> dataServices = new ArrayList<>();

	@Reference( cardinality=ReferenceCardinality.MULTIPLE, policy=ReferencePolicy.DYNAMIC )
        void addDataService( DataService service, Map<String, Object> properties) {
		this.dataServices.add(service);
		System.out.println( "Added " + service.getClass().getName());
	}

	void removeDataService(DataService service) {
		this.dataServices.remove(service);
		System.out.println( "Removed " + service.getClass().getName());
	}

	public void retrieve(int id) {
		for (DataService service : this.dataServices) {
			System.out.println(service.getData(id));
		}
	}
}
Add the new bundles to an existing Run Configuration and execute it. By calling the retrieve command on the console you should get an output similar to this:
osgi> retrieve 3
OFFLINE data for id 3
ONLINE data for id 3
Nothing special so far. Now let’s modify the example to verify the Service Properties.
-
Modify
DataRetriever#addDataService()to print the given properties to the console@Reference( cardinality=ReferenceCardinality.MULTIPLE, policy=ReferencePolicy.DYNAMIC ) void addDataService( DataService service, Map<String, Object> properties) { this.dataServices.add(service); System.out.println("Added " + service.getClass().getName()); properties.forEach((k, v) -> { System.out.println(k+"="+v); }); System.out.println(); } -
Start the example and execute the retrieve command. The result should now look like this:
  osgi> retrieve 3
  org.fipro.ds.data.offline.OfflineDataService
  fipro.connectivity=offline
  component.id=3
  component.name=org.fipro.ds.data.offline.OfflineDataService
  service.id=51
  objectClass=[Ljava.lang.String;@1403f0fa
  service.scope=bundle
  service.bundleid=5

  org.fipro.ds.data.online.OnlineDataService
  fipro.connectivity=online
  component.id=4
  component.name=org.fipro.ds.data.online.OnlineDataService
  service.id=52
  objectClass=[Ljava.lang.String;@c63166
  service.scope=bundle
  service.bundleid=6

  OFFLINE data for id 3
  ONLINE data for id 3
The Service Properties contain the fipro.connectivity property specified by us, aswell as several properties that are set by the SCR.
Note: The
DataRetrieveris not in Immediate Component and therefore gets activated when the retrieve command is executed the first time. The target services are bound at activation time, therefore the setter is called at that time and not before. -
Modify the
OfflineDataService- Add an Activate life cycle method
- Add a property with a property name that starts with a full stop
  package org.fipro.ds.data.offline;

  import java.util.Map;

  import org.fipro.data.Constants;
  import org.fipro.data.DataService;
  import org.osgi.service.component.annotations.Activate;
  import org.osgi.service.component.annotations.Component;

  @Component( property= { "fipro.connectivity=offline", ".private=private configuration" } )
  public class OfflineDataService implements DataService {

      @Activate
      void activate(Map<String, Object> properties) {
          System.out.println("OfflineDataService activated");
          properties.forEach((k, v) -> {
              System.out.println(k+"="+v);
          });
          System.out.println();
      }

      @Override
      public String getData(int id) {
          return "OFFLINE data for id " + id;
      }
  }
Execute the retrieve command again and verify the console output. You will notice that the output from the Activate life cycle method contains the .private property but no properties with a service prefix. The output from the bind event method on the other hand does not contain the .private property, as the leading full stop marks it as a private property.
  osgi> retrieve 3
  OfflineDataService activated
  objectClass=[Ljava.lang.String;@c60d42
  component.name=org.fipro.ds.data.offline.OfflineDataService
  component.id=3
  .private=private configuration
  fipro.connectivity=offline

  org.fipro.ds.data.offline.OfflineDataService
  fipro.connectivity=offline
  component.id=3
  component.name=org.fipro.ds.data.offline.OfflineDataService
  service.id=51
  objectClass=[Ljava.lang.String;@2b5d77a6
  service.scope=bundle
  service.bundleid=5

  ...
Service Ranking
In case multiple services of the same type are available, the service ranking is taken into account to determine which service will get bound. In case of multiple bindings the service ranking effects in which order the services are bound. The ranking order is defined as follows:
- Sorted on descending ranking order (highest first)
- If the ranking numbers are equal, sorted on ascending service.id property (oldest first)
As service ids are never reused and handed out in order of their registration time, the ordering is always complete.
The property service.ranking can be used to specify the ranking order and in case of OSGi components it can be specified as a Component Property via @Component where the value needs to be of type Integer. The default ranking value is zero if the property is not specified explicitly.
Modify the two DataService implementations to specify the initial service.ranking property.
@Component(
    property = {
        "fipro.connectivity=online",
        "service.ranking:Integer=7"
    }
)
public class OnlineDataService implements DataService { ...
@Component(
    property = {
        "fipro.connectivity=offline",
        "service.ranking:Integer=5",
        ".private=private configuration
    }
)
public class OfflineDataService implements DataService { ...
If you start the application and execute the retrieve command now, you will notice that the OnlineDataService is called first. Change the service.ranking of the OnlineDataService to 3 and restart the application. Now executing the retrieve command will first call the OfflineDataService.
To make this more obvious and show that the service ranking can also be changed dynamically, create a new DataGetter command in the org.fipro.ds.configurator bundle:
package org.fipro.ds.configurator;

import java.util.Map;

import org.fipro.ds.data.DataService;
import org.osgi.service.component.annotations.Component;
import org.osgi.service.component.annotations.Reference;
import org.osgi.service.component.annotations.ReferencePolicy;
import org.osgi.service.component.annotations.ReferencePolicyOption;

@Component(
    property= {
        "osgi.command.scope:String=fipro",
        "osgi.command.function:String=get"
    },
    service=DataGetter.class
)
public class DataGetter {

	private DataService dataService;

	@Reference( policy=ReferencePolicy.DYNAMIC, policyOption=ReferencePolicyOption.GREEDY )
        void setDataService(DataService service, Map<String, Object> properties) {
		this.dataService = service;
	}

	void unsetDataService(DataService service) {
		if (service == this.dataService) {
			this.dataService = null;
		}
	}

	public void get(int id) {
		System.out.println(this.dataService.getData(id));
	}
}
This command has a MANDATORY reference to a DataService. The policy option is set to GREEDY which is necessary to bind to a higher ranked service if available. The policy is set to DYNAMIC to avoid re-activation of the DataGetter component if a service changes. If you change the policy to STATIC, the binding to the higher ranked service is done by re-activating the component.
Note:
For dynamic references the unbind event method is mandatory. This is necessary because the component is not re-activated if the bound services change, which means there will be no new Component Instance. Therefore the Component Instance state needs to be secured in the unbind method. In our case we check if the current service reference is the same that should be unbound. In that case we set the reference to null, otherwise there is already another service bound.
Finally create a toggle command, which dynamically toggles the service.ranking property of OnlineDataService.
package org.fipro.ds.configurator;

import java.io.IOException;
import java.util.Dictionary;
import java.util.Hashtable;

import org.osgi.service.cm.Configuration;
import org.osgi.service.cm.ConfigurationAdmin;
import org.osgi.service.component.annotations.Component;
import org.osgi.service.component.annotations.Reference;

@Component(
    property= {
        "osgi.command.scope:String=fipro",
        "osgi.command.function:String=ranking"
    },
    service=ToggleRankingCommand.class
)
public class ToggleRankingCommand {

	ConfigurationAdmin admin;

	@Reference
	void setConfigurationAdmin(ConfigurationAdmin admin) {
		this.admin = admin;
	}

	public void ranking() throws IOException {
		Configuration configOnline =
                    this.admin.getConfiguration("org.fipro.ds.data.online.OnlineDataService", null);
		Dictionary<String, Object> propsOnline = null;
		if (configOnline != null && configOnline.getProperties() != null) {
			propsOnline = configOnline.getProperties();
		}
		else {
			propsOnline = new Hashtable<>();
		}

		int onlineRanking = 7;
		if (configOnline != null && configOnline.getProperties() != null) {
			Object rank = configOnline.getProperties().get("service.ranking");
			if (rank != null) {
				onlineRanking = (Integer)rank;
			}
		}

		// toggle between 3 and 7 onlineRanking = (onlineRanking == 7) ? 3 : 7;

		propsOnline.put("service.ranking", onlineRanking); configOnline.update(propsOnline);
		}
	}
Starting the example application the first time and executing the get command will return the ONLINE data. After executing the ranking command, the get command will return the OFFLINE data (or vice versa dependent on the initial state).
Note:
Equinox DS will log an error or warning to the console every second time. Probably an issue with processing the service reference update in Equinox DS. The example will still work, and if you replace Equinox DS with Felix SCR the message does not come up. So it looks like another Equinox DS issue.
Reference Properties
Reference Properties are special Component Properties that are associated with specific component references. They are used to configure component references more specifically. With DS 1.2 the target property is the only supported Reference Property. The reference property name needs to follow the pattern <reference_name>.<reference_property> so it can be accessed dynamically. The target property can be specified via the @Reference annotation on the bind event method via the target annotation type element. The value needs to be an LDAP filter expression and is used to select target services for the reference. The following example specifies a target property for the DataService reference of the DataRetriever command to only select target services which specify the Service Property fipro.connectivity with value online.
@Reference(
    cardinality=ReferenceCardinality.MULTIPLE,
    policy=ReferencePolicy.DYNAMIC,
    target="(fipro.connectivity=online)" )
If you change that in the example and execute the retrieve command in the console again, you will notice that only the OnlineDataService will be selected by the DataRetriever.
Specifying the target property directly on the reference is a static way of defining the filter. The registering of custom commands to the Apache Gogo Shell seems to work that way, as you can register any service to become a console command when the necessary properties are specified.
In a dynamic environment it needs to be possible to change the target property at runtime aswell. This way it is possible to react on changes to the environment for example, like whether there is an active internet connection or not. To change the target property dynamically you can use the ConfigurationAdmin service. For this the reference property name needs to be known. Following the pattern <reference_name>.<reference_property> this means for our example where reference_name = DataService reference_property = target the reference property name is DataService.target
To test this we implement a new command component in org.fipro.ds.configurator that allows us to toggle the connectivity state filter on the DataService reference target property.
package org.fipro.ds.configurator;

import java.io.IOException;
import java.util.Dictionary;
import java.util.Hashtable;

import org.osgi.service.cm.Configuration;
import org.osgi.service.cm.ConfigurationAdmin;
import org.osgi.service.component.annotations.Component;
import org.osgi.service.component.annotations.Reference;

@Component(
    property= {
        "osgi.command.scope:String=fipro",
        "osgi.command.function:String=toggle"
    },
    service=ToggleConnectivityCommand.class )
public class ToggleConnectivityCommand {

	ConfigurationAdmin admin;

	@Reference
	void setConfigurationAdmin(ConfigurationAdmin admin) { t
		his.admin = admin;
	}

	public void toggle() throws IOException {
		Configuration config =
                    this.admin.getConfiguration("org.fipro.ds.configurator.DataRetriever");

		Dictionary<String, Object> props = null;
		Object target = null;
		if (config != null && config.getProperties() != null) {
			props = config.getProperties();
			target = props.get("DataService.target");
		}
		else {
			props = new Hashtable<String, Object>();
		}

		boolean isOnline = (target == null || target.toString().contains("online"));

		// toggle the state
		StringBuilder filter = new StringBuilder("(fipro.connectivity=");
		filter.append(isOnline ? "offline" : "online").append(")");

		props.put("DataService.target", filter.toString());
		config.update(props);
	}
}
Some things to notice here:
- We use the default PID org.fipro.ds.data.configurator.DataRetriever to get a configuration object.
- We check if there is already an existing configuration. If there is an existing configuration we operate on the existing
Dictionary. Otherwise we create a new one. - We try to get the current state from the
Dictionary. - We create an LDAP filter String based on the retrieved information (or default if the configuration is created) and set it as reference target property.
- We update the configuration with the new values.
From my observation the reference policy and reference policy option doesn’t matter in that case. On changing the reference target property dynamically, the component gets re-activated to ensure a consistent state.
DS 1.3
With DS 1.3 the Minimum Cardinality Reference Property was introduced. Via this reference property it is possible to modify the minimum cardinality value at runtime. While it is only possible to specify the optionality via the @Reference cardinality attribute (this means 0 or 1), you can specify any positive number for MULTIPLE or AT_LEAST_ONE references. So it can be used for example to specify that at least 2 services of a special type needs to be available in order to satisfy the Component Configuration.
The name of the minimum cardinality property is the name of the reference appended with .cardinality.minimum. In our example this would be DataService.cardinality.minimum
Note:
The minimum cardinality can only be specified via the cardinality attribute of the reference element. So it is only possible to specify the optionality to be 0 or 1. To specify the minimum cardinality in an extended way, the minimum cardinality reference property needs to be applied via Configuration Admin.
Create a command component in org.fipro.ds.configurator to modify the minimum cardinality property dynamically. It should look like the following example:
package org.fipro.ds.configurator;

import java.io.IOException;
import java.util.Dictionary;
import java.util.Hashtable;

import org.osgi.service.cm.Configuration;
import org.osgi.service.cm.ConfigurationAdmin;
import org.osgi.service.component.annotations.Component;
import org.osgi.service.component.annotations.Reference;

@Component(
    property = {
        "osgi.command.scope=fipro",
        "osgi.command.function=cardinality"
    },
    service=ToggleMinimumCardinalityCommand.class
)
public class ToggleMinimumCardinalityCommand {

	@Reference
	ConfigurationAdmin admin;

	public void cardinality(int count) throws IOException {
		Configuration config =
                    this.admin.getConfiguration("org.fipro.ds.configurator.DataRetriever");

		Dictionary<String, Object> props = null;
		if (config != null && config.getProperties() != null) {
		    props = config.getProperties();
		}
		else {
		    props = new Hashtable<String, Object>();
		}

		props.put("DataService.cardinality.minimum", count);
		config.update(props);
	}
}
Launch the example and execute retrieve 3. You should get a valid response like before from a single service (online or offline dependent on the target property that is set). Now if you execute cardinality 2 and afterwards retrieve 3 you should get a CommandNotFoundException. Checking the components on the console via scr:list will show that org.fipro.ds.configurator.DataRetriever now has a unsatisfied reference. Calling cardinality 1 afterwards will resolve that again.
Now you can play around and create additional services to test if this is also working for values > 1.
While I was writing on this blog post, finding and reporting some issues in Equinox DS, the following ticket was created Bug 501950. If everything works out, Equinox DS will be replaced with Felix SCR. This would solve several issues and finally bring DS 1.3 also to Eclipse. So I cross my fingers that this ticket will be fixed for Oxygen. (which on the other hand means some work for the DS Annotations @pnehrer)
That’s if for this blog post. It again got much longer than I intended. But on the way writing the blog post I again learned a lot that wasn’t clear to me before. I hope you also could take something out of it to use declarative services even more in your projects.
Of course you can find the sources of this tutorial in my GitHub account: