
NatTable context menus with Eclipse menus
In this blog post I will explain how to add context menus to a NatTable instance and how it is possible to combine menus configured via Eclipse Application Model with NatTable menus. It is based on the enhancements added in NatTable 1.2.0, but I will also explain the differences to prior NatTable versions and the issues that lead to the enhancements.
I will also show some basics and the usage with Eclipse 3.x menus.
Basics
In SWT it is possible to attach a menu to a control by calling Control#setMenu(Menu). This menu will be shown when performing a right click on the rendered control.
Text input = new Text(parent, SWT.BORDER);

// create a simple Menu for the input text field
Menu menu = new Menu(input);
MenuItem item = new MenuItem(menu, SWT.PUSH);
item.setText("Open dialog");
item.addSelectionListener(new SelectionAdapter() {
	@Override
	public void widgetSelected(SelectionEvent e) {
		MessageDialog.openInformation( null, "Information", "Some information dialog");
	}
});

// set the menu to the input Text control
input.setMenu(menu);
Using the SWT default mechanism for registering a menu to a NatTable instance would cause showing the menu at every region of a NatTable composition. For example a menu that should only be attached to the column header would open by performing a right click on any region in a grid composition (column header, row header, corner, body). Because of that, and as NatTable comes with a lot of built in commands and a special label/region based concept to determine a context, it provides its own mechanism to register menus.
Via IUiBindingRegistry it is possible to register a binding in NatTable to perform an action on user interaction, e.g. open a menu on performing a right click in a configured grid region. The PopupMenuBuilder is a builder in NatTable to create a menu with menu items that perform NatTable commands. It has several methods for adding such menu items and initializes and returns the menu on calling PopupMenuBuilder#build().
To create a menu with NatTable commands you need to perform the following steps:
- Create an
IConfigurationfor the menu by extendingAbstractUiBindingConfiguration - Create a menu using the NatTable
PopupMenuBuilderhelper class - Register a
PopupMenuActionbinding using the created menu - Add the
IConfigurationto the NatTable instance
The following code shows the DebugMenuConfiguration that is shipped with NatTable to add debugging capability in a rendered NatTable.
// [1] IConfiguration for registering a UI binding to open a menu
public class DebugMenuConfiguration extends AbstractUiBindingConfiguration {

	private final Menu debugMenu;
	public DebugMenuConfiguration(NatTable natTable) {
		// [2] create the menu using the PopupMenuBuilder
		this.debugMenu = new PopupMenuBuilder(natTable)
                    .withInspectLabelsMenuItem()
                    .build();
	}

	@Override
	public void configureUiBindings( UiBindingRegistry uiBindingRegistry) {
		// [3] bind the PopupMenuAction to a right click
		// using GridRegion.COLUMN\_HEADER instead of null would
		// for example open the menu only on performing a right
		// click on the column header instead of any region
		uiBindingRegistry.registerMouseDownBinding(
                    new MouseEventMatcher(
                        SWT.NONE,
                        null,
                        MouseEventMatcher.RIGHT_BUTTON),
                    new PopupMenuAction(this.debugMenu));
	}
}
// [4] add the menu configuration to a NatTable instance
natTable.addConfiguration(new DebugMenuConfiguration(natTable));
In NatTable versions before 1.2.0, you also need to ensure that the created menu is disposed when the NatTable instance is disposed. Otherwise you run into a memory leak. The reason for this is, that the menu is not connected to the NatTable Control as SWT menu. So when the NatTable instance gets disposed, the connected menu is not known and therefore not disposed with the Control. This can be solved by adding a DisposeListener to the NatTable instance as shown below.
public DebugMenuConfiguration(NatTable natTable) {
	// [2] create the menu using the PopupMenuBuilder
	this.debugMenu = new PopupMenuBuilder(natTable).withInspectLabelsMenuItem().build();

	// ensure the created menu gets disposed
	// only necessary for NatTable < 1.2.0
	natTable.addDisposeListener(new DisposeListener() {
		public void widgetDisposed(DisposeEvent e) {
			if (debugMenu != null && !debugMenu.isDisposed()) debugMenu.dispose();
		}
	});
}
Since NatTable 1.2.0 the necessary DisposeListener is added automatically when calling PopupMenuBuilder#build().
Combination with Eclipse 3.x menus
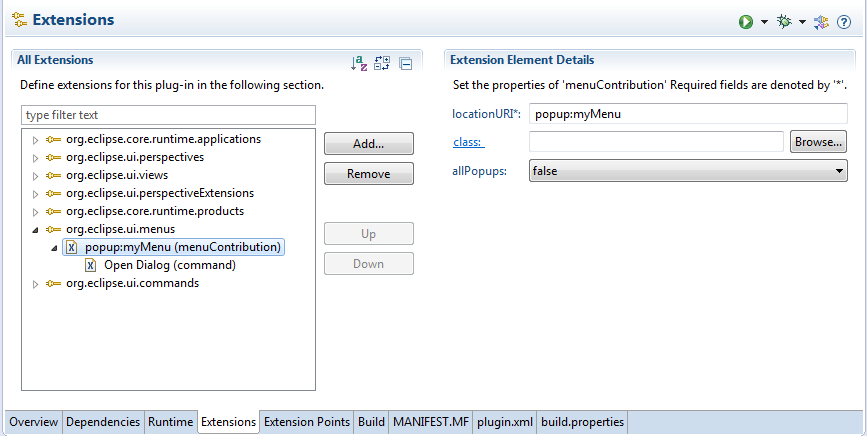
Using Eclipse it is possible to specify a menu declarative. In Eclipse 3.x this is done using the extension point org.eclipse.ui.menus. Create a new menuContribution for that extension point and set the locationURI to a value that starts with popup:, e.g. popup:myMenu.
This menu can then be used as a NatTable menu by creating a MenuManager, registering the menu via id together with the MenuManager to the site and create a PopupMenuBuilder using the MenuManager instance.
// somewhere in the ViewPart, e.g. createPartControl(Composite)
MenuManager mgr = new MenuManager();
getSite().registerContextMenu("myMenu", mgr, null);
// in the menu configuration
public DebugMenuConfiguration(NatTable natTable, MenuManager mgr) {
	// extend the declarative menu provided by the MenuManager
	this.debugMenu = new PopupMenuBuilder(natTable, mgr).withInspectLabelsMenuItem().build();
}
Since NatTable 1.2.0 it is possible to create the PopupMenuBuilder using a MenuManager instance. By using the MenuManager it is possible to configure visibility and enablement constraints in the plugin.xml and extend the declarative menu with NatTable commands using the PopupMenuBuilder. Prior 1.2.0 it was only possible to create the PopupMenuBuilder using the Menu instance created via MenuManager#createContextMenu(Control). Menu items that are added via PopupMenuBuilder will be dismissed that way, since they are not of type IContributionItem.
Combination with Eclipse 4.x menus
In Eclipse 4.x you declare a popup menu for a SWT control in the application model, e.g. in the menus section of a part.
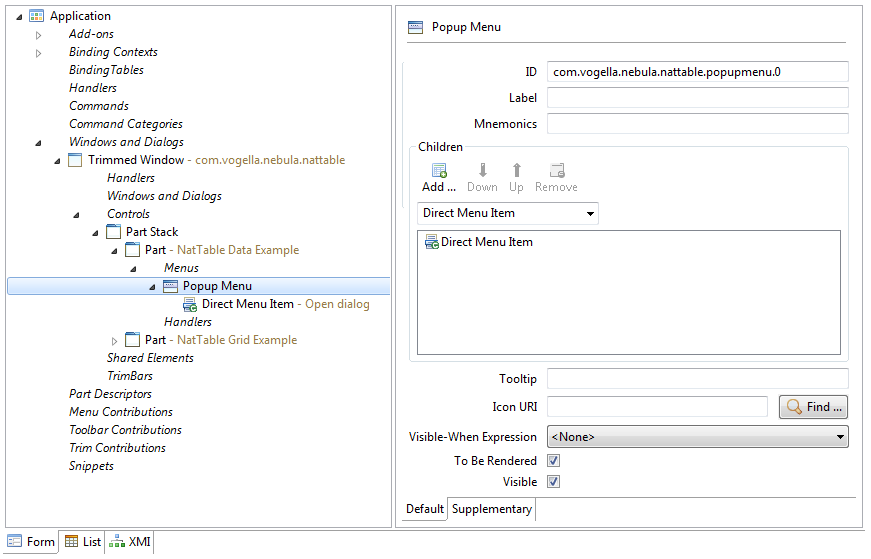
The declared menu can then be retrieved via EMenuService. For this get the EMenuService via injection and call EMenuService#registerContextMenu(Object, String)
@Inject EMenuService menuService;
menuService.registerContextMenu(natTable, "com.vogella.nebula.nattable.popupmenu.0");
Further informations on popup menus with Eclipse 4.x can be found here.
Using the EMenuService will directly register the menu as SWT menu to the NatTable control, which is violating the NatTable menu concepts. As explained above, the menu will be shown for the whole NatTable, and it is not possible to distinguish between regions in a grid for example.
Since it is not possible to retrieve the menu without registering it directly to the Widget, we need to retrieve and unregister it accordingly. After that we are able to create the PopupMenuBuilder instance using the created and retrieved menu.
// get the menu registered by EMenuService
final Menu e4Menu = natTable.getMenu();

// remove the menu reference from NatTable
instance natTable.setMenu(null);

natTable.addConfiguration(new AbstractUiBindingConfiguration() {

    @Override
    public void configureUiBindings(UiBindingRegistry uiBindingRegistry) {
	// add NatTable menu items
	// and register the DisposeListener
	new PopupMenuBuilder(natTable, e4Menu).withInspectLabelsMenuItem().build();

	// register the UI binding
	uiBindingRegistry.registerMouseDownBinding(
            new MouseEventMatcher(
                SWT.NONE,
                GridRegion.BODY,
                MouseEventMatcher.RIGHT_BUTTON),
            new PopupMenuAction(e4Menu));
    }
});
As explained before, using the Menu instance directly would avoid adding additional menu items, because the MenuManager that created the Menu only handles IContributionItem correctly and is called on filling the menu. Fortunately, using Eclipse 4, the Menu that is created via MenuManager knows the MenuManager that created it. It can be retrieved via Menu#getData(), which is set by the MenuManagerRenderer. The PopupMenuBuilder checks that value and keeps the reference to the MenuManager in order to support extending the menu and adding visibility and enablement states as explained in a minute.
The MenuManager itself also adds the reference to itself to the created Menu via setData(). It uses the key org.eclipse.jface.action.MenuManager.managerKey which is defined as a constant in MenuManager. Unfortunately this constant is private and therefore not accessible from any other code, which seems to be the reason for the MenuManagerRenderer to add the reference via setData() without a key.
State configuration of menu items
Another advantage that comes with NatTable 1.2.0 is the support for visibility and enabled states. As explained above, the PopupMenuBuilder is now able to work with a MenuManager instead of the simple Menu instance. This way also the visibility constraints via core expressions will work correctly.
For NatTable commands it is also possible to specify a visible or enabled state via IMenuItemState. This can be done using the methods withEnabledState(String, IMenuItemState) and withVisibleState(String, IMenuItemState) on PopupMenuBuilder on building the menu. The addition of the visible and enabled states for NatTable menu items for example adds support to disable a menu item for specific columns or for a special state, like disabling the hide column menu item if it would lead to an empty table (hide last column issue). For this every default menu item can be identified via unique id, which are specified as constants in the PopupMenuBuilder.
The following code will extend the Eclipse 4 menu from above with the debug menu item and disable it for the first column in the body region of the grid.
new PopupMenuBuilder(natTable, e4Menu)
    .withInspectLabelsMenuItem()
    .withEnabledState(
        PopupMenuBuilder.INSPECT_LABEL_MENU_ITEM_ID,
        new IMenuItemState() {

        @Override
        public boolean isActive(NatEventData natEventData) {
            return natEventData.getColumnPosition() > 1;
        }
})
.build();
In order to be able to configure a visible or enabled state for custom menu items, the menu items need to be added specifying an id. This can be done using PopupMenuBuilder#withMenuItemProvider(String, IMenuItemProvider). Using the id that was used to add the menu item, it is possible to configure a IMenuItemState for that menu item.